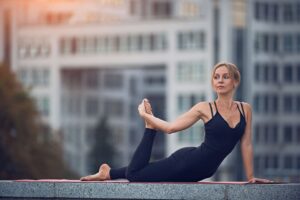
What is a Mermaid Pose?
The beautiful attitude of a mermaid sitting on a rock is mirrored in the deep hip-opening yoga practice known as “mermaid pose.” It is a demanding yet rewarding position that calls for a blend of strength, flexibility, and balance. The mermaid position engages the core, opens the chest and shoulders, and works the hip flexors, glutes, and quads. Advanced yogis love the mermaid posture, also called Eka Pada Rajakapotasana, as it blends aspects of elegance, power, and flexibility.
How to do Mermaid pose
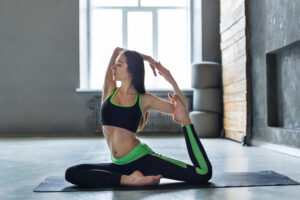
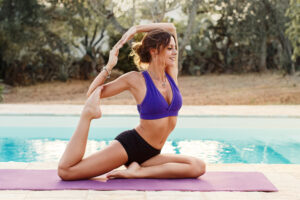
- Start from a kneeling posture. Stretch the right leg to the side, bend the left knee, and place the left foot towards the inner thigh.
- Lengthen your spine. Pull the navel in toward your spine to activate the core muscles.
- Let the shoulders drop and relax. Make a little bend to the left by reaching your left arm above.
- To maintain balance in mermaid pose, bend from the waist, leaning to your right side. Maintain an open chest and a forward look.
- Raise the right arm over your head and reach for the forearm behind your head by bending your elbow and gripping the fingers. Place your head on your forearm.
- While maintaining the mermaid pose, inhale slowly and steadily. Hold the pose for five to ten breaths or as long as it feels comfortable.
- To come out of the posture, lower your left arm and raise your body back up. Put your right leg back in the kneeling posture. Repeat on the other side.
Physical Benefits of Mermaid Pose
Here are some key benefits of the mermaid pose:
Stretches Hips
The pose relieves tension and tightness in the hips. Frequent practice of this exercise can enhance the range of motion and flexibility in the hip joints.
Strengthens Core
The mermaid posture engages the quadriceps, glutes, and core muscles heavily. This strengthens the muscles and promotes balance and stability throughout the body.
Corrects Posture
The mermaid pose naturally corrects the posture as you stretch the spine and expand your chest. This also helps to relieve back pain and encourages improved alignment in our day-to-day lives.
Increases Flexibility
The deep hip stretch of the pose, which targets the inner thighs and groin, helps to increase flexibility all over. Increased mobility in these regions can be attained with regular practice.
Emotional and Mental Benefits
Enhance focus
By being attentive during the practice of the posture, one develops a stronger mind-body connection. You feel grounded and become aware by paying attention to your breath and your body’s sensations.
Energy Release
It is believed that the mermaid posture opens the sacral chakra, which is linked to sexuality, creativity, and emotional equilibrium. This pose promotes good health and releases any repressed energy.
Preparation for the Mermaid Pose
It’s crucial to approach the mermaid posture slowly and be mindful of the limitations of your body. Several warm-up activities to include in your regimen to prepare the muscles for the deep stretch are as follows:
Cat and Cow stretch
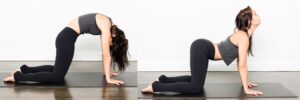
- Starting on all fours, place your hands under your shoulders and your knees under your hips to perform the cat-cow stretch.
- Breathe in as you drop your belly, arch your back, and raise your head (Cow Pose).
- Breathe out while bending your back and bringing your chin to your chest (Cat Pose).
Hip circles
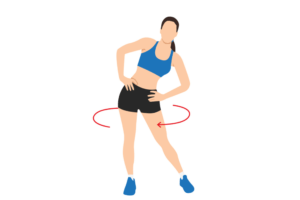
- Position your feet hip-width apart to do hip circles.
- With your hands on your hips, carefully start rotating your hips in clockwise and counterclockwise directions.
- Allow your hips to expand and let go of any tightness.
Butterfly pose
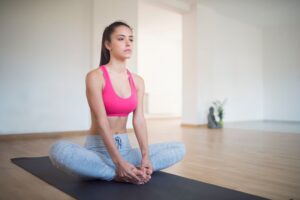
- Come to a seated position. Pull your feet’ soles together, letting your knees fall to the sides.
- Hold onto the outsides of the feet. Bend slightly forward from the hips and lengthen the spine.
- Now, flap the thighs like the wings of the butterfly. Perform the butterfly pose for 30 seconds.
Pigeon Pose
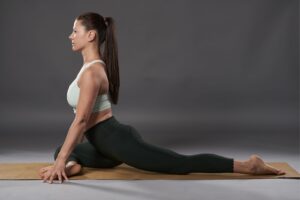
- Bend your right leg forward and place it behind your right wrist, starting from a high plank posture.
- Lower your hips to the floor and extend your left leg straight back.
- Use a blanket or bolster beneath your right hip for support if this seems too intense.
- Take a few breaths in this position, then swap sides. The Pigeon Pose helps stretch the inner and outer thighs and creates a deep rotation in the hips.
Camel Pose
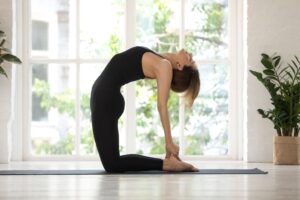
- Sit in Vajrasana.
- Kneel with the toes tucked under. Stand up on the knees and support the lower back with your hands.
- Gently bend backward to grasp the heels.
- Move your hips forward and start to elevate the chest.
- Move the weight forward and contract the shoulder blades.
- Stretch your neck and gaze up high as per your comfort.
Half frog pose
- To begin, lie down on your belly. Leaning on your right forearm for support, extend your left hand to grasp your left foot.
- Press your left side pelvis firmly onto the floor by drawing your heel as near to your outer buttock as you can.
- Point your fingers in the same direction as your toes and rotate the hand that is on the foot.
- Hold the pose for 30 seconds.
Tips for Beginners
Some tips to master the mermaid pose correctly are as follows:
Open the Chest: It’s critical to maintain an open and elevated chest. Refrain from contacting your upper body, as this may cause lower back pain and affect the pose’s alignment.
Overstretching the Lower Back: Gently arch the back and avoid extreme back bending. Overarching the back might lead to compression and pain. To achieve a proper alignment, tighten the core muscles and extend the spine.
Deep Breathing: While maintaining any yoga posture, the breath is an essential component. Keep your breathing regular and deep to bring you into a relaxed state. Concentrate on breathing and let the body open up bit by bit.
Hence, the mermaid pose or the Eka Pada Rajakapotasana is an empowering yoga practice that offers immense physical and psychological benefits. It helps to build patience and attention. Respect the boundaries of your body, and indulge in the beauty of the mermaid posture.