This guide explains the 12 poses of Surya Namaskar, their names, correct breathing pattern, practical benefits, common mistakes and safe modifications. The aim is not to make every position look perfect. It is to move with control, breathe comfortably and improve gradually while building a practice you can realistically maintain.
What Is Surya Namaskar?
The Sanskrit word Surya means “sun,” while Namaskar refers to a respectful greeting or salutation. Surya Namaskar therefore means “salutation to the sun.” In yogic traditions, the sun represents light, vitality and the energy that supports life. The sequence may be practised as physical exercise, mindful movement or a devotional ritual.
A useful historical correction is needed here. Sun reverence in India is ancient, but the exact flowing sequence commonly taught today is not clearly documented as an unchanged practice from thousands of years ago. Its modern physical form developed through Indian yoga and physical-culture traditions and became widely systematised during the twentieth century. Ancient symbolism and modern movement practice are connected, but they are not identical.
Why Are There 12 Steps?
Most popular versions contain 12 positions, although only seven or eight distinct poses appear because several are repeated on the return journey. Different schools vary slightly. Different traditions teach step five in slightly different ways. Some include Plank Pose, while others transition directly into Downward-Facing Dog. In this guide, step five is practised as Dandasana, or Plank Pose.
The sequence creates a balanced movement arc. The sequence starts in a standing position, moves through an upward stretch, a forward bend and a lunge, continues into Plank and floor-based poses, and then follows the same pathway back to standing. Breath provides the rhythm. Without breath awareness, Surya Namaskar becomes a rushed exercise circuit; with it, the practice becomes steadier and more focused.
The 12 Poses of Surya Namaskar
Practise on a firm, non-slip mat with enough space behind you. Move slowly during your first sessions. If breathing becomes strained, reduce the speed, shorten the movement or pause.
1. Pranamasana (Prayer Pose)
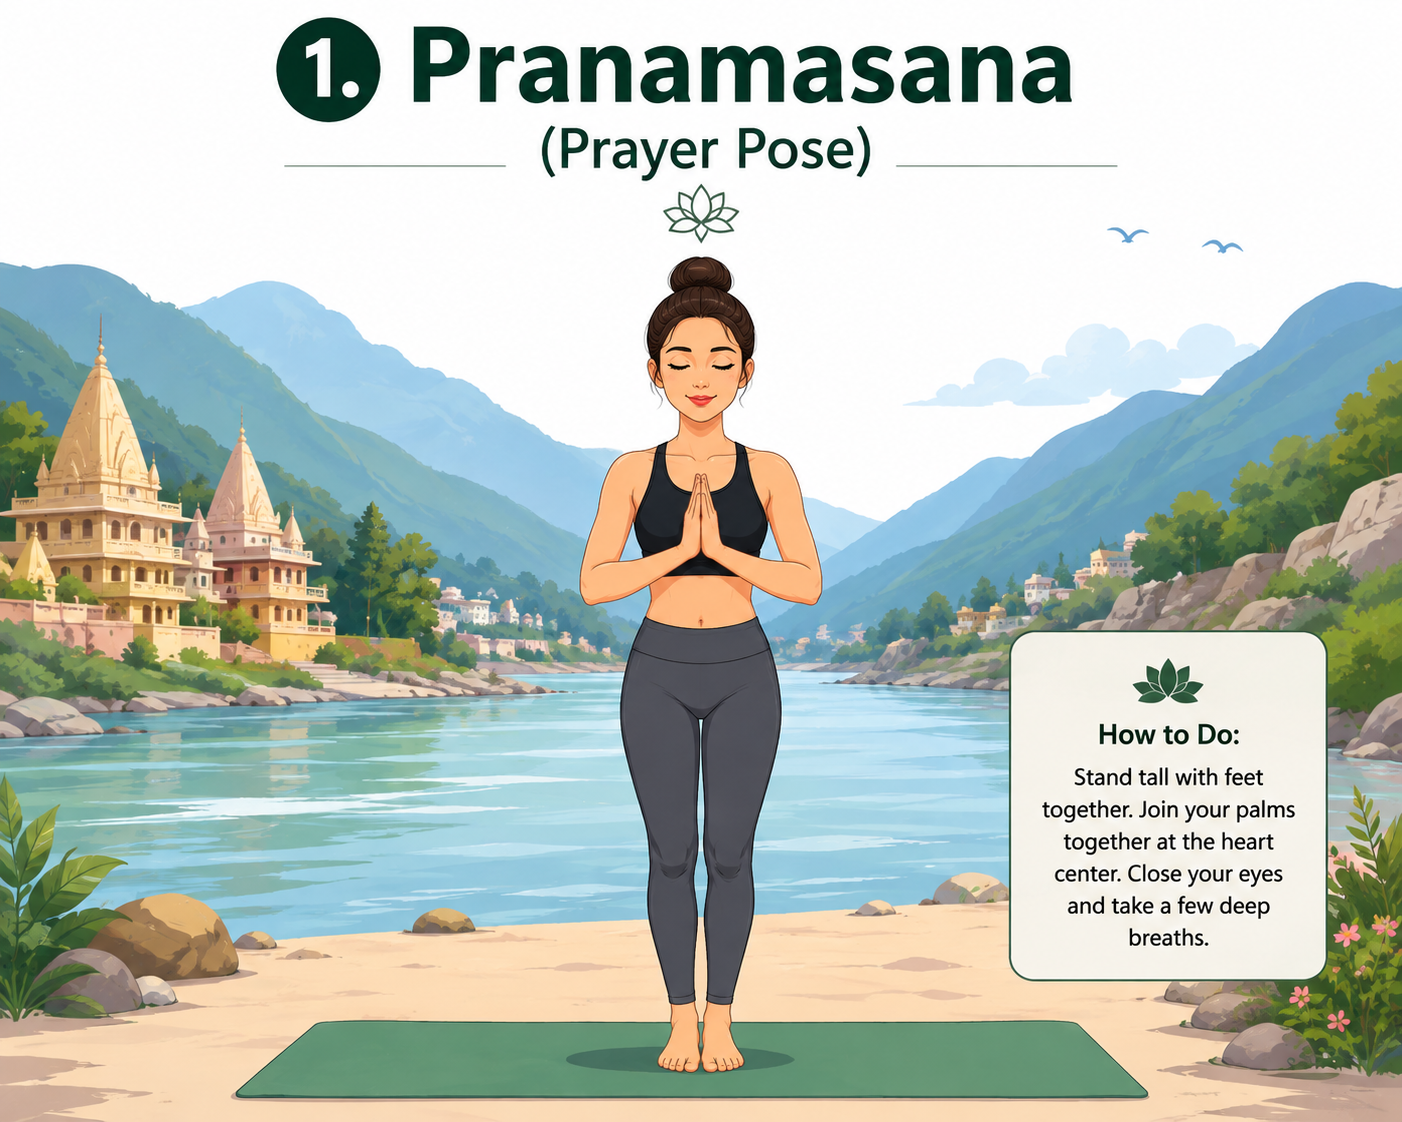
Stand near the front of the mat with the feet together or slightly apart. Distribute your weight evenly, lengthen the spine and relax the shoulders. Join both palms in front of the heart at the centre of the chest.
Breathing: Exhale gently as the palms meet, then breathe naturally.
Benefit: Pranamasana establishes posture, balance and attention before movement begins.
- It strengthens your foot and ankle muscles.
- Promotes even distribution of pressure over the soles of the feet.
- Relieves unnecessary tension in the shoulders and hands.
- Offers a comfortable starting position for the body before movement.
Common mistake: Avoid pushing the chest forward or making the body rigid. Good posture should feel alert, not military.
2. Hasta Uttanasana (Raised Arms Pose)
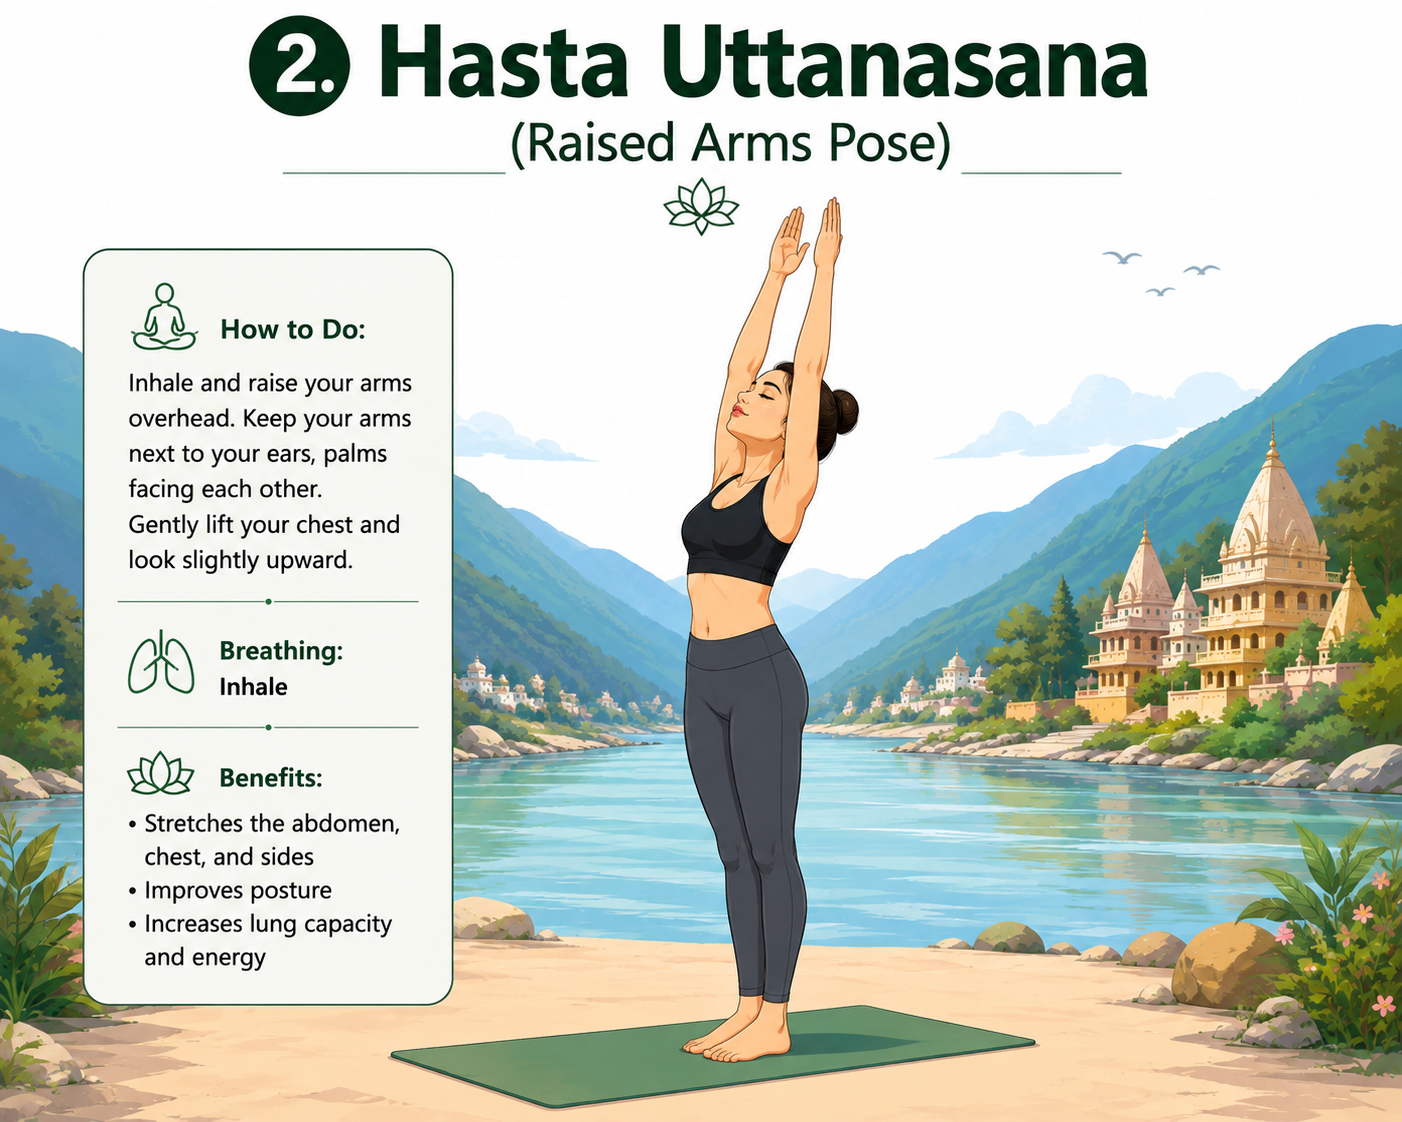
Inhale and sweep the arms overhead. Keep them beside the ears if comfortable. Reach upward, lift the chest and add a mild extension through the upper spine.
Breathing: Inhale while lifting.
Benefit: The pose lengthens the front body and mobilises the shoulders and upper back.
- Stretches the muscles of the abdomen.
- Helps you get your arms all the way up overhead.
- Muscle mobilisation of the upper back.
- Releases the front of the chest to ease breathing.
Common mistake: Do not throw the head and lower back backward. Lengthen upward first and keep the backbend small.
3. Padahastasana (Standing Forward Bend)
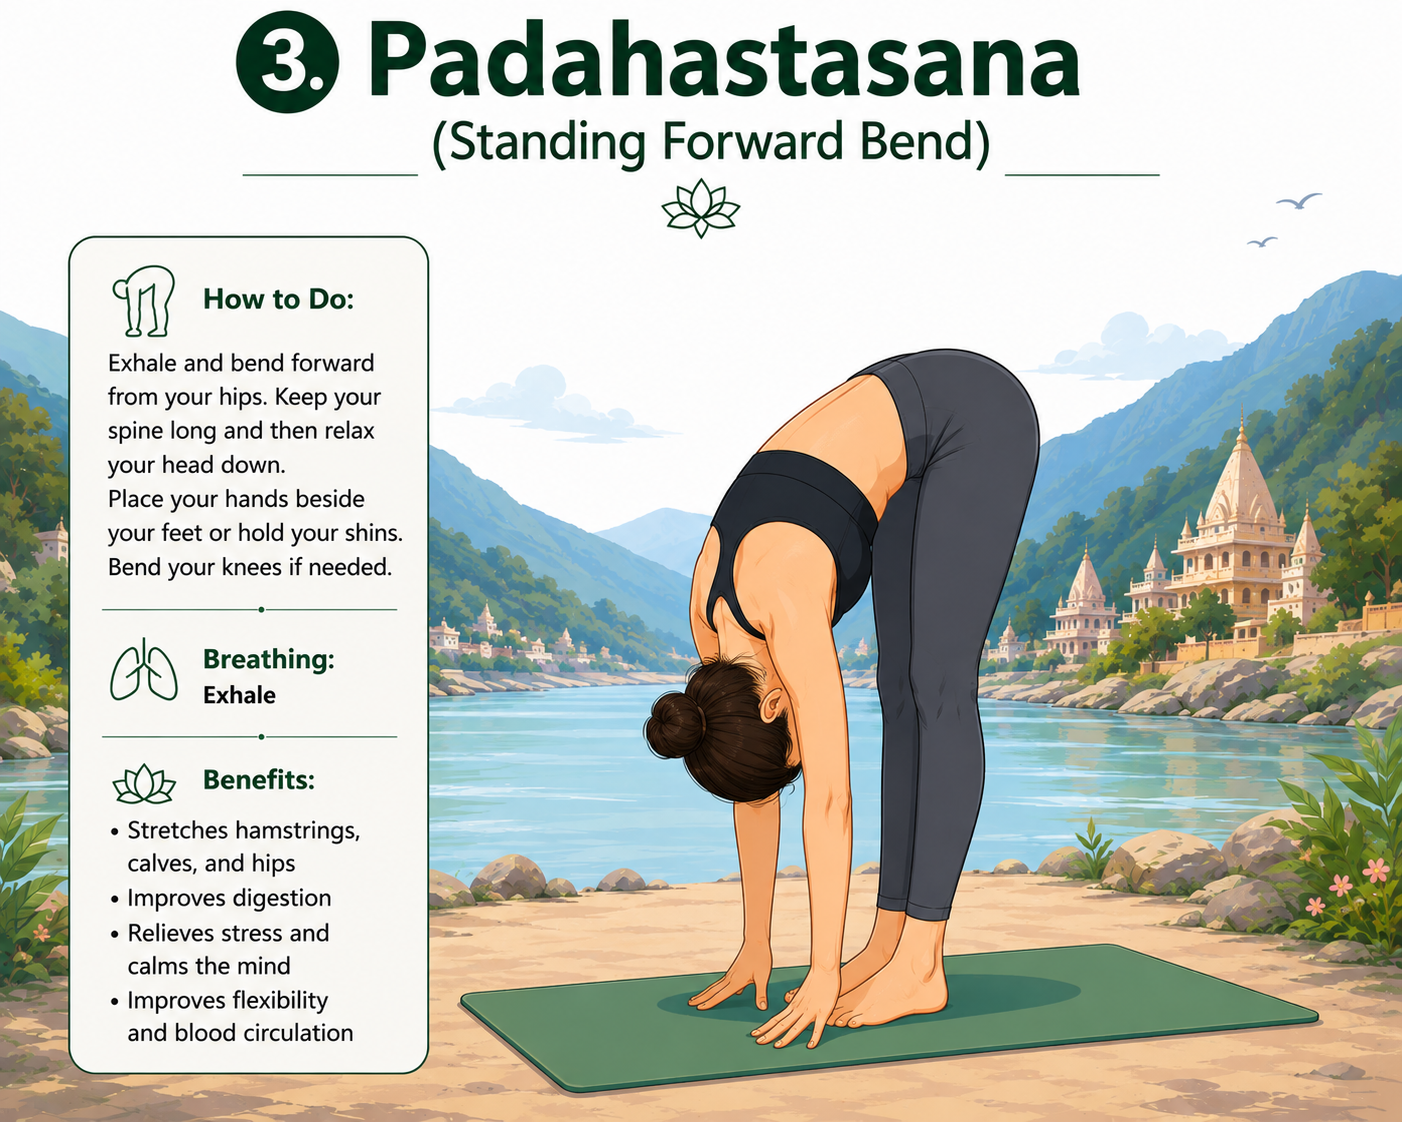
Exhale and hinge forward from the hips. Keep the spine long at first, then relax the head and neck. Place the hands beside the feet, on blocks or on the shins. Bend the knees enough to bring the abdomen closer to the thighs.
Breathing: Exhale as you fold.
Benefit: The pose stretches the back of the legs and moves the hips and spine into flexion.
- Hamstrings and calves stretch.
- Increases range of hip flexibility.
- Gently stretches the muscles of the lower back.
- Helps loosen the tightness in the back of the knees & thighs.
Beginner tip: Touching the floor is not the goal. Forcing straight knees usually creates strain while achieving very little besides pleasing the ego.
4. Ashwa Sanchalanasana (Equestrian Pose)
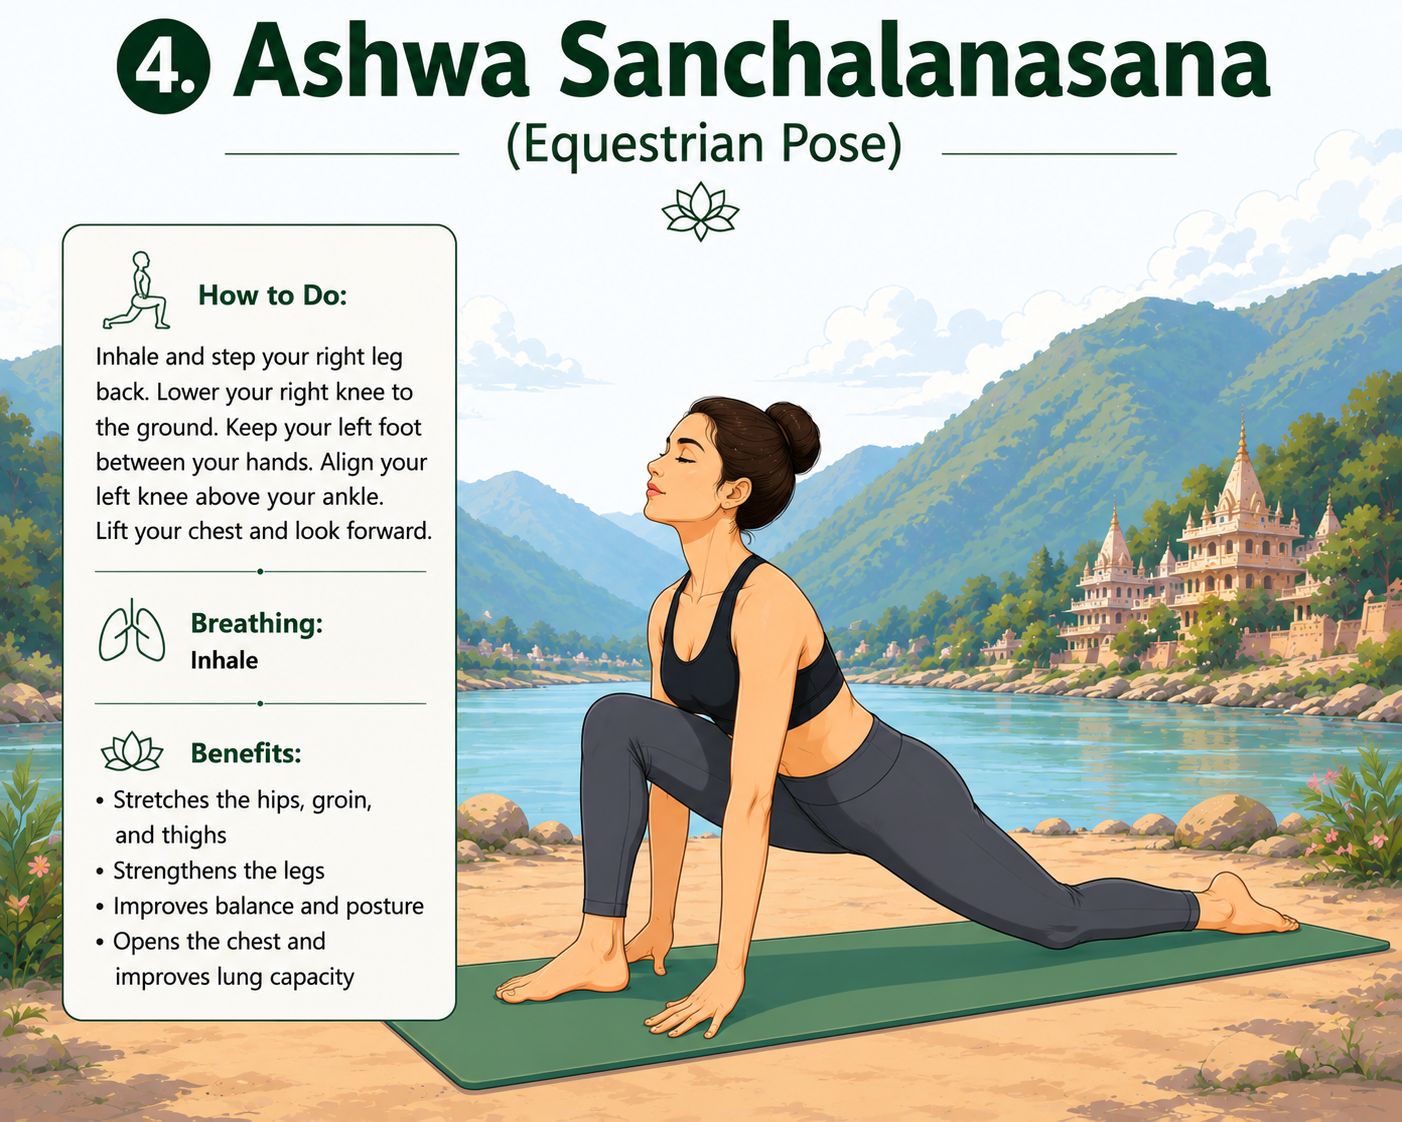
Inhale and step the right leg back. Lower the right knee, keep the left foot between the hands and position the left knee roughly above the ankle. Lengthen the chest forward and look ahead.
Breathing: Inhale while stepping back.
Benefit: This low lunge mobilises the hips, strengthens the legs and challenges balance.
- Loosens tight hip flexibility from long periods of sitting down.
- Enhances ability to take longer, more comfortable steps.
- Strengthens the front thigh and knee support muscles.
- Gently stretches the stomach and back of the front leg.
Common mistake: Do not let the front knee collapse inward. Keep it aligned with the direction of the toes.
5. Dandasana (Plank Pose)
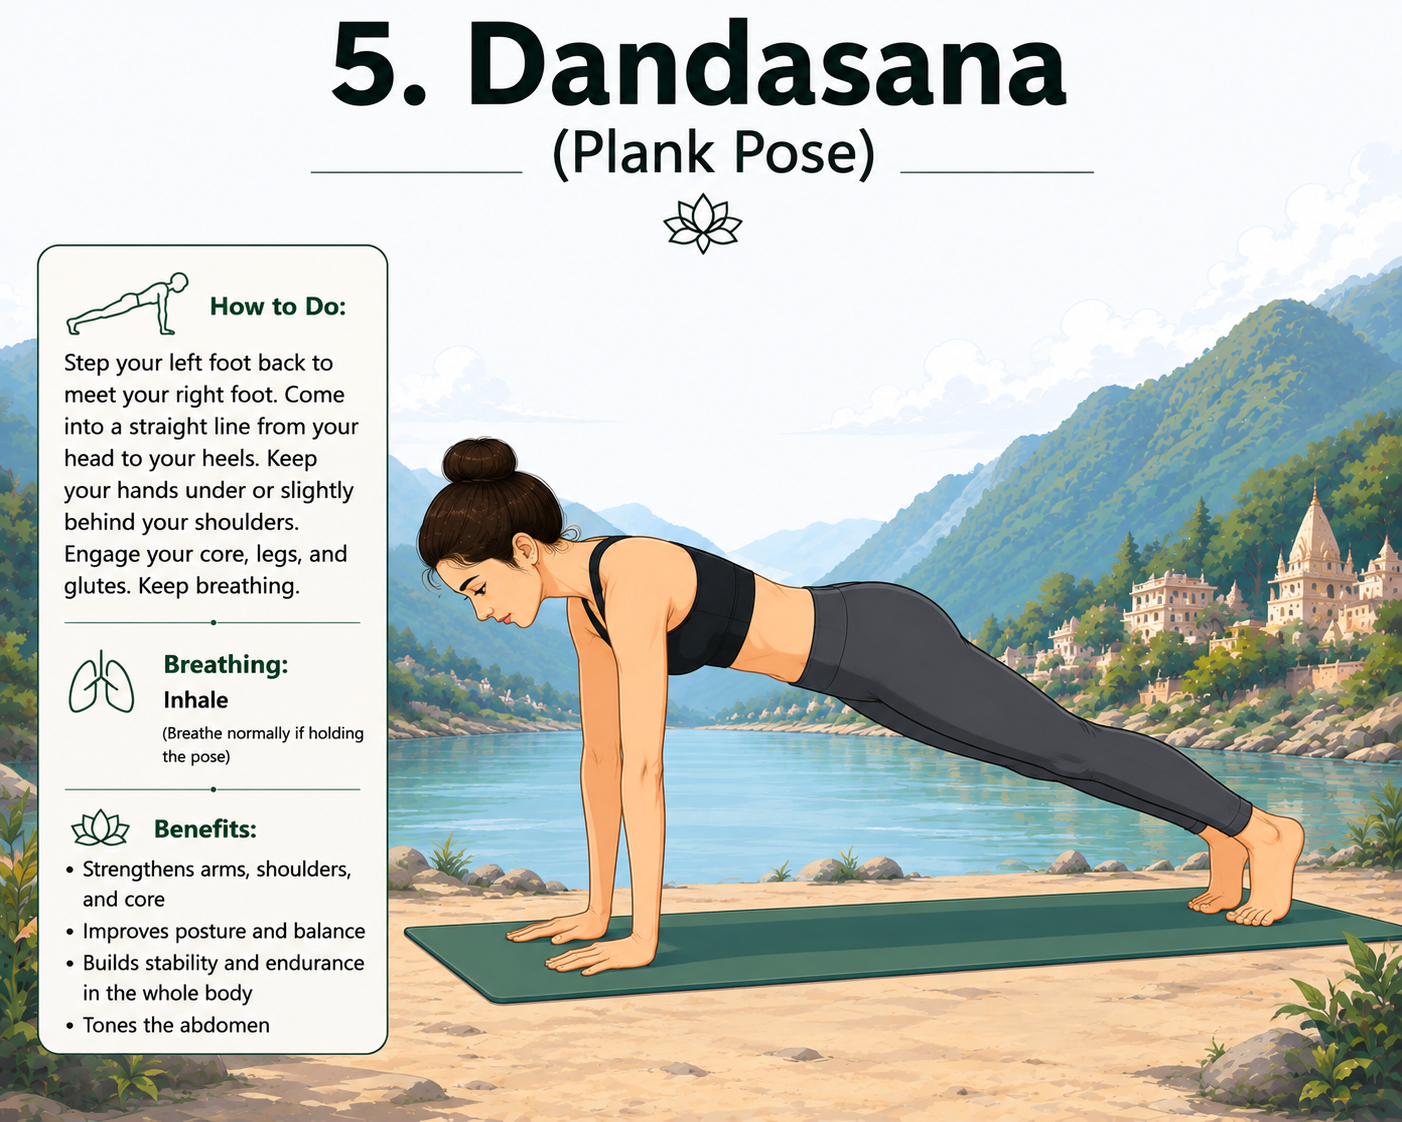
Step the left foot back beside the right. Form one line from the head to the heels, with the wrists under or slightly behind the shoulders. Spread the fingers and gently engage the abdomen, legs and buttocks.
Breathing: Inhale as you enter Plank in this version. Continue breathing if you hold it.
- Strengthens the triceps as they help support your body.
- Builds endurance in the abdominal muscles.
- Strengthens the muscles around the shoulder blades.
- Works on the thighs and buttocks while keeping the legs extended.
Benefit: Plank builds weight-bearing strength in the arms and shoulders while training the trunk to stabilise the body.
Modification: Lower the knees if the hips sag or the shoulders collapse.
6. Ashtanga Namaskara (Eight-Limbed Salute)
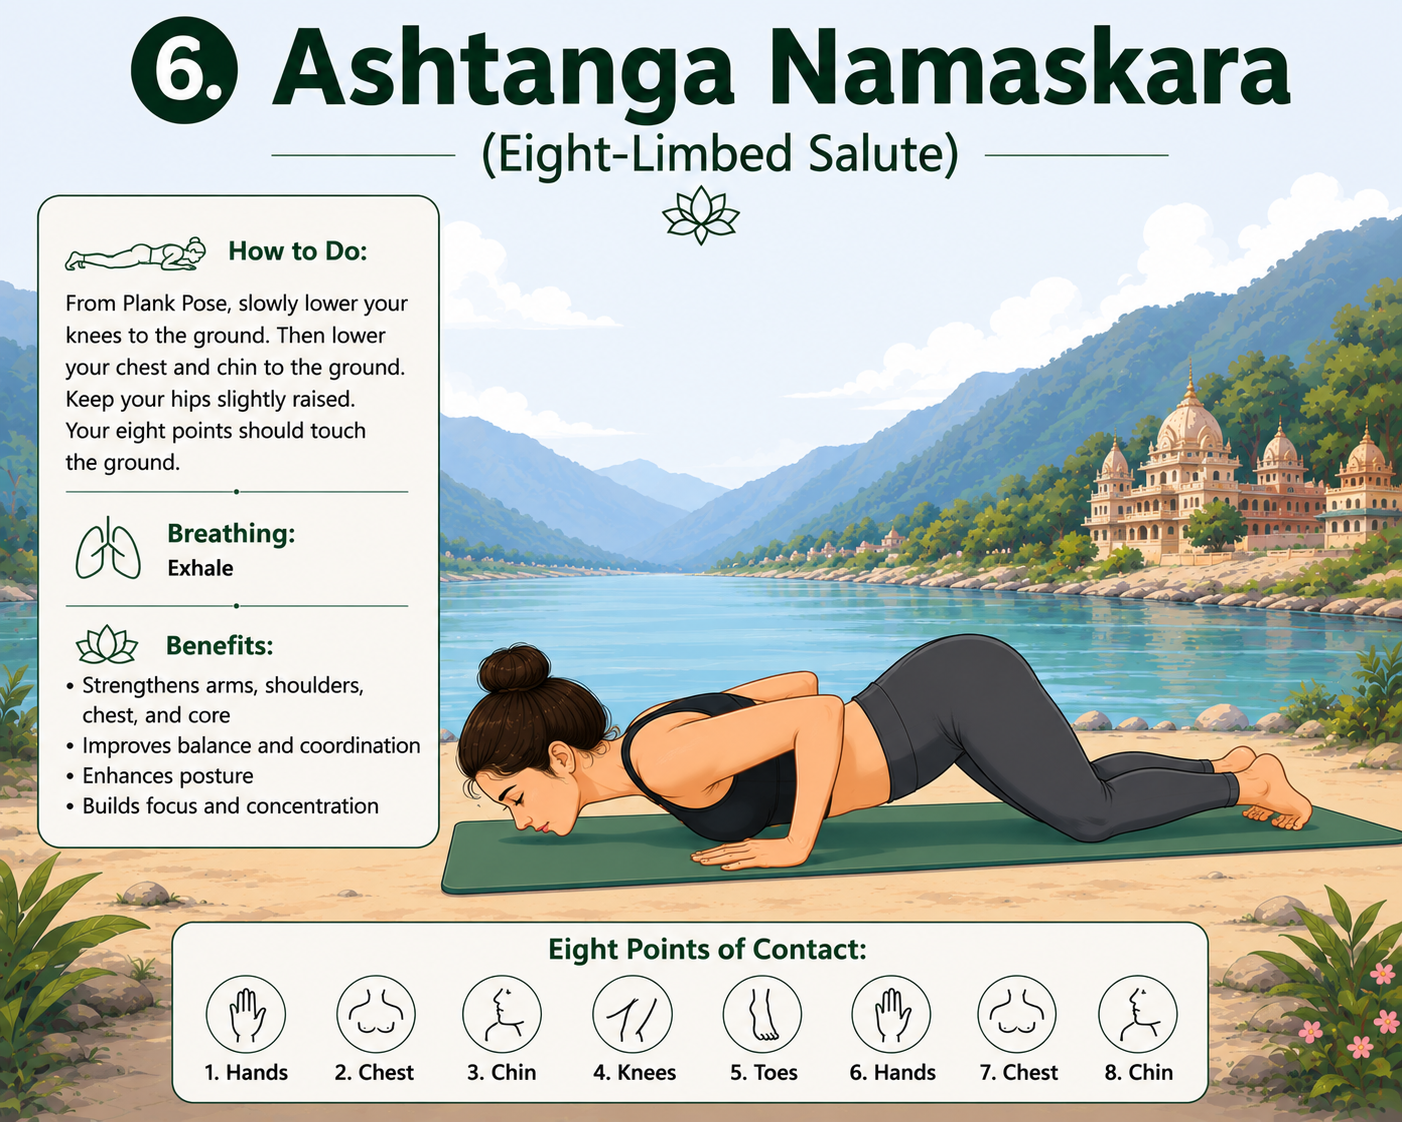
Lower the knees. Exhale, bend the elbows close to the ribs and bring the chest and chin toward the floor while keeping the hips slightly raised. In the traditional position, eight parts of the body remain in contact with the mat: the hands, knees, feet, chest and chin.
Breathing: Exhale while lowering.
Benefit: The pose develops controlled upper-body lowering and prepares the body for Cobra.
- Strengthens the triceps as you lower your body.
- Builds strength in the chest muscles.
- Trains the shoulders to handle controlled body weight.
- Develops the ability to lower the body without dropping heavily.
Common mistake: Do not drop the whole torso heavily to the floor.
7. Bhujangasana (Cobra Pose)
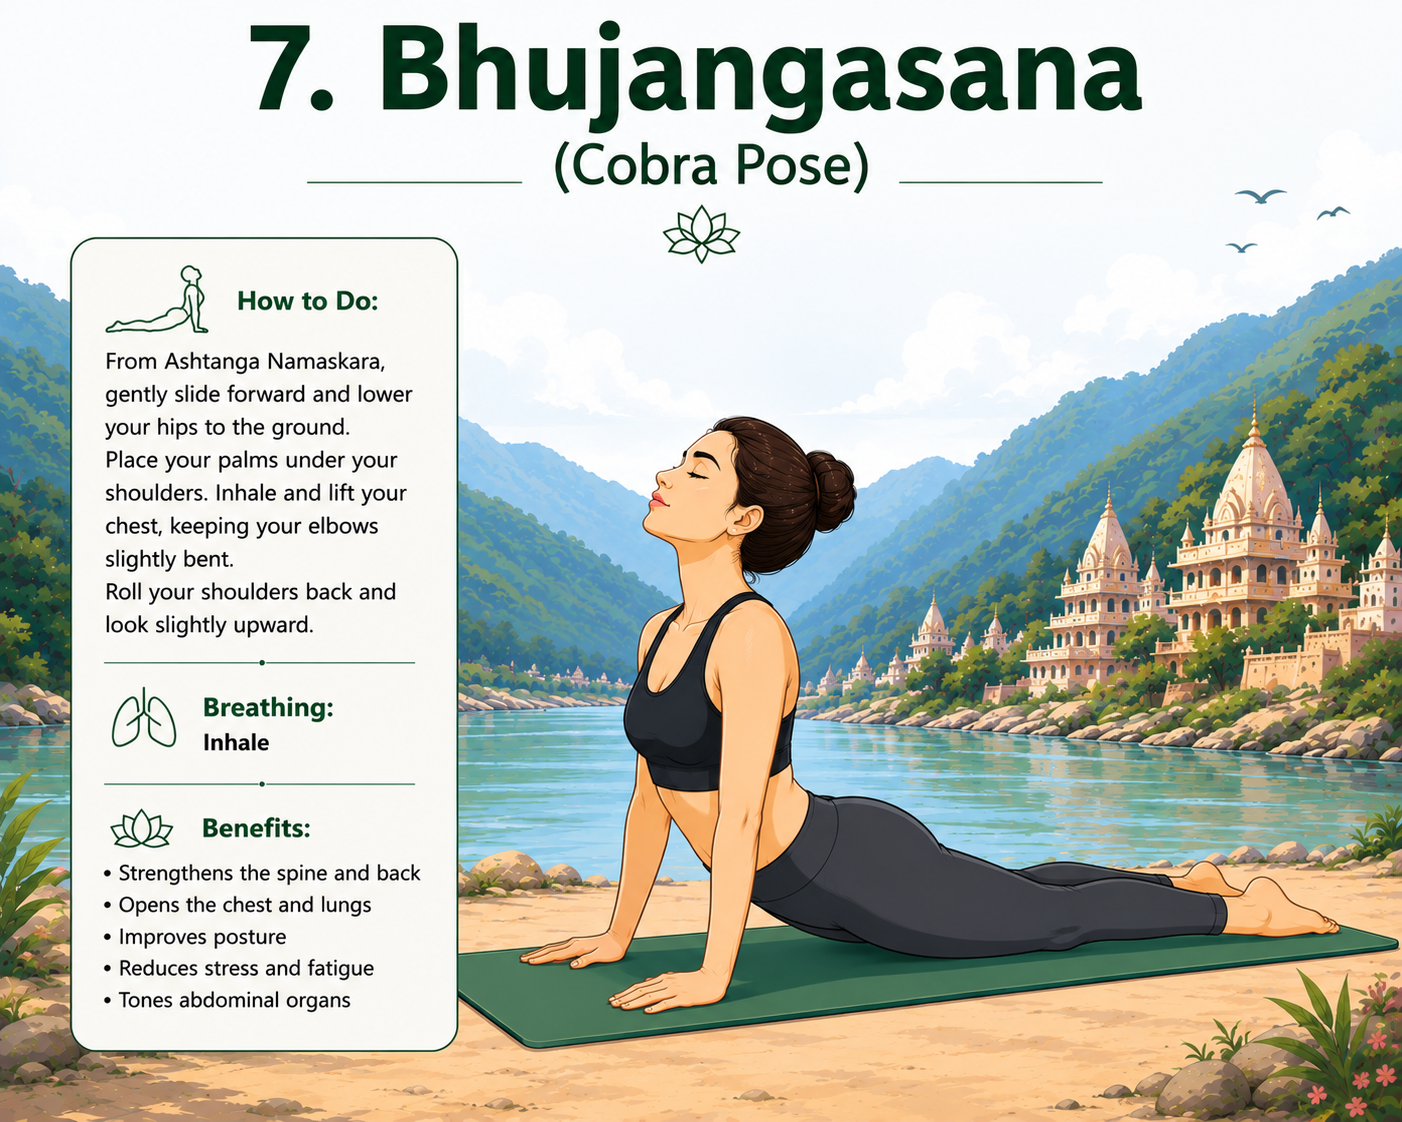
Slide the chest forward and inhale as you lift it. Keep the hands near the lower ribs, the elbows bent and the shoulders away from the ears. Press the tops of the feet down and let the back muscles help lift the chest.
Breathing: Inhale while rising.
Benefit: Cobra opens the chest, moves the spine into extension and activates the back muscles.
- Strengthens the muscles running along the spine.
- Improves the ability to bend the upper back backwards.
- Stretches the abdominal muscles.
- Opens the chest and front of the shoulders.
Precaution: Stop if you feel sharp pain, lower-back pinching or symptoms travelling into the legs.
8. Adho Mukha Svanasana (Downward-Facing Dog)
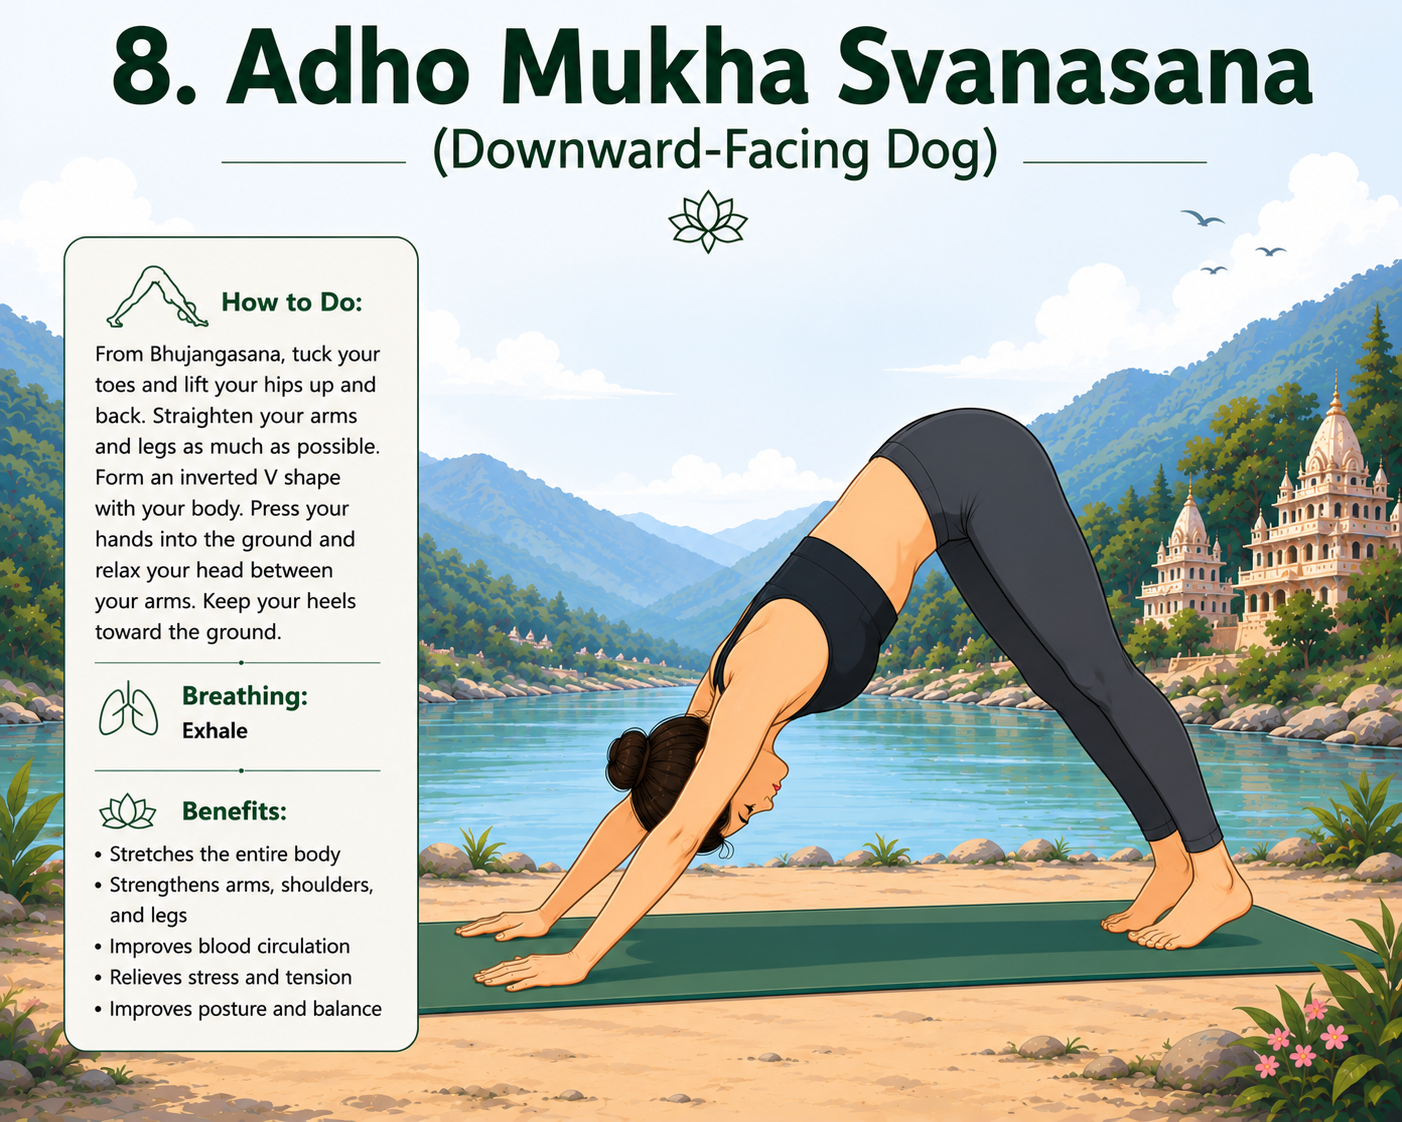
Exhale, tuck the toes and lift the hips upward and backward into an inverted “V.” Press through the hands and lengthen the spine. Keep the knees bent if needed. The heels may move toward the mat but do not have to touch.
Breathing: Exhale into the pose and breathe smoothly if pausing.
Benefit: The pose combines shoulder stability with length through the spine, calves and hamstrings.
- Gives the hamstrings a sustained stretch.
- Lengthens the calf muscles.
- Strengthens the shoulders and arms under body weight.
- Improves movement at the shoulder joints.
Common mistake: Do not round the back merely to force the heels down. The mat is not keeping score.
9. Ashwa Sanchalanasana (Equestrian Pose)
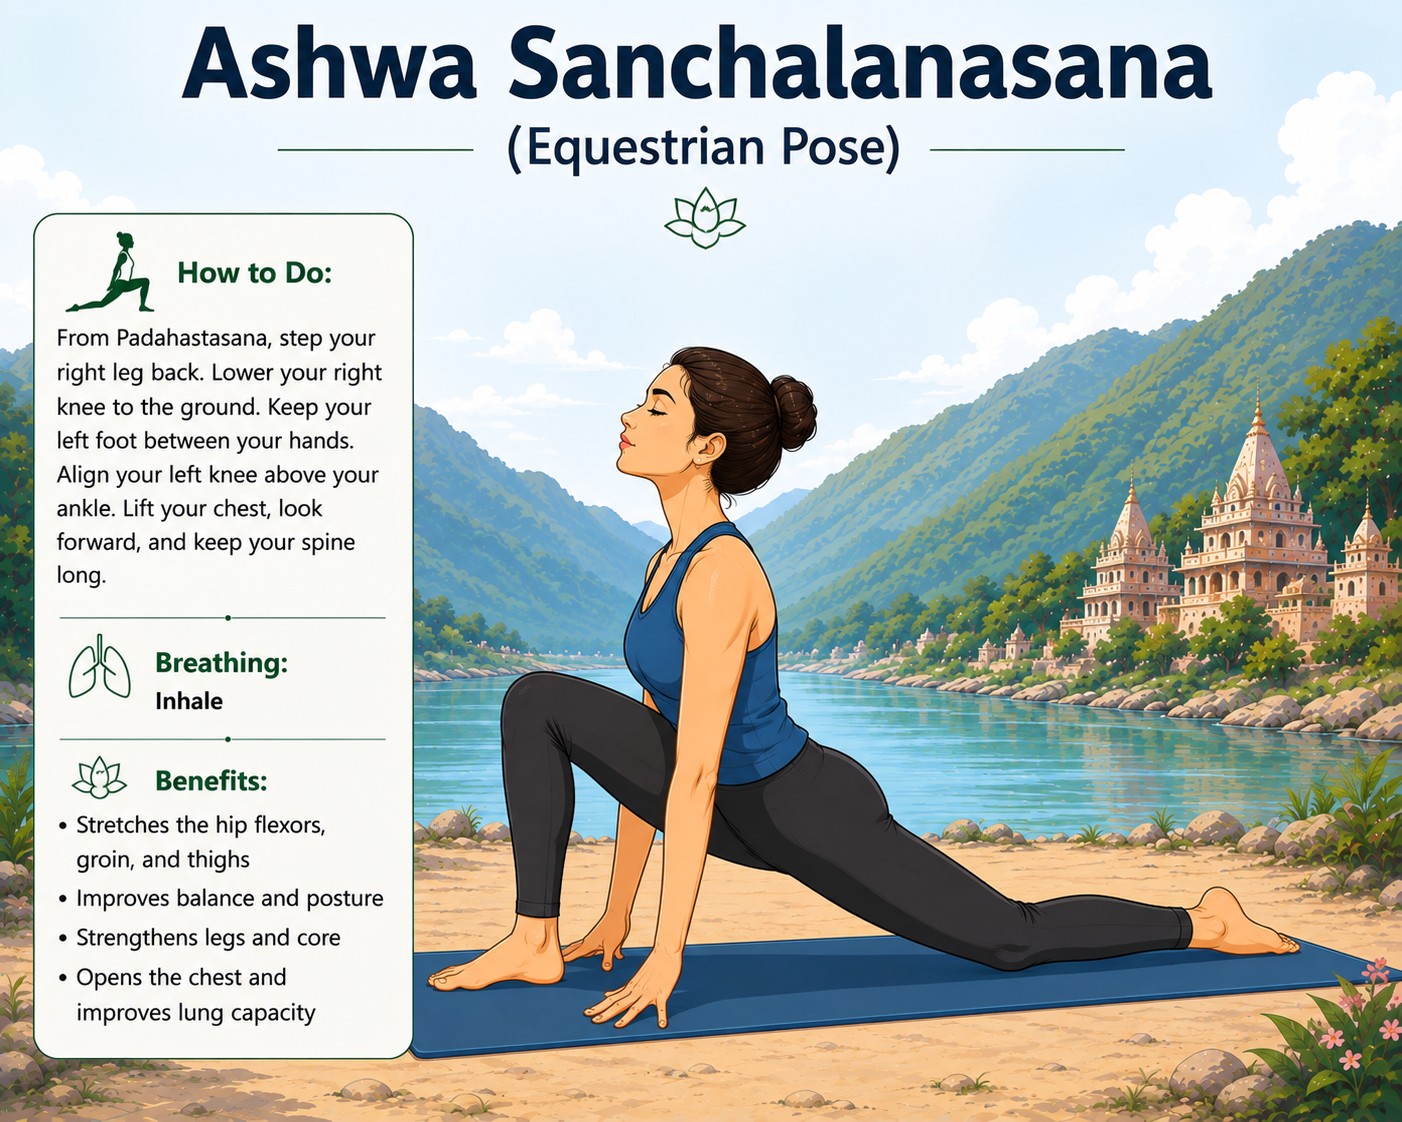
As you inhale, bring the right foot forward between the hands and gently place the left knee on the mat. Keep the right knee aligned above the ankle while lifting and opening the chest.
Breathing: Inhale while stepping forward.
Benefit: This begins the return to standing while stretching the opposite hip.
- Stretches the hip flexors of the leg left behind.
- Opens the groin and front of the upper thigh.
- Improves hip extension after the previous forward-facing position.
- Makes it easier to bring the back foot forward with practice.
Beginner tip: Move the foot forward in stages or guide it with one hand if it does not reach the hands in one step.
10. Padahastasana (Standing Forward Bend)
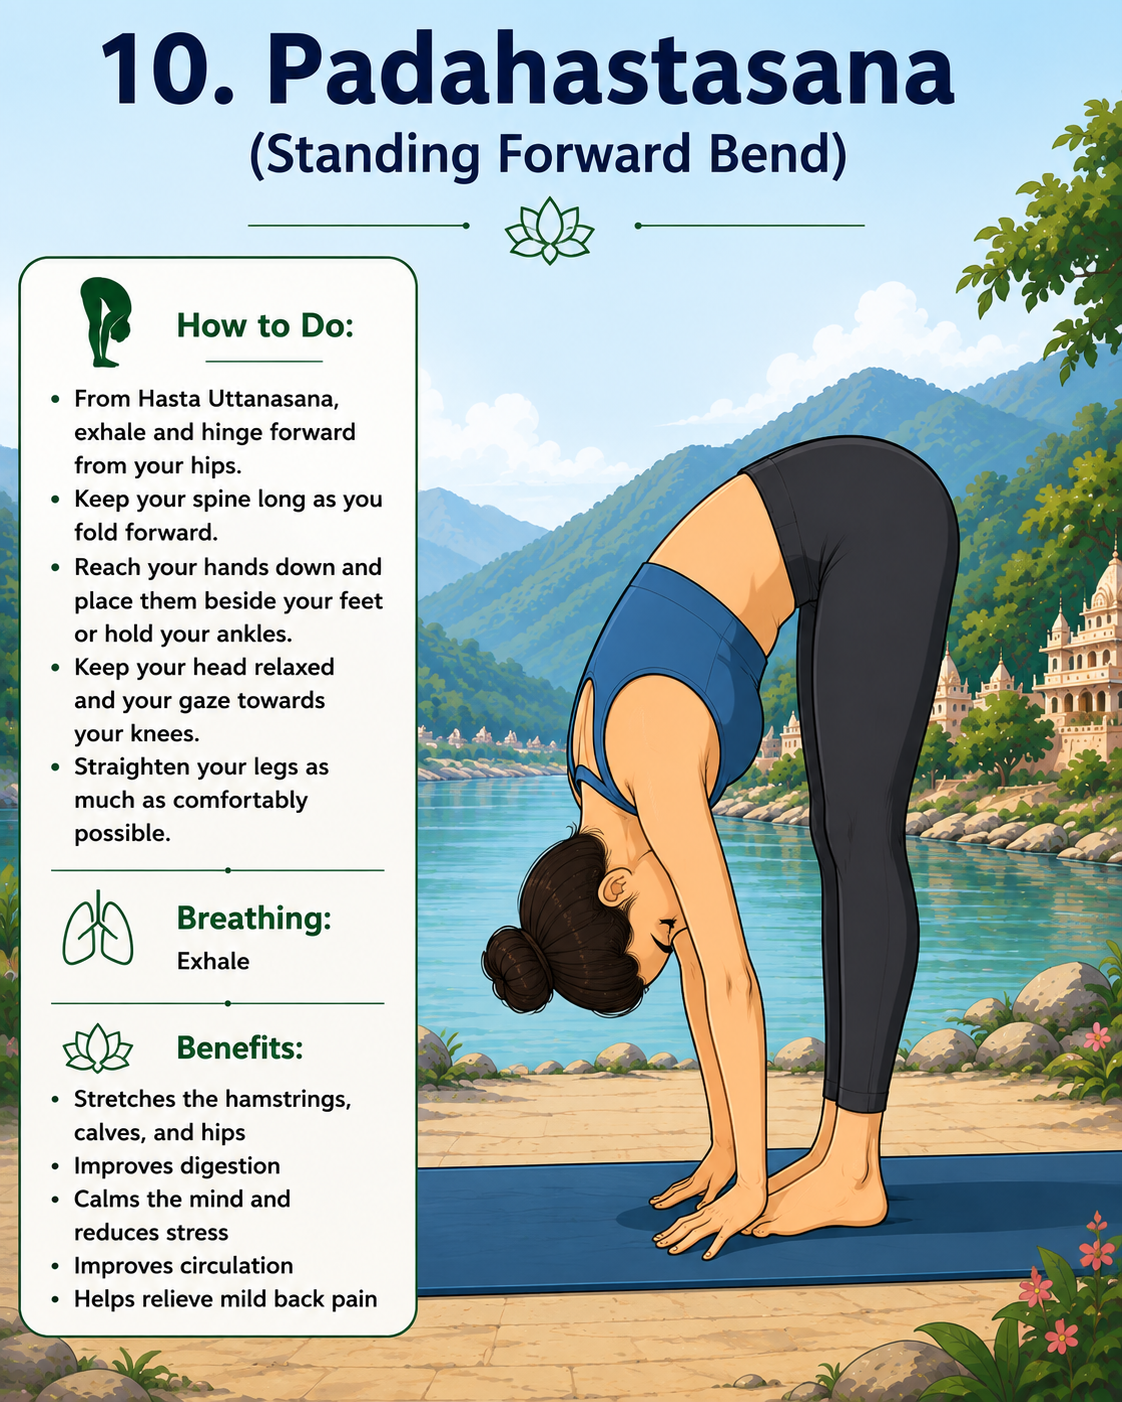
Exhale and step the left foot beside the right. Fold over the legs with the knees bent as needed. Relax the neck and avoid bouncing.
Breathing: Exhale as the feet meet.
Benefit: The second forward bend revisits hip flexion and stretches the back of the legs after the body has warmed.
- Deepens the stretch through the hamstrings after the body has warmed up.
- Releases tightness in the calves.
- Encourages greater movement at the hips.
- Allows the neck and upper back to relax during the fold.
Common mistake: Avoid locking the knees or pulling aggressively into the fold.
11. Hasta Uttanasana (Raised Arms Pose)
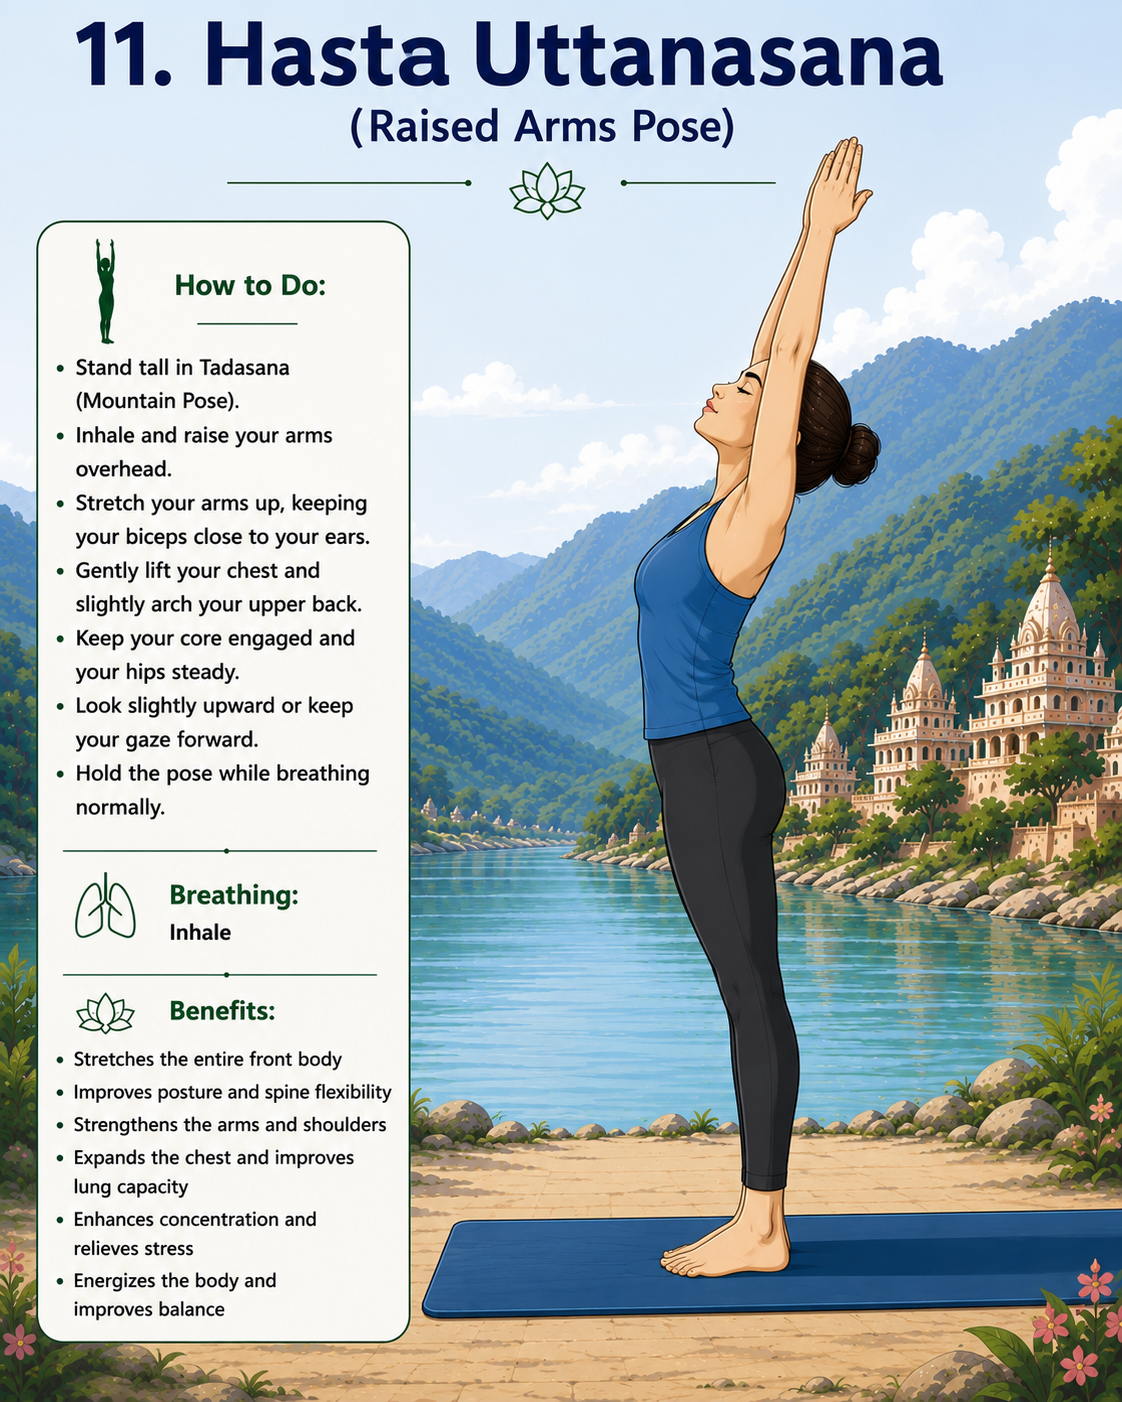
Inhale and rise with a long spine, sweeping the arms overhead. Reach upward and add a comfortable upper-back extension.
Breathing: Inhale while rising.
Benefit: The movement returns the body upright and reopens the chest.
- Stretches the chest after the forward bend.
- Opens the front of the shoulders.
- Improves the ability to reach the arms overhead.
- Gives the ribs more room to expand during inhalation.
Common mistake: Do not jerk upward. Rise gradually, especially if forward bends make you dizzy.
12. Pranamasana (Prayer Pose)
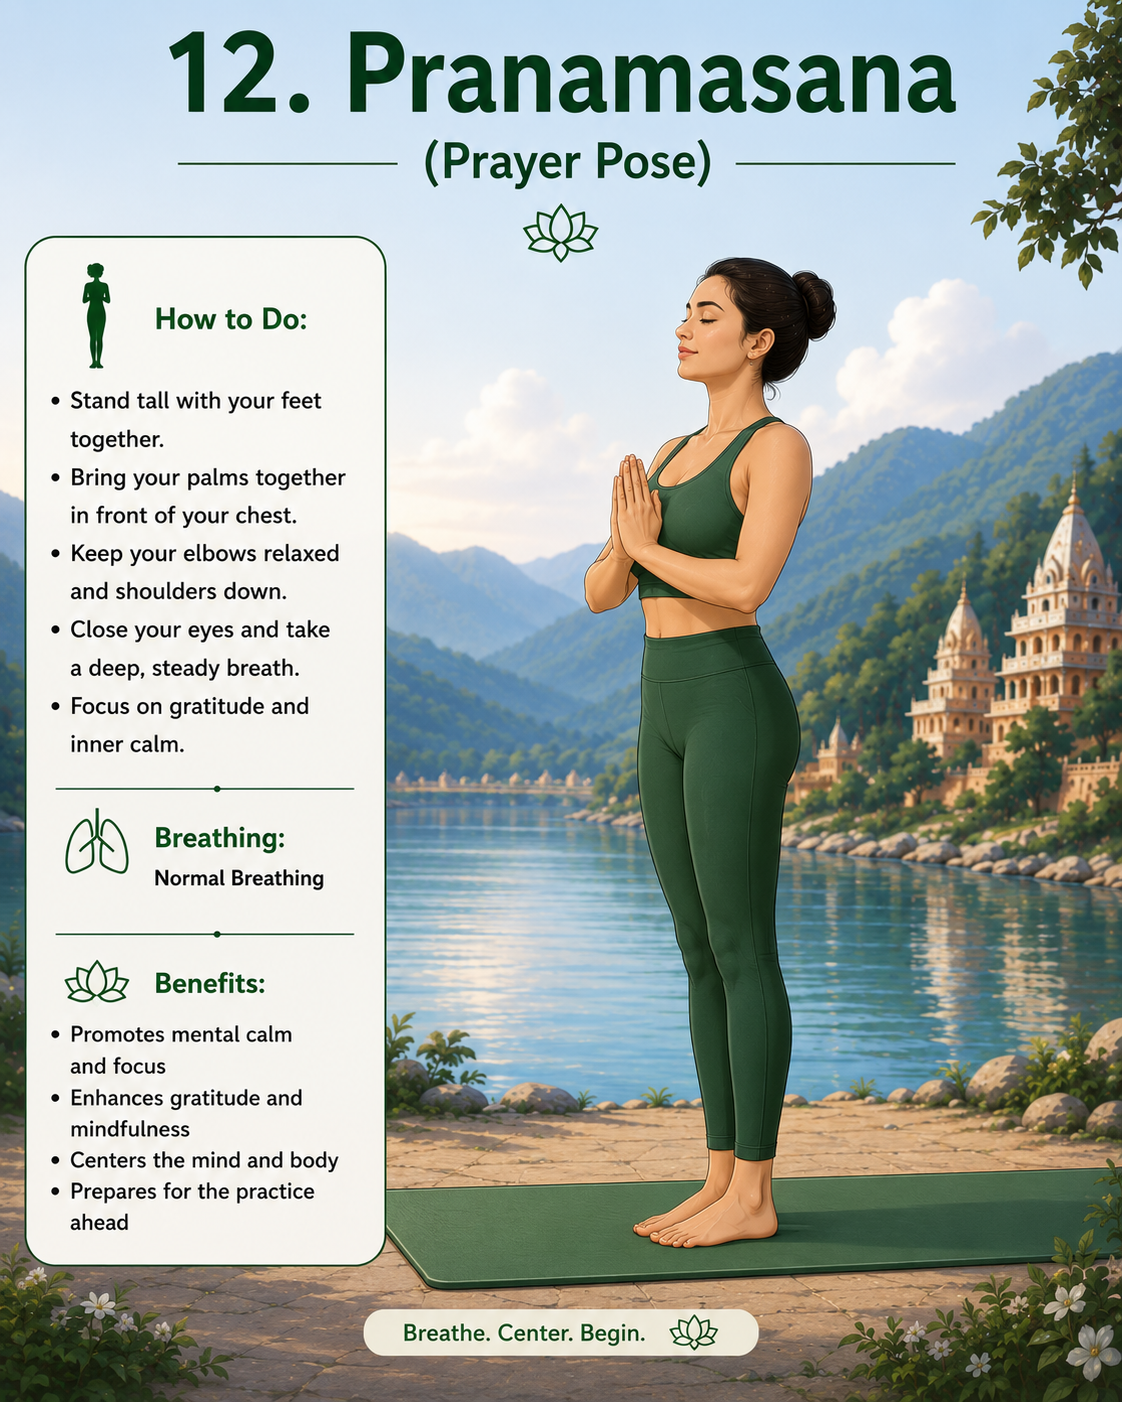
Exhale and bring the palms to the chest. Stand quietly for one or two breaths and notice your heart rate and breathing before repeating the sequence.
Breathing: Exhale as the hands return.
Benefit: The pause helps you judge whether the practice remains controlled.
- Gives the legs a short recovery after continuous movement.
- Allows breathing to settle before the next round.
- Gives you a moment to notice your heart rate.
- Helps the body transition smoothly from movement back to rest.
Repeat the sequence by stepping the left leg back in step four and bringing the left foot forward in step nine. Counting varies: some teachers call each 12-step sequence one round, while others call the right-and-left pair one complete round. Confirm the system used in your class rather than arguing about mathematics on a yoga mat.
Benefits of Surya Namaskar: What Science Actually Suggests
Surya Namaskar is sometimes marketed as a cure for everything from digestive trouble to hormonal imbalance. That is not scientifically responsible. Research is promising, but many studies are small, short or limited to young participants. The clearest benefits come from the physical work the sequence requires.
Improves Mobility and Flexibility
Forward bends, lunges, Cobra and Downward-Facing Dog move the hips, spine and shoulders through varied ranges. Regular, controlled practice can gradually improve movement tolerance and flexibility, particularly around the hamstrings, calves, shoulders and hips.
Builds Strength and Muscular Endurance
Plank, controlled lowering, Cobra and Downward-Facing Dog load the arms, shoulders and trunk, while lunges challenge the legs. In a six-month study of 42 schoolchildren, both slow and fast Surya Namaskar training were associated with improvements in hand-grip strength, endurance and respiratory muscle measures. The findings are encouraging, but they should not be treated as a guarantee for every age group.
Provides Cardiovascular Exercise
Intensity depends on pace, fitness, technique and number of rounds. A laboratory study of six experienced young practitioners found that four rounds produced a vigorous cardiovascular response and estimated high energy expenditure during a 30-minute session. The sample was tiny, so its calorie estimate should not be used as a universal calculator. It does show that brisk Surya Namaskar can become meaningful aerobic activity.
Supports Weight Management
The sequence may support weight management by increasing activity and energy use. It does not selectively burn belly fat, “boost metabolism” indefinitely or cancel an unsuitable diet. Body-weight change still depends on total food intake, activity, sleep, health and consistency.
Develops Breath Awareness
Matching movement with inhalation and exhalation trains breathing control. The school study above also reported improvements in several pulmonary measures, but this does not prove that Surya Namaskar treats asthma or other lung conditions. Medical conditions require medical care.
May Reduce Stress
Breath-linked movement gives the mind a clear task. In a randomised study, stressed college students completed a supervised 14-day programme and reported greater relaxation and lower worry, negative emotion and physical stress symptoms than a wait-list group. The programme also included warm-up, breathing, mantras and cooling down, so the result cannot honestly be credited to the poses alone.
Improves Coordination and Body Awareness
The practitioner repeatedly organises the feet, knees, pelvis, spine and shoulders while changing position. This can improve movement awareness and coordination. It may also encourage better posture habits, although ten minutes of yoga cannot completely defeat ten hours of slumping.
What About Digestion, Circulation and “Detox”?
Many practitioners feel warmer, more alert and less stiff after the sequence. Movement supports general circulation and physical activity is valuable for health. Direct evidence that Surya Namaskar uniquely massages internal organs, balances every hormone or detoxifies the body is weak. The liver and kidneys already handle detoxification without waiting for Downward Dog.
Breathing Pattern During the 12 Steps
The commonly taught breathing map below follows the Plank-based sequence used in this guide. Minor variations exist between schools.
| Step | Pose | Breath |
| 1 | Pranamasana (Prayer Pose) | Exhale and settle |
| 2 | Hasta Uttanasana (Raised Arms Pose) | Inhale |
| 3 | Padahastasana (Standing Forward Bend) | Exhale |
| 4 | Ashwa Sanchalanasana (Equestrian Pose / Low Lunge) | Inhale |
| 5 | Dandasana (Plank Pose) | Inhale; breathe normally if held |
| 6 | Ashtanga Namaskara (Eight-Limbed Salute) | Exhale |
| 7 | Bhujangasana (Cobra Pose) | Inhale |
| 8 | Adho Mukha Svanasana (Downward-Facing Dog) | Exhale |
| 9 | Ashwa Sanchalanasana (Equestrian Pose / Low Lunge) | Inhale |
| 10 | Padahastasana (Standing Forward Bend) | Exhale |
| 11 | Hasta Uttanasana (Raised Arms Pose) | Inhale |
| 12 | Pranamasana (Prayer Pose) | Exhale |
Use the breath as a guide, not a test. Breathe through the nose whenever it feels natural and comfortable, but never force the breath or continue if breathing becomes difficult. Some traditions teach brief retention around Plank; beginners do not need it.
Common Mistakes While Performing Surya Namaskar
- Moving too quickly: Learn each transition slowly before adding speed.
- Holding the breath: Reduce the range or pause if breathing becomes strained.
- Forcing the forward bend: Bend the knees instead of pulling on the back.
- Overarching the lower back: Keep Raised Arms Pose and Cobra moderate.
- Poor wrist loading: Spread the fingers and press through the whole hand.
- Collapsing the front knee inward: Align it with the toes during lunges.
- Ignoring pain: Stretching and effort may be normal; sharp or radiating pain is not.
- Repeating one side: Alternate the leading leg.
Who Can Practise Surya Namaskar?
Most healthy adults can learn a modified sequence. Beginners may use blocks, lower the knees in Plank or shorten the lunges. Children can practise age-appropriate versions under supervision. Older adults or people who struggle to move to the floor may use a wall or chair-based variation.
Intermediate and advanced practitioners can increase pace, repetitions or holding time. Advanced practice should mean better control, not simply more rounds performed while technique falls apart.
Who Should Avoid or Modify Surya Namaskar?
- Pregnancy: Yoga is not automatically prohibited, but the sequence usually needs trimester-specific modification. Strong abdominal compression, prone Cobra and fast transitions may become unsuitable. Use prenatal guidance and follow medical advice.
- Uncontrolled high blood pressure or heart disease: Begin gradually, avoid deliberate breath-holding and ask a clinician which intensity is appropriate.
- Recent surgery: Obtain medical clearance, especially after abdominal, spinal, eye or joint procedures.
- Acute back or neck pain: Do not practise through numbness, weakness or radiating pain.
- Wrist, shoulder or knee injuries: Weight-bearing and kneeling positions may need major changes.
- Dizziness, fever or acute illness: Rest rather than forcing a daily streak.
A qualified yoga therapist or physiotherapist can adapt the sequence. A blog cannot examine your joints through the screen, despite the internet’s broader confidence.
How Many Rounds Should You Do Daily?
There is no scientifically established perfect number.
Beginners: Start with two to four 12-step sequences, alternating the leading leg.
Intermediate practitioners: Four to eight sequences may be suitable if breathing and alignment remain steady.
Experienced practitioners: Increase volume gradually. Practices of 108 rounds are ceremonial or endurance challenges, not a daily requirement and certainly not a beginner target.
For weight management, consistency matters more than a dramatic number. A short practice repeated regularly is usually more useful than one punishing session followed by several days of soreness.
Best Time to Practise Surya Namaskar
Morning is popular because the stomach is usually lighter and the environment may be quieter. Sunrise also has traditional and symbolic importance. There is no convincing evidence that the sequence gains special physical powers at sunrise or stops working later in the day.
Practise when you can be consistent and unhurried. Leave roughly two to four hours after a substantial meal, depending on meal size and comfort. Evening practice is also acceptable, although fast rounds close to bedtime may feel stimulating for some people.
Conclusion
The 12 poses of Surya Namaskar offer a practical way to combine movement, breathing and attention. Depending on pace and repetitions, the sequence can develop mobility, muscular endurance, coordination and cardiovascular fitness. Its deeper value comes from repeated, attentive practice rather than exaggerated promises.
Begin with a few slow rounds. Bend the knees when needed, lower them in Plank, keep the backbends comfortable and let the breath determine the pace. Eventually, the individual steps begin to feel like one continuous rhythm.
Consistency matters, but judgement matters too. Surya Namaskar should leave you feeling awake and worked, not punished. Learn it carefully, modify it honestly and allow progress to happen without turning the yoga mat into another arena for competition.
Explore more Nirvana Yoga School guides on yoga postures, pranayama, meditation and conscious living to build a balanced, informed and sustainable practice.