After a long day at your desk or a lengthy journey, you may notice that your hips feel unusually stiff when you stand up. Even simple activities such as bending down, sitting cross-legged, or climbing stairs may feel less comfortable than usual.
It is a familiar experience, particularly for people who spend much of their day sitting or repeating the same movements.
Our hip joints allow a wide variety of movements, yet many of these are rarely used in everyday activities. Over time, certain movements may begin to feel restricted.
Practising hip stretches is one way to maintain flexibility and explore a more comfortable range of motion. You don't need advanced yoga skills or an elaborate routine to begin. A few carefully chosen postures can make a useful addition to your day.
In this article, we will look at ten yoga-based hip stretches, explain how to practise them correctly, and put together a short routine that beginners can follow at home.
We will also discuss why the hips become stiff, how to stretch your hip flexors, and when stretching may not be the right approach.
Explore our Yoga Teacher Training in Rishikesh programs to learn more about yoga, flexibility, mindful movement, and a consistent yoga practice.
Why Do Your Hips Feel Tight?
Hip stiffness doesn't always have a single cause. It can develop from your everyday activities, exercise habits, or the way your muscles and joints respond to movement.
Understanding a little about hip anatomy can help you choose suitable stretches instead of repeatedly practising the same posture.
Sitting for Long Hours
From working at your desk to travelling or relaxing at home, sitting takes up a considerable part of our day. You might sit while working, eating, driving, studying, or watching television. During these activities, your hips remain bent for extended periods.
This position isn't harmful by itself. However, spending most of the day with very little change in position may leave you feeling stiff when you finally get up and move.
Taking regular movement breaks, walking briefly, and changing your sitting position can help introduce more variety into your day.
Limited Movement and Physical Activity
Walking is useful, but it doesn't take the hips through every possible direction of movement.
Your hip joints also allow rotation, movement sideways, and extension behind the body. If these movements are rarely practised, some positions may gradually feel unfamiliar or restricted.
Yoga introduces movements that are often missing from a typical daily routine.
Exercise and Repetitive Movements
Runners, cyclists, gym enthusiasts, and people who perform repetitive physical work may also experience hip stiffness.
Exercise challenges the muscles around the hips, and some people notice temporary tightness following demanding sessions.
Appropriate recovery, mobility exercises, and strength training are important parts of maintaining comfortable movement.
Understanding the Muscles Around Your Hips
Several groups of muscles support the movement and stability of the hip joint.
- Hip flexors: Located toward the front of the hips, these muscles help bring the thigh toward the body, as when lifting a knee to climb a step.
- Gluteal muscles: The muscles of the buttocks contribute to hip extension, rotation, and pelvic stability.
- Adductors: Running along the inner thighs, these muscles help draw the legs toward the centre of the body.
- Hamstrings: Situated behind the thighs, they assist with hip extension and knee movement.
- Deep hip rotators: Smaller muscles around the joint help control rotational movements.
A complete hip-stretching routine should include different directions of movement rather than concentrating on one muscle group.
When Tightness May Need Attention
Sometimes what feels like muscular tightness is related to weakness, joint irritation, or an underlying injury.
If stiffness is accompanied by persistent pain, weakness, numbness, or difficulty walking, it is sensible to seek guidance from a healthcare professional.
Stretching should never be used to force movement through pain.
How to Stretch Hips Safely
Before moving into the yoga postures, take a few minutes to prepare your body.
You will usually find the practice more comfortable when you begin with some easy movement instead of immediately attempting a deep stretch.
Keep these points in mind:
- Begin with movement: Walk around, march gently, or make small hip circles before holding a posture.
- Enter each pose gradually: Give your body time to settle rather than dropping quickly into the deepest position.
- Let your breathing remain comfortable: Avoid tightening your jaw or holding your breath while stretching.
- Keep support nearby: A folded blanket, cushion, yoga block, or sturdy chair can make difficult positions more manageable.
- Recognize the difference between tension and pain: A mild pulling sensation in a muscle can be normal. Sharp pain, joint pressure, or pinching means you should ease out.
- Make practice manageable: A few comfortable sessions spread across the week are generally more helpful than occasionally pushing yourself too hard.
The purpose of hip-opening yoga poses isn't to achieve a particular shape. What matters is how comfortably and effectively your body moves.
10 Best Hip Stretches for Flexibility
The following postures work with different muscles and movements around the hips.
Some focus on the front of the hips, while others involve the inner thighs, buttocks, or surrounding tissues.
You can explore them one at a time. Start with the postures that feel accessible and add more as your confidence and comfort improve.
1. Low Lunge (Anjaneyasana)
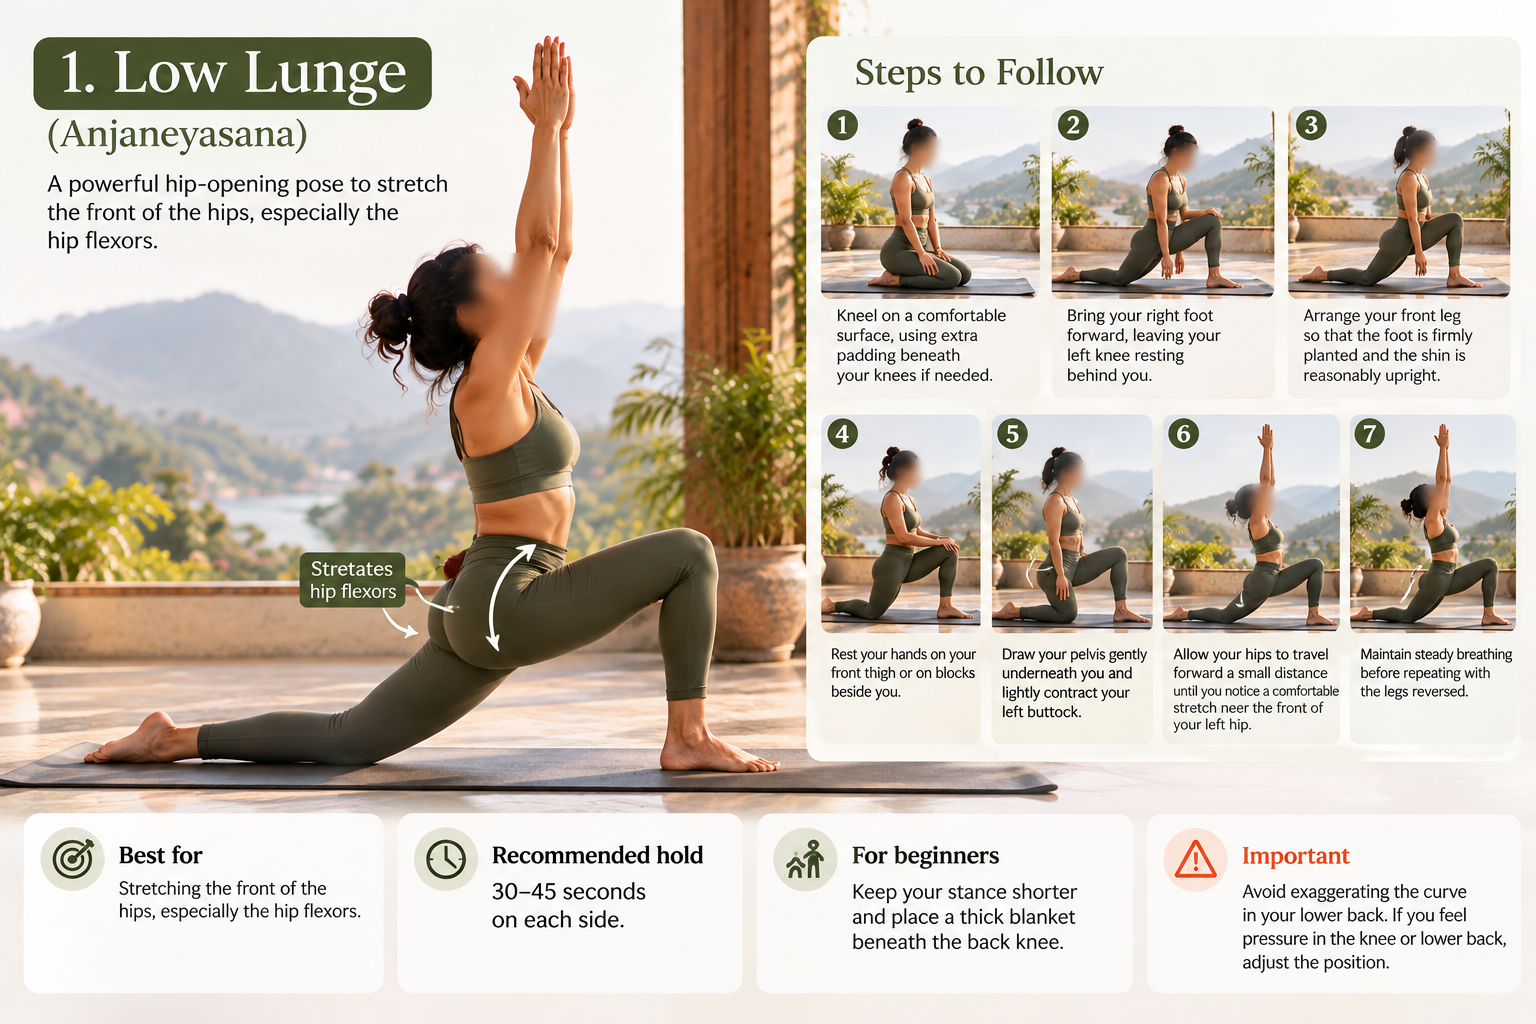
Best for: Stretching the front of the hips, especially the hip flexors.
Low Lunge is a useful posture for people who spend much of the day seated. It places the back hip into extension, creating a stretch across the front of that side.
Steps to follow:
1. Kneel on a comfortable surface, using extra padding beneath your knees if needed.
2. Bring your right foot forward, leaving your left knee resting behind you.
3. Arrange your front leg so that the foot is firmly planted and the shin is reasonably upright.
4. Rest your hands on your front thigh or on blocks beside you.
5. Draw your pelvis gently underneath you and lightly contract your left buttock.
6. Allow your hips to travel forward a small distance until you notice a comfortable stretch near the front of your left hip.
7. Maintain steady breathing before repeating with the legs reversed.
Recommended hold: 30–45 seconds on each side.
For beginners: Keep your stance shorter and place a thick blanket beneath the back knee.
Important: Avoid exaggerating the curve in your lower back. If you feel pressure in the knee or lower back, adjust the position.
2. Butterfly Pose (Baddha Konasana)
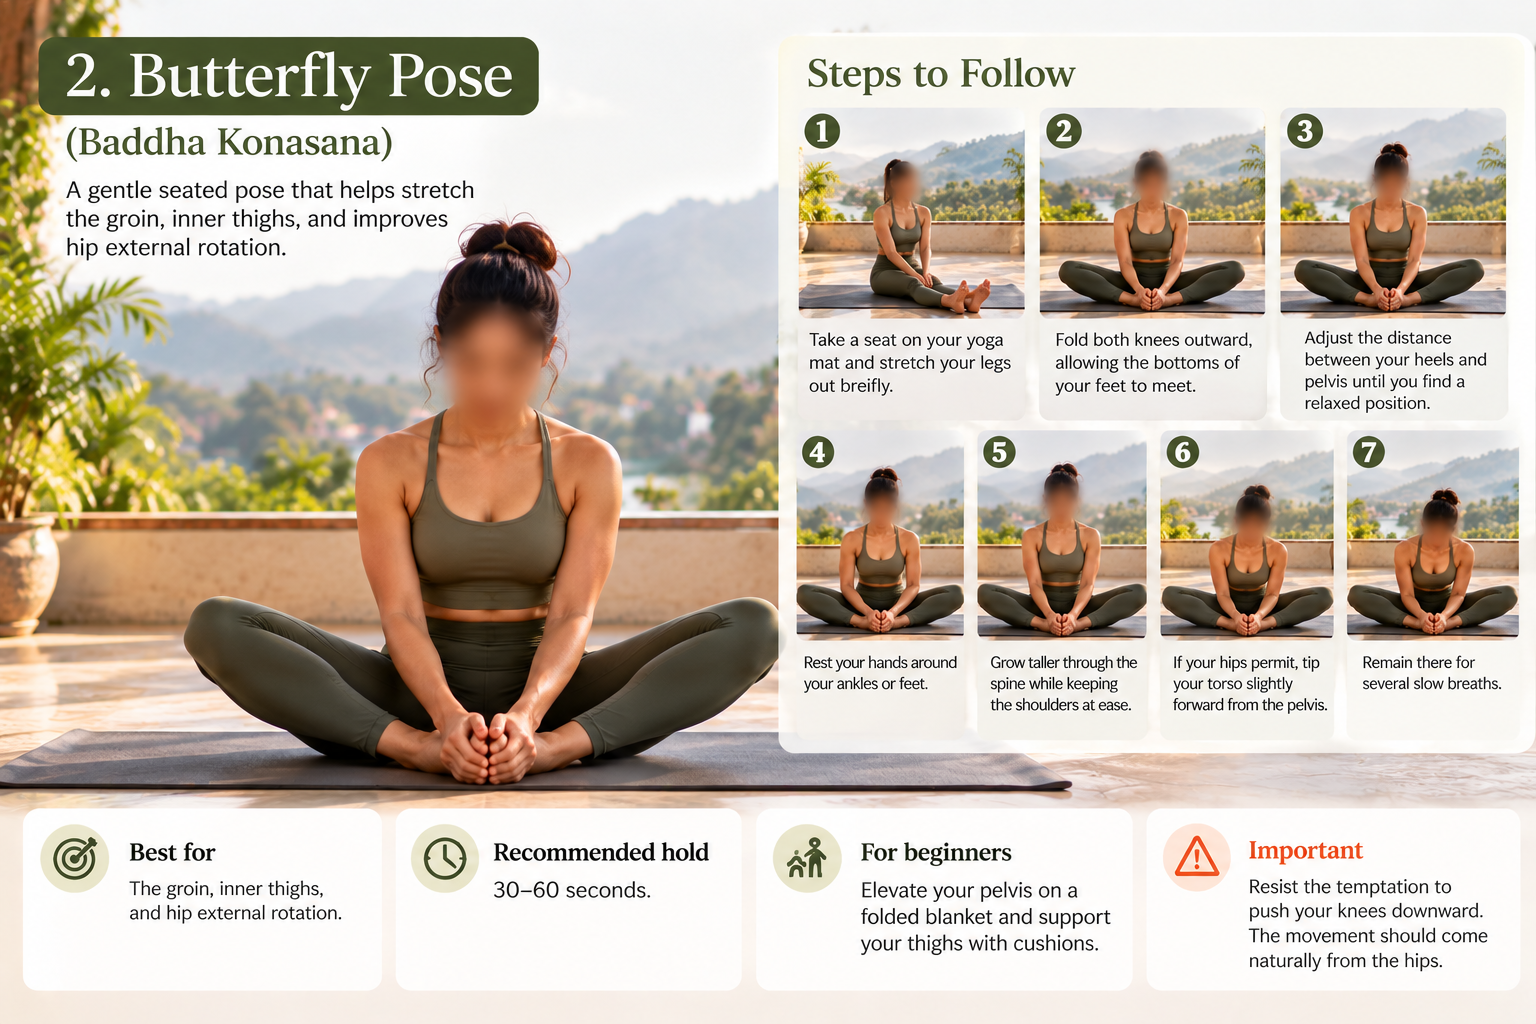
Best for: The groin, inner thighs, and hip external rotation.
Butterfly Pose is commonly taught in beginner yoga classes because it allows students to adjust the position to their individual flexibility.
Rather than trying to bring the knees down, the emphasis is on sitting comfortably and allowing the inner thighs to lengthen gradually.
Steps to follow:
1. Take a seat on your yoga mat and stretch your legs out briefly.
2. Fold both knees outward, allowing the bottoms of your feet to meet.
3. Adjust the distance between your heels and pelvis until you find a relaxed position.
4. Rest your hands around your ankles or feet.
5. Grow taller through the spine while keeping the shoulders at ease.
6. If your hips permit, tip your torso slightly forward from the pelvis.
7. Remain there for several slow breaths.
Recommended hold: 30–60 seconds.
For beginners: Elevate your pelvis on a folded blanket and support your thighs with cushions.
Important: Resist the temptation to push your knees downward. The movement should come naturally from the hips.
3. Reclined Figure-Four Stretch
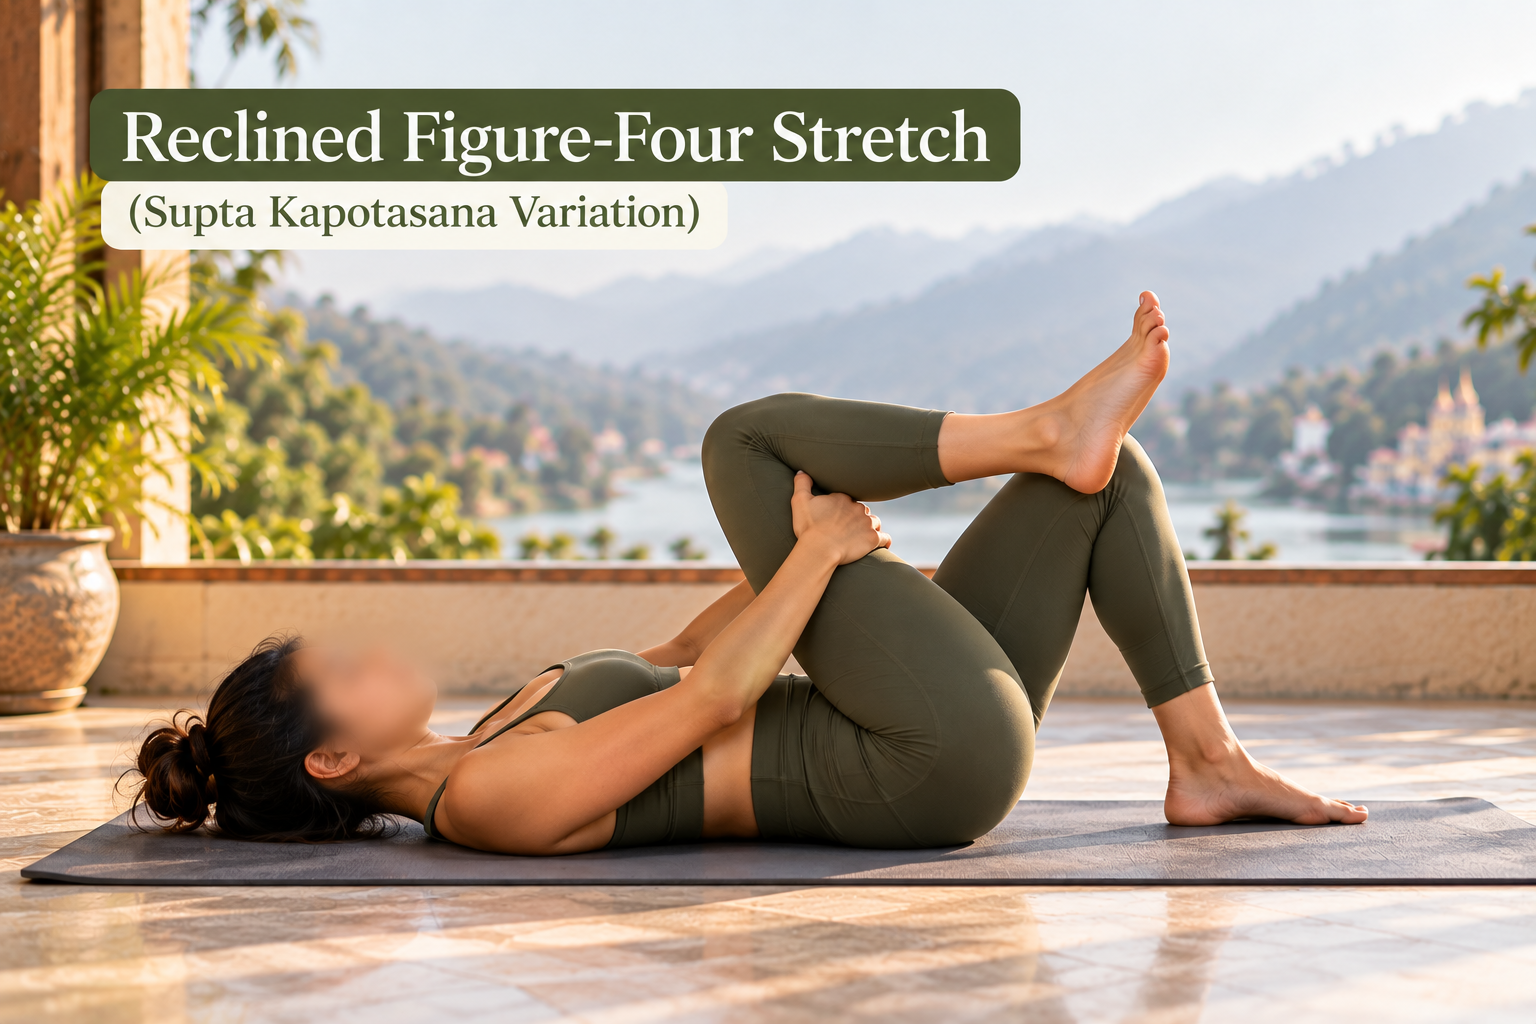
Best for: The glutes and muscles involved in hip rotation.
If seated hip stretches feel challenging, this lying-down variation can be a good alternative.
Because the floor supports your back, you can concentrate on the stretch without needing to balance or maintain an upright seated posture.
Steps to follow:
1. Settle onto your back, keeping both feet grounded and your knees pointing upward.
2. Rest your right ankle on your left thigh, just above the knee.
3. Turn the right knee outward as far as it moves comfortably.
4. Leave the right foot gently flexed to support the position.
5. Pass your hands behind the left thigh and gradually raise that leg.
6. Bring it toward your torso only until a gentle pulling sensation develops around the right buttock.
7. Lower your leg carefully and practise on the other side.
Recommended hold: 30–45 seconds per leg.
For beginners: Leave the left foot on the mat instead of lifting it.
Important: If the crossed knee feels strained, reduce the stretch or choose another posture.
This variation can be particularly useful for people who find the traditional Pigeon Pose too demanding.
4. Pigeon Pose (Eka Pada Rajakapotasana Preparation)
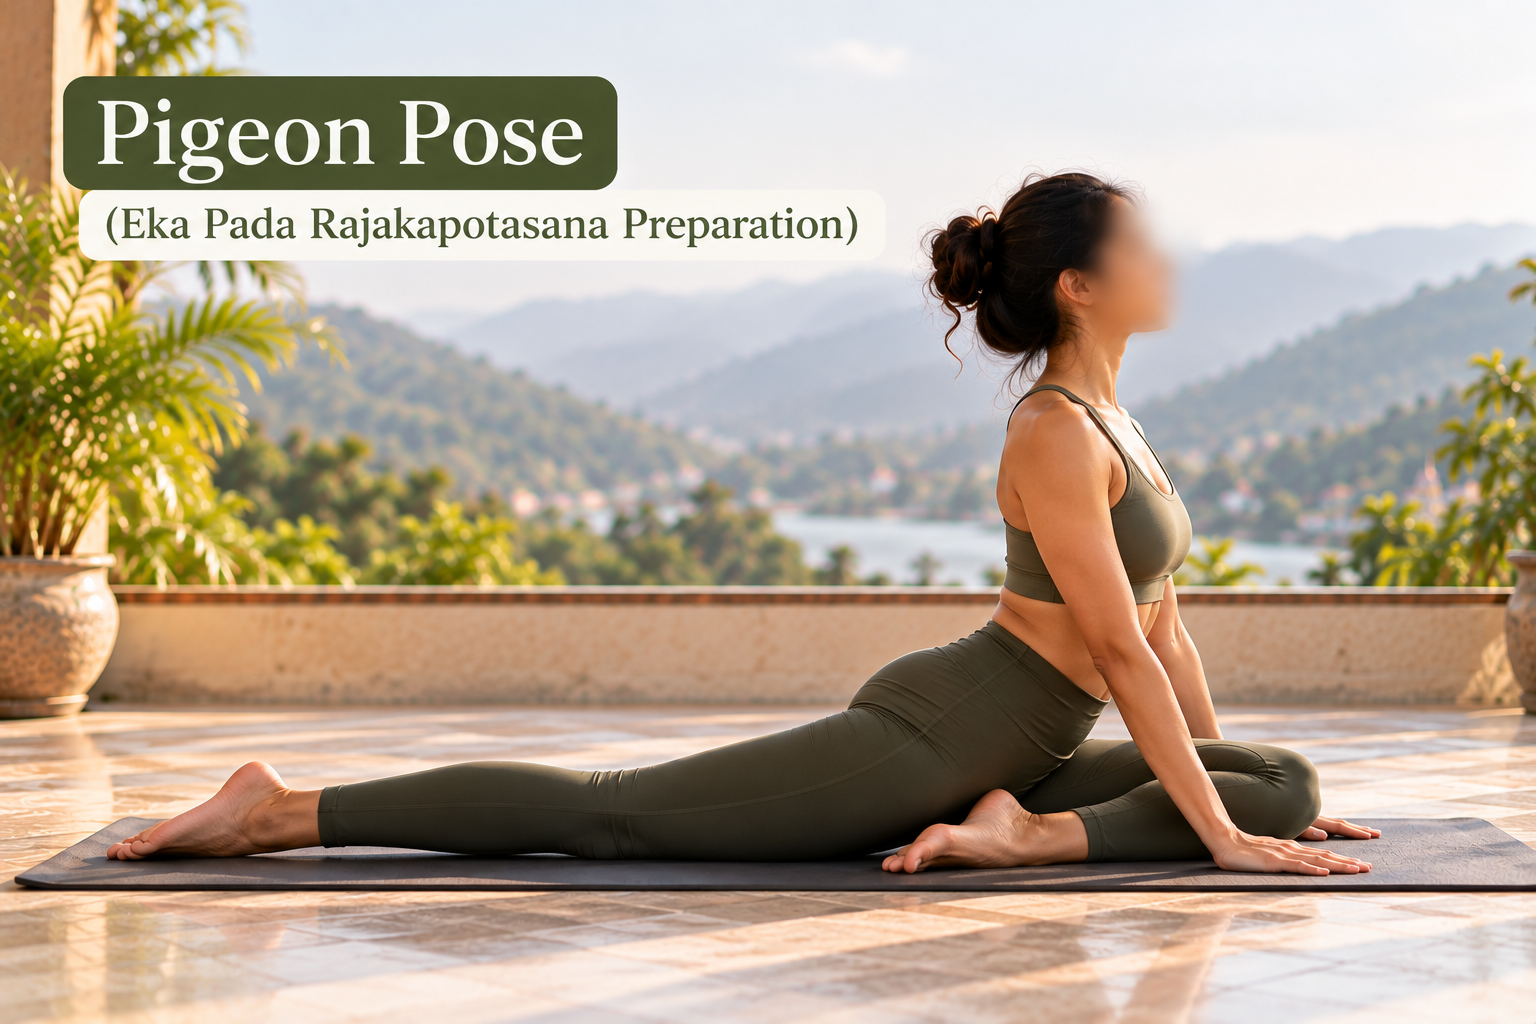
Best for: The outer hip and buttock muscles of the front leg.
Pigeon Pose is often associated with hip-opening yoga, although it is not suitable for everybody.
Hip anatomy and available rotation vary considerably between individuals. A person with limited external rotation may find this posture uncomfortable even after years of yoga practice.
Steps to follow:
1. Come into a hands-and-knees position.
2. Guide your right knee forward toward your right hand.
3. Let the right lower leg rest diagonally across the mat at an angle that suits your hip.
4. Extend your left leg behind you.
5. Place a folded blanket beneath your right hip if you need additional support.
6. Stay upright or move your chest forward slightly, provided the posture remains comfortable.
7. Release gradually and change sides.
Recommended hold: 30–60 seconds per side.
For beginners: Choose the Reclined Figure-Four Stretch if your hips feel restricted.
Important: Never force your front shin into a horizontal position or continue if the knee feels compressed.
5. Happy Baby Pose (Ananda Balasana)
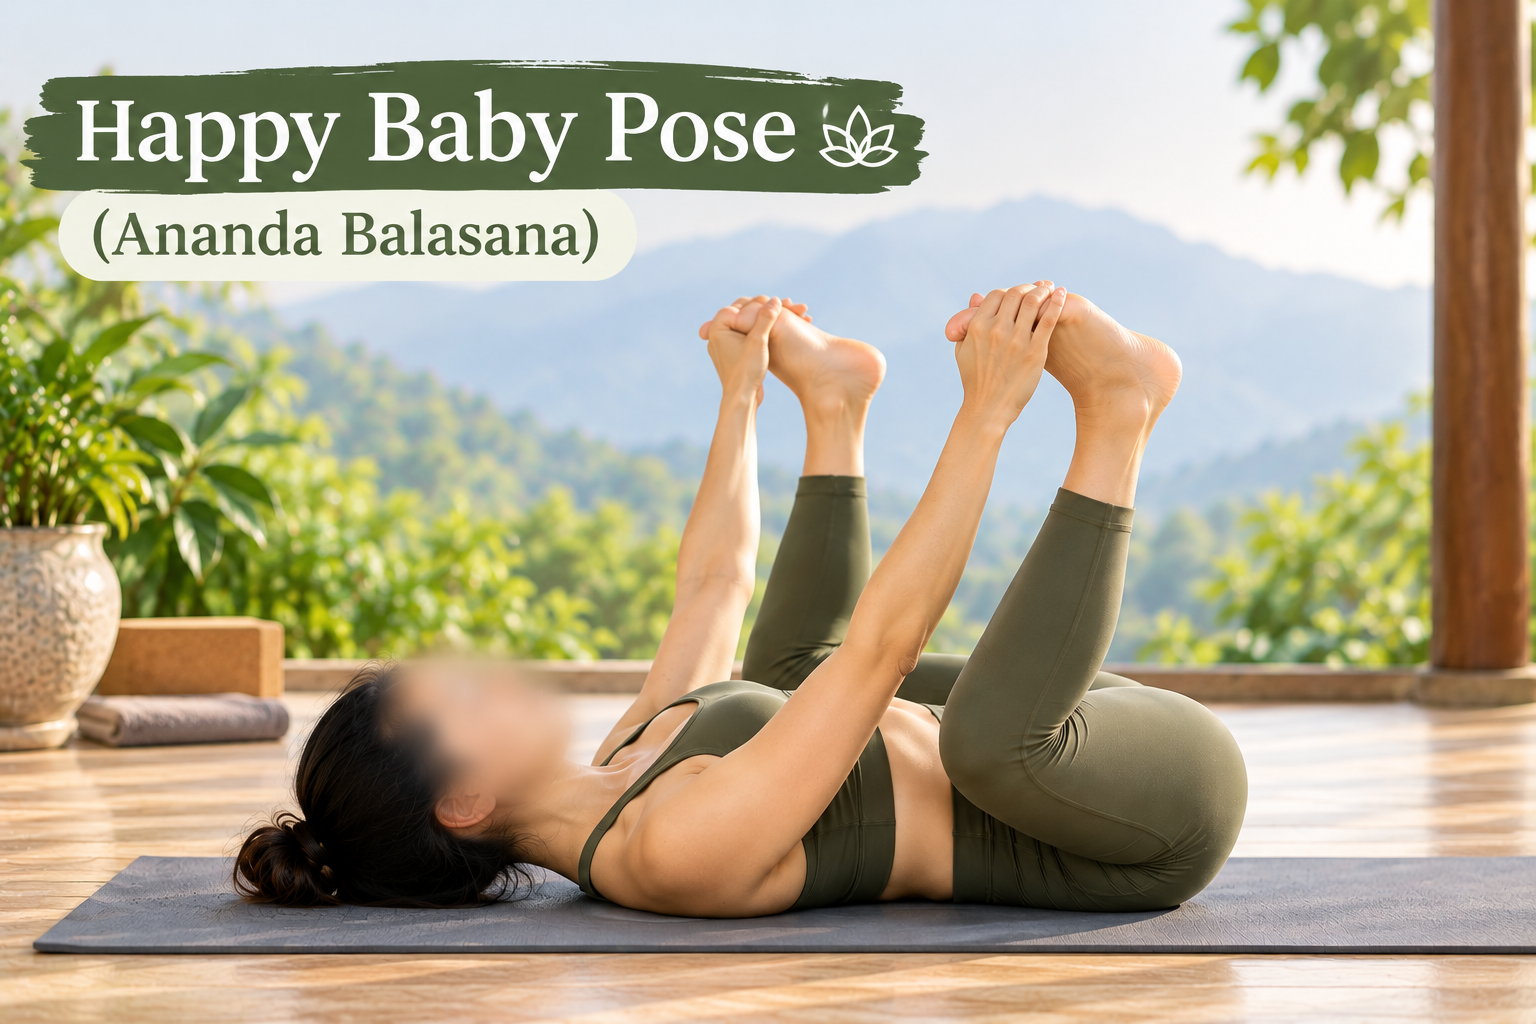
Best for: Gentle stretching around the inner hips and lower back.
Happy Baby Pose is frequently used near the end of a yoga session, when the body is already warm and ready to settle.
Despite its playful name, the posture should be approached gently.
Steps to follow:
1. Rest on your back and bring both knees toward your abdomen.
2. Separate your knees gradually so they move toward either side of your torso.
3. Reach for the outer edges of your feet, or hold the backs of your thighs.
4. Allow your lower back and pelvis to remain comfortably supported.
5. Keep your neck relaxed against the mat.
6. Hold the position without pulling aggressively.
Recommended hold: 30–60 seconds.
For beginners: Keep your hands behind your thighs or use a yoga strap.
Important: Avoid forcing the knees toward the ground. During pregnancy, obtain individualized advice about suitable positions and prolonged lying on your back.
6. Garland Pose (Malasana)
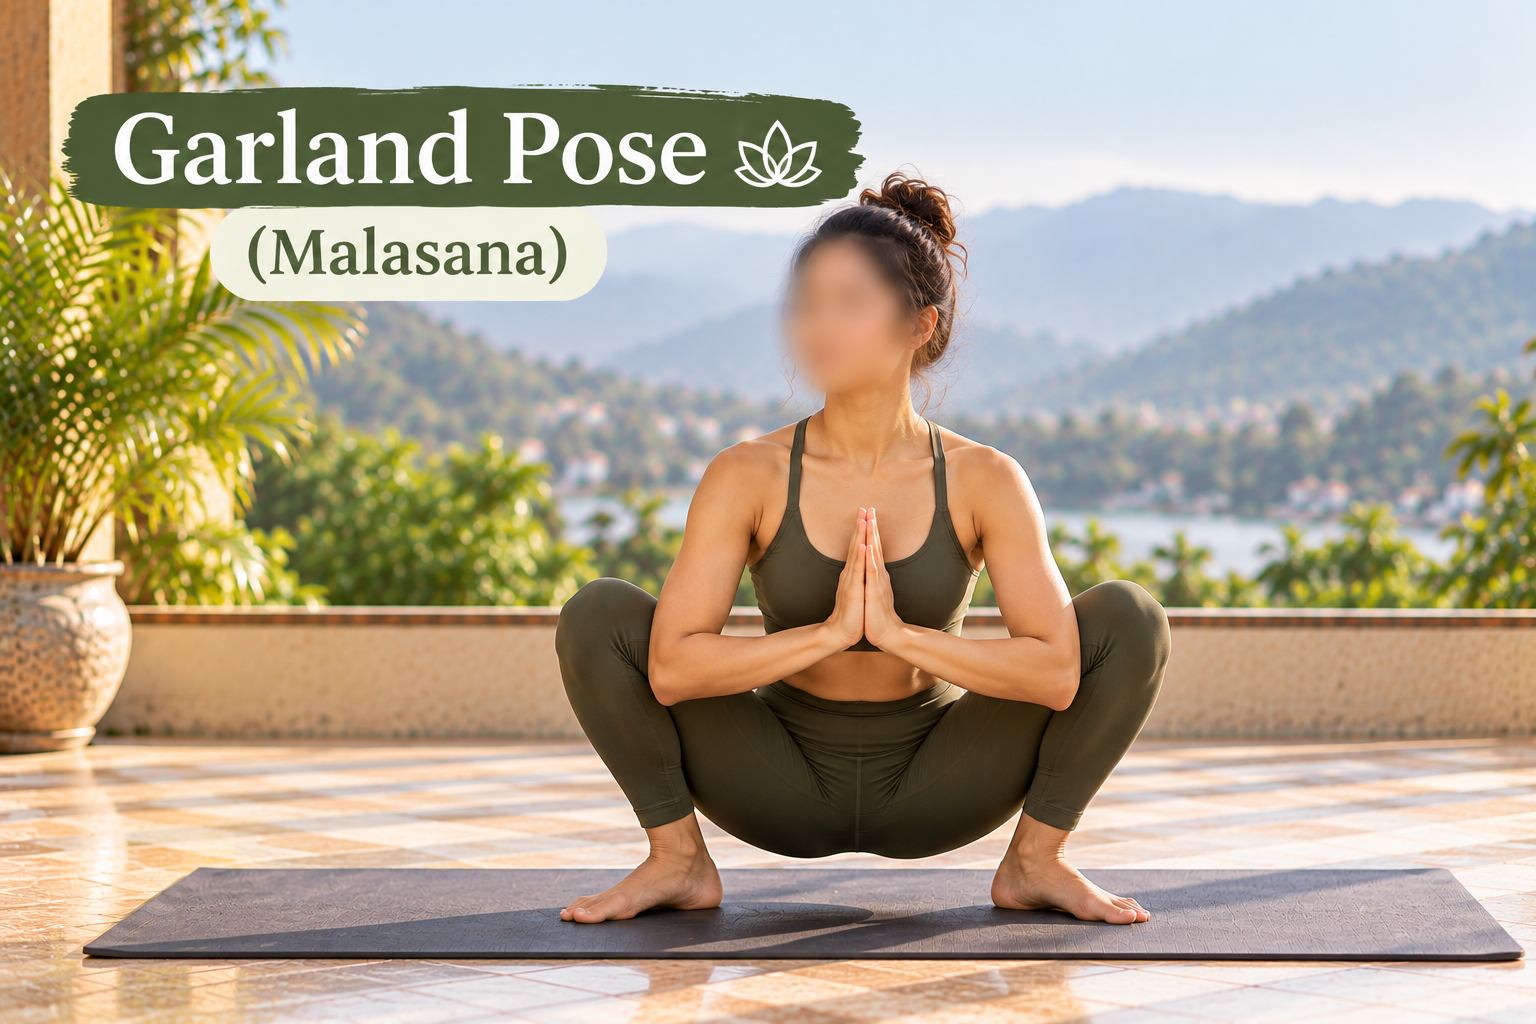
Best for: Hip mobility, inner thighs, ankles, and squat flexibility.
Squatting is a natural movement used in many daily activities. However, prolonged sitting and limited movement can make a deep squat difficult for some people.
Malasana provides an opportunity to explore this position with awareness and support.
Steps to follow:
1. Begin standing with the feet a little wider than your pelvis.
2. Turn the toes outward to an angle that feels natural.
3. Bend at the hips and knees, gradually lowering toward a squat.
4. Keep your weight comfortably distributed through the feet.
5. Bring your hands together in front of your chest.
6. Maintain a relaxed, upright posture without straining.
Recommended hold: Approximately 30 seconds.
For beginners: Sit on a firm yoga block or use a secure support to reduce the depth.
Important: Deep squatting may not be appropriate for people with certain knee, ankle, or hip conditions, including some joint-replacement precautions.
7. Lizard Pose (Utthan Pristhasana)
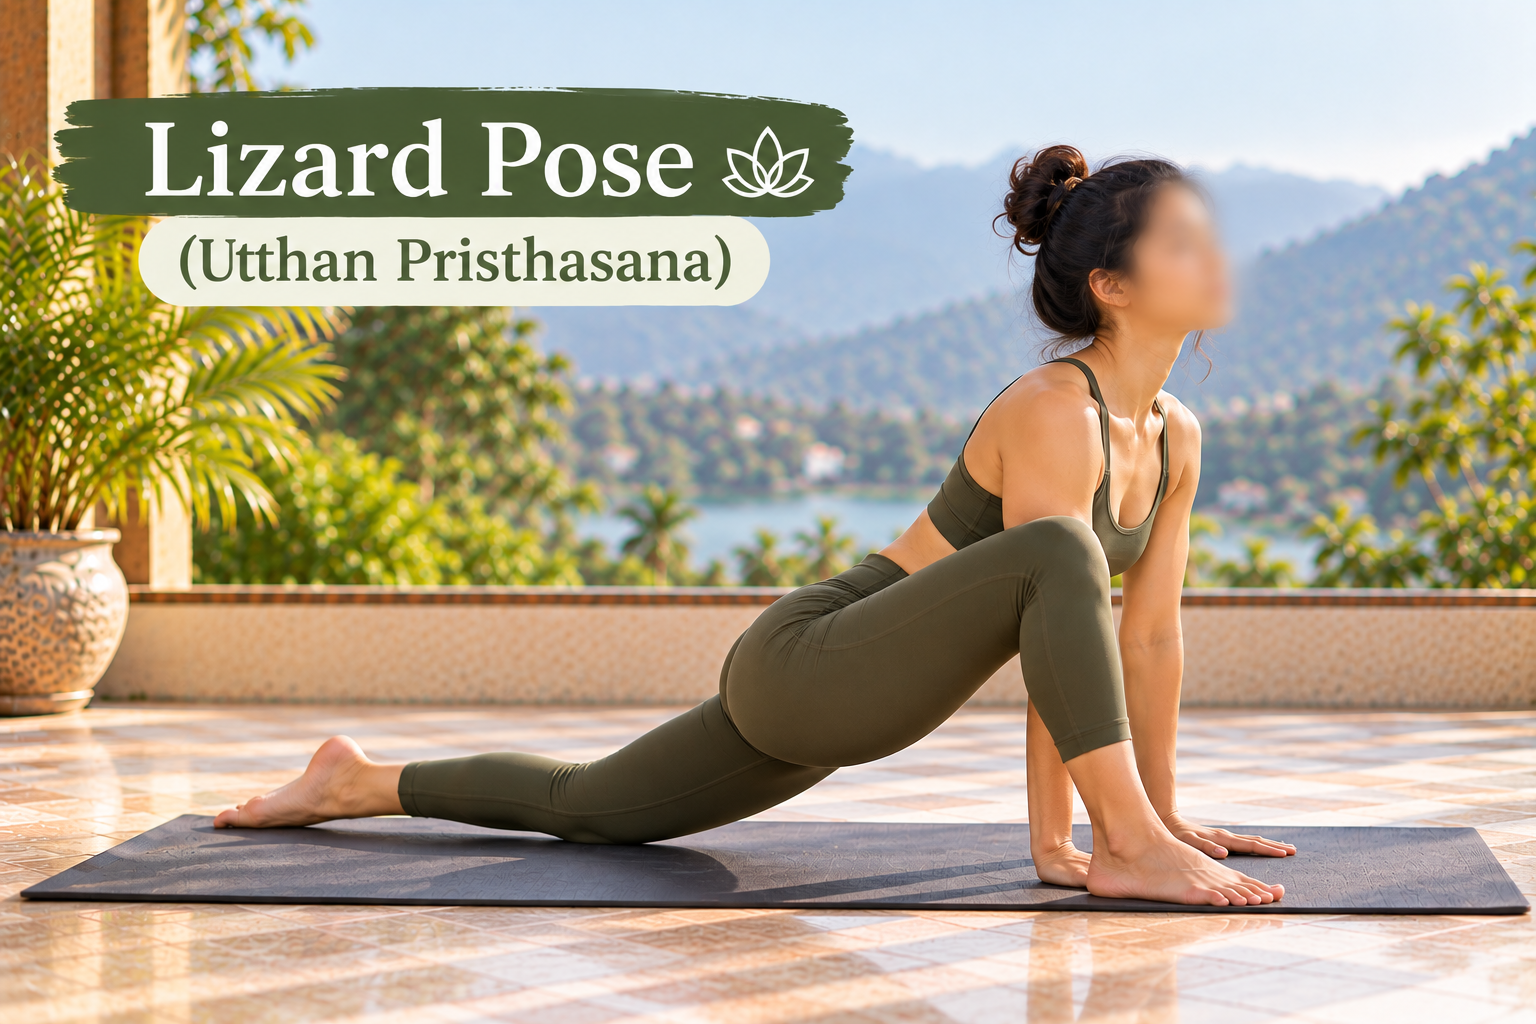
Best for: Hip flexors, groin, and surrounding thigh muscles.
Lizard Pose is a stronger variation of a lunge and may be more appropriate once you are familiar with basic hip stretches.
It can involve a considerable range of motion, so there is no need to rush toward the floor.
Steps to follow:
1. Start from a supported Low Lunge.
2. Move your front foot slightly farther outward.
3. Bring your hands to the inside of that foot.
4. Rest the rear knee on the ground, using padding if required.
5. Maintain a comfortable length through your spine.
6. Let the pelvis shift forward only as much as your body allows without strain.
7. Breathe steadily before changing sides.
Recommended hold: 30–45 seconds per leg.
For beginners: Keep your hands raised on blocks rather than lowering your elbows.
Important: Stop if you notice sharp pulling in the groin, pinching at the front of the hip, or discomfort around the knees.
8. Wide-Knee Child's Pose
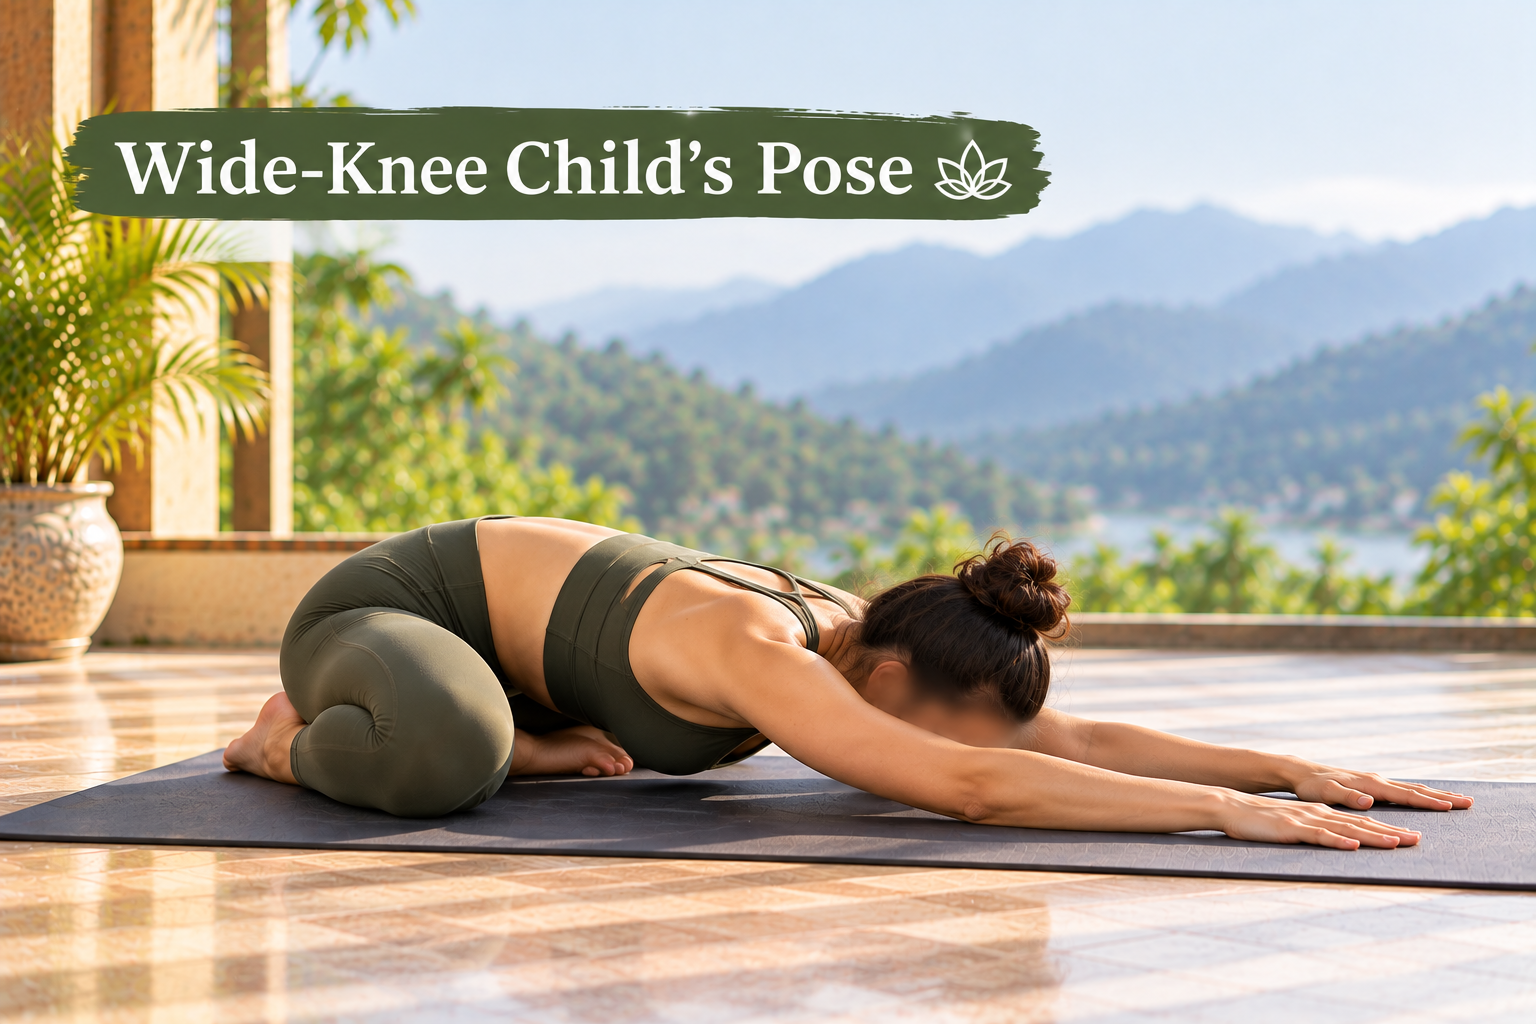
Best for: Inner-thigh movement, hips, and gentle relaxation.
Wide-Knee Child's Pose is a restful position for many people, especially after standing or balancing postures.
The distance between your knees can be adjusted, so there is no fixed position that everyone must achieve.
Steps to follow:
1. Come down onto your hands and knees.
2. Move your knees apart until there is enough space for your torso.
3. Bring your big toes close together if this feels comfortable.
4. Slowly guide your hips toward your heels.
5. Walk your hands forward and allow your chest to lower.
6. Support your head or upper body if needed.
7. Remain still and breathe naturally.
Recommended hold: 45–60 seconds.
For beginners: Place a bolster beneath the chest and additional support behind the knees.
Important: If kneeling causes pain, skip this posture and practise a comfortable lying-down stretch instead.
9. Supine Knee-to-Chest Stretch
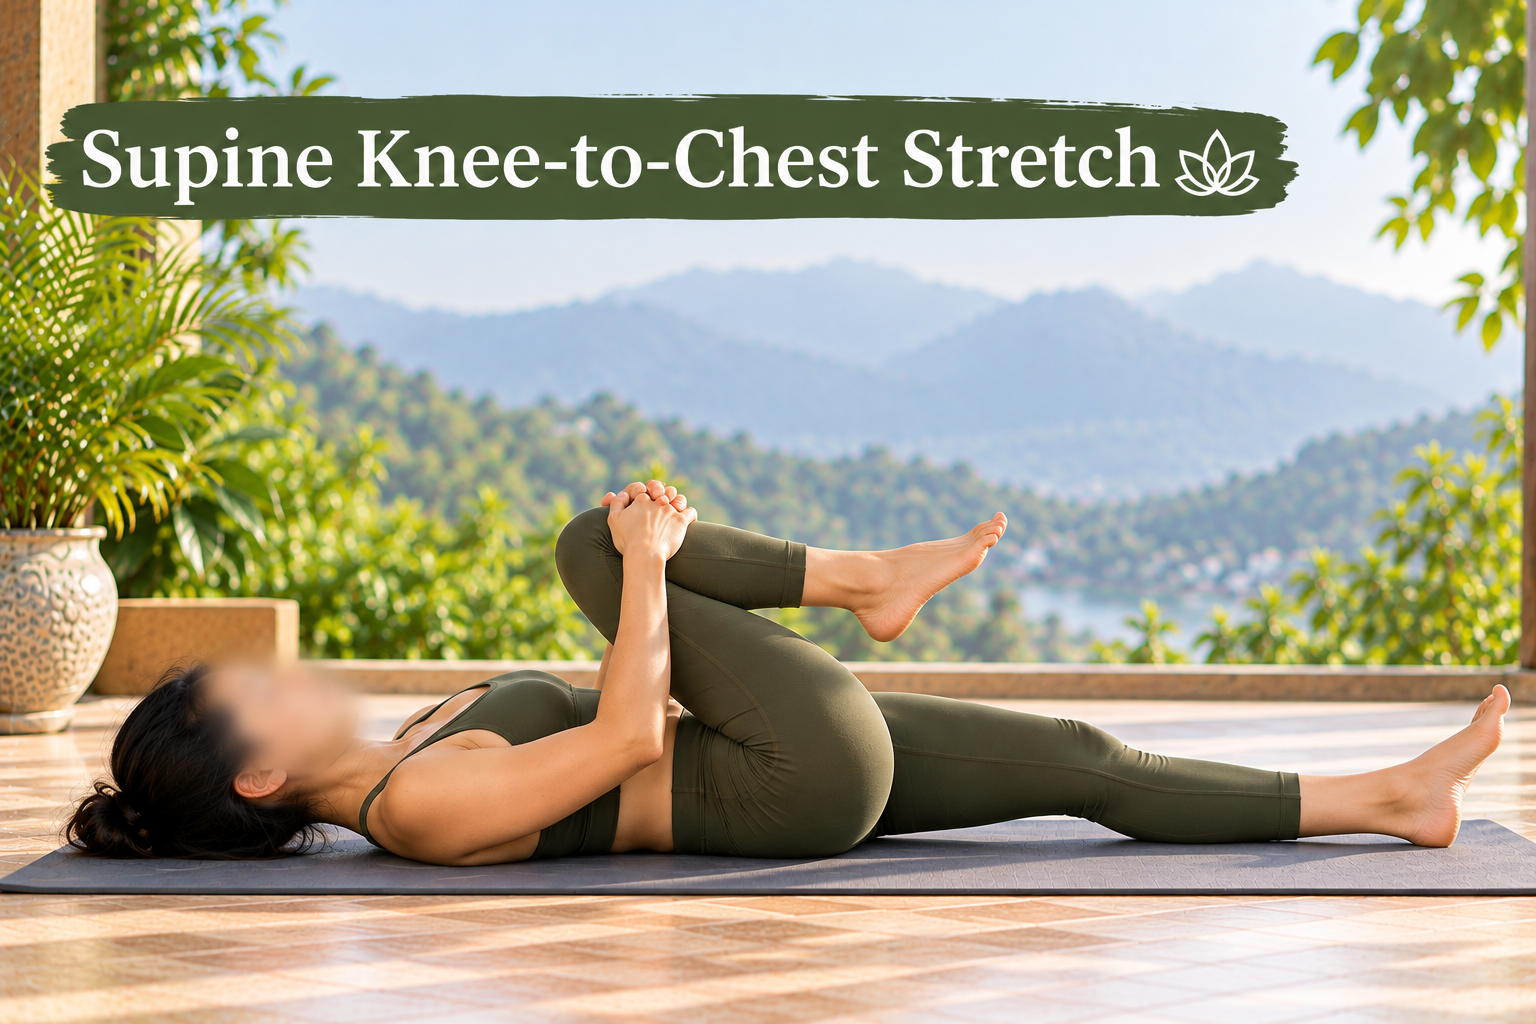
Best for: Gentle hip flexion and stretching around the glutes.
If you notice a sharp, pinching sensation near the front of your hip while drawing your knee inward, ease the leg away until the discomfort settles. It is a practical option for people beginning a flexibility routine at home.
Steps to follow:
1. Lie on your back with your legs comfortably positioned.
2. Bend your right knee and slowly bring it toward your torso.
3. Hold behind the thigh or around the shin.
4. Draw the leg inward only as much as feels comfortable.
5. Let the other leg remain bent or extended, depending on your preference.
6. Hold without lifting your head or shoulders.
7. Release and repeat with the left leg.
Recommended hold: 20–30 seconds per side.
For beginners: Keep the opposite foot on the floor with its knee bent.
Important: If bringing the knee toward your body creates a painful pinch at the front of the hip, reduce the movement.
10. Supported Bridge Pose (Setu Bandhasana)
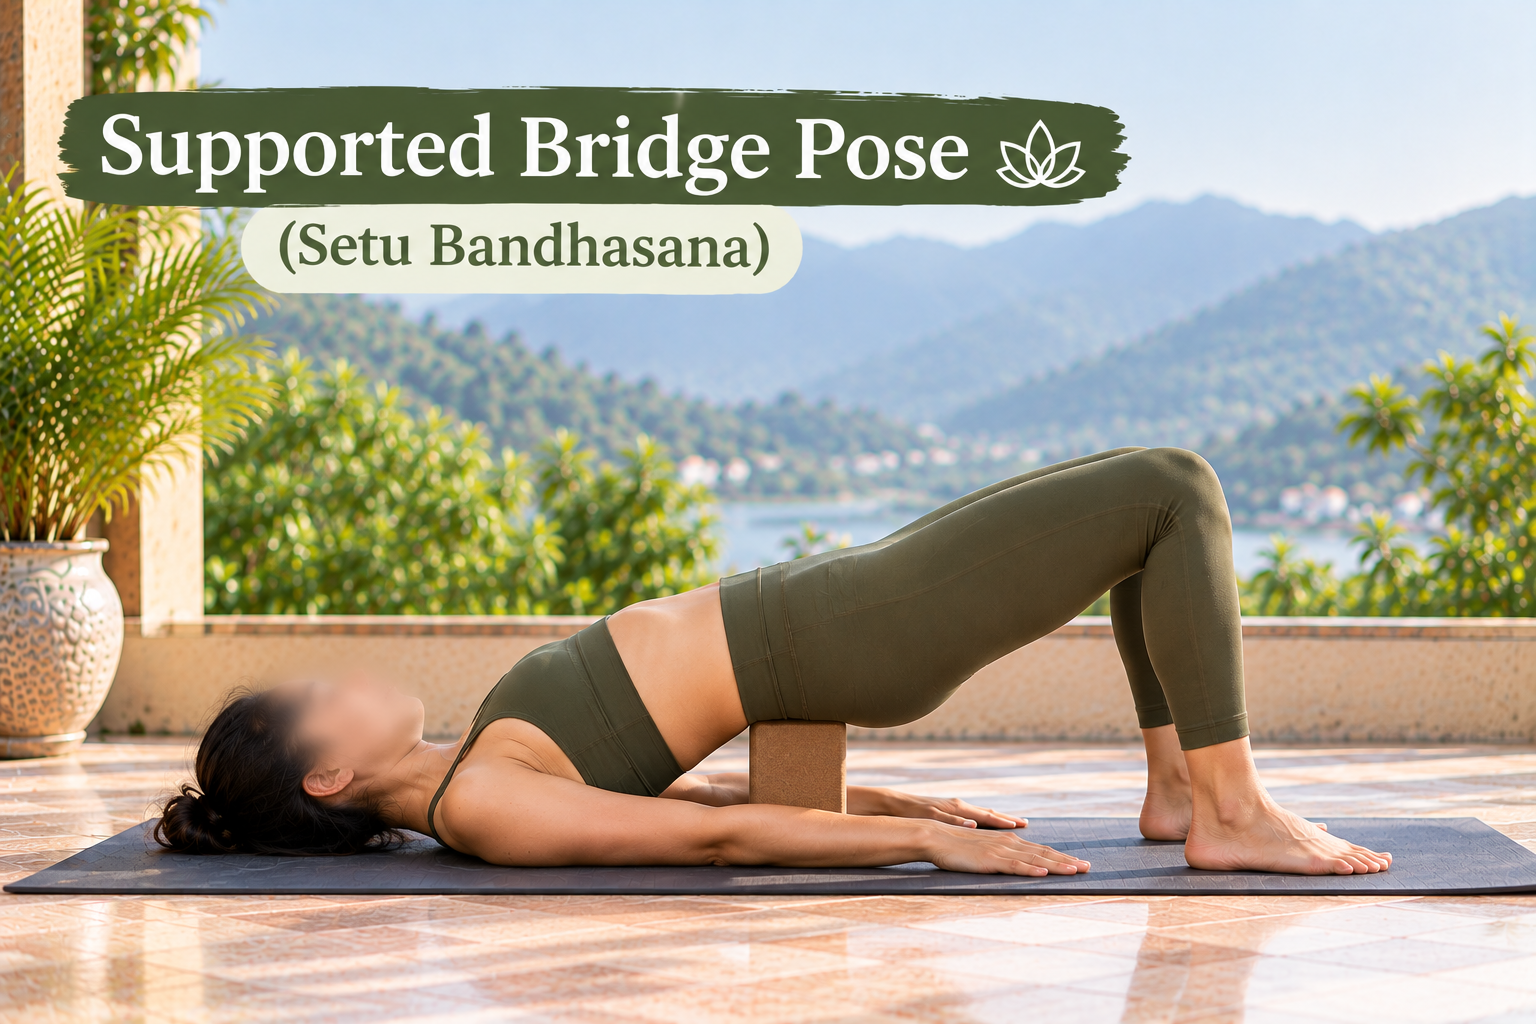
Best for: Gentle hip extension and relaxing the front of the body.
Supported Bridge offers a different movement from many seated and forward-folding stretches.
By allowing the hips to extend, it may provide a comfortable change of position after long periods of sitting.
Steps to follow:
1. Rest on your back, bend your knees, and place both feet on the ground.
2. Keep your feet approximately hip-width apart.
3. Press gently into the feet and raise your pelvis.
4. Slide a yoga block beneath the sacrum, the firm bone at the base of the spine.
5. Lower your weight onto the block, using its lowest height.
6. Relax your shoulders and keep the neck still.
7. To finish, lift your pelvis slightly, remove the block, and lower slowly.
Recommended hold: 30–60 seconds.
For beginners: Practise a few small glute bridges without using a block.
Important: A block should not press into the lumbar spine. Stop if you experience back or neck discomfort.
How to Stretch Your Hip Flexors Correctly
The hip flexors play an important role in walking, running, climbing stairs, and lifting the legs.
People who spend long hours sitting often notice stiffness around the front of their hips, although this sensation doesn't always mean the muscles are physically shortened.
Among the many hip flexor stretches, a properly aligned kneeling lunge is a straightforward place to begin.
Getting the Position Right
- Support the back knee. Use a soft mat or folded blanket to reduce pressure.
- Keep the front foot stable. Arrange your stance so you can balance without effort.
- Adjust your pelvis. A slight backward tilt of the pelvis helps direct the movement toward the front of the back hip.
- Engage the back-leg glute. A gentle contraction can help maintain pelvic control.
- Limit forward movement. You may only need to travel a few centimetres to feel the stretch.
- Breathe comfortably. Stay for about 30 seconds before changing sides.
One mistake worth watching for is excessive arching of the lower back. A person may appear to be moving farther into the lunge while actually increasing movement through the spine.
Keeping the pelvis controlled is usually more useful than trying to achieve a dramatic-looking posture.
If kneeling isn't comfortable, a supported standing hip flexor stretch may be a better choice.
Hip Stretches and Hip Mobility Exercises: What's the Difference?
Flexibility and mobility are closely related, but they describe different aspects of movement.
Flexibility refers to the ability of muscles and surrounding tissues to lengthen and permit a range of motion.
Mobility includes the ability to move a joint through its available range with muscular control.
For example, someone may be able to lift their knee toward their chest using their hands but find it harder to lift the leg to the same height without assistance.
This illustrates why stretching and strengthening can complement each other.
Three Gentle Hip Mobility Exercises
Standing Hip Circles
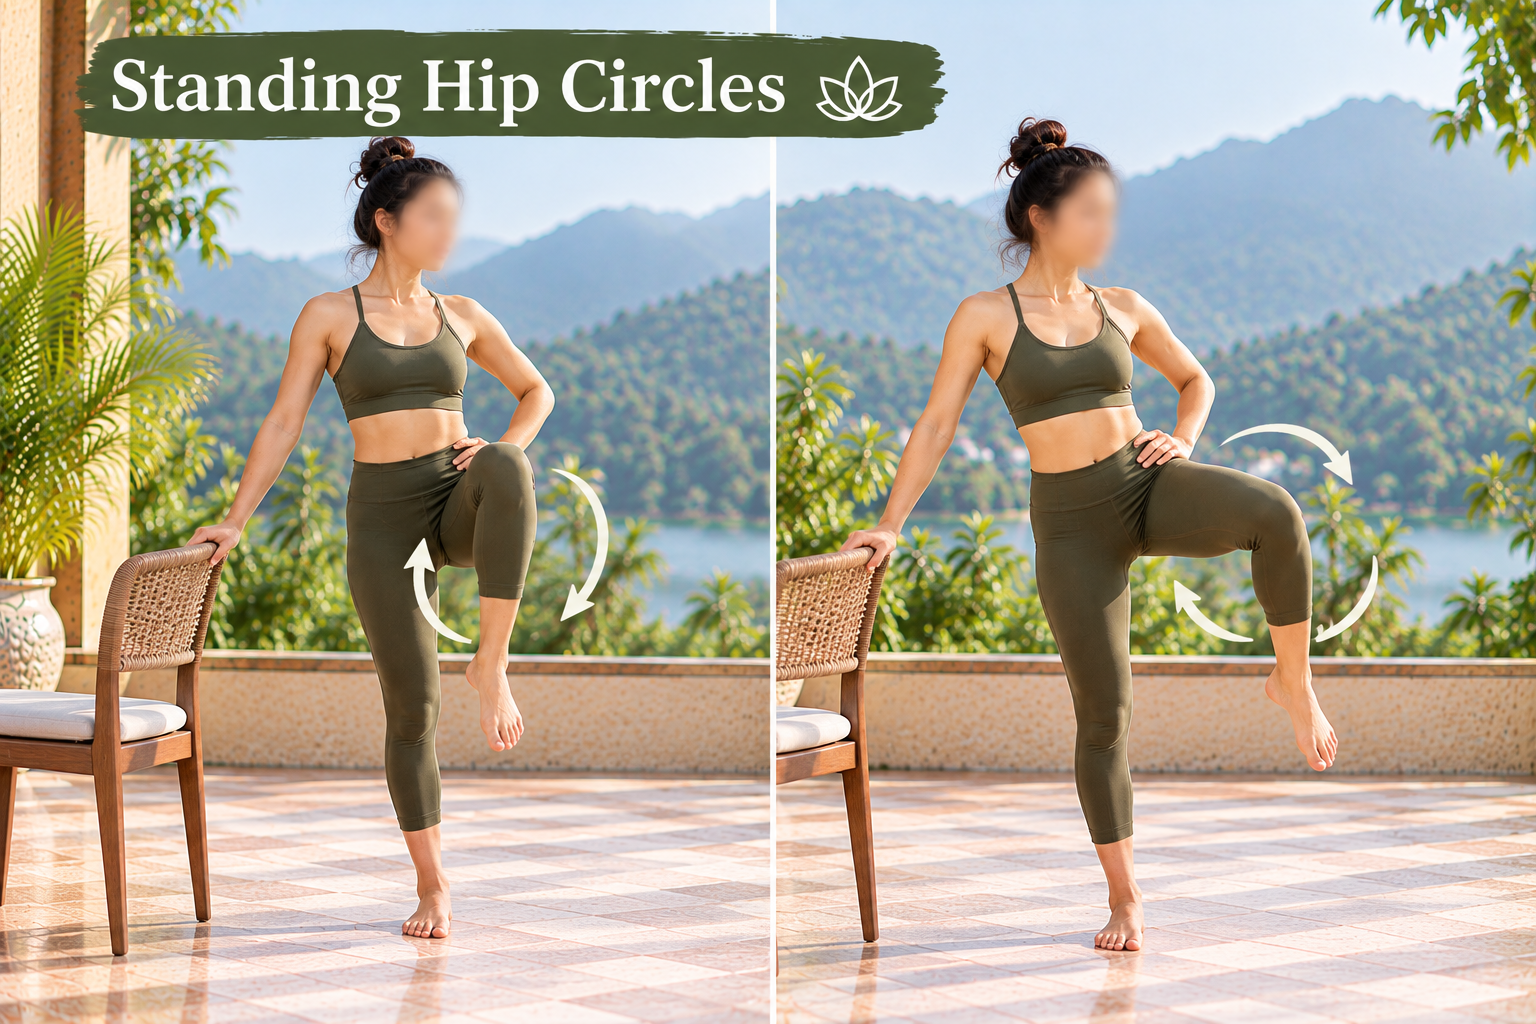
- Position yourself beside a sturdy chair or wall so you have something to hold onto if you feel unsteady.
- Lift one knee to a comfortable height.
- Move the thigh through a small circular path.
- Complete five controlled circles in each direction before changing legs.
Slow Standing Marches
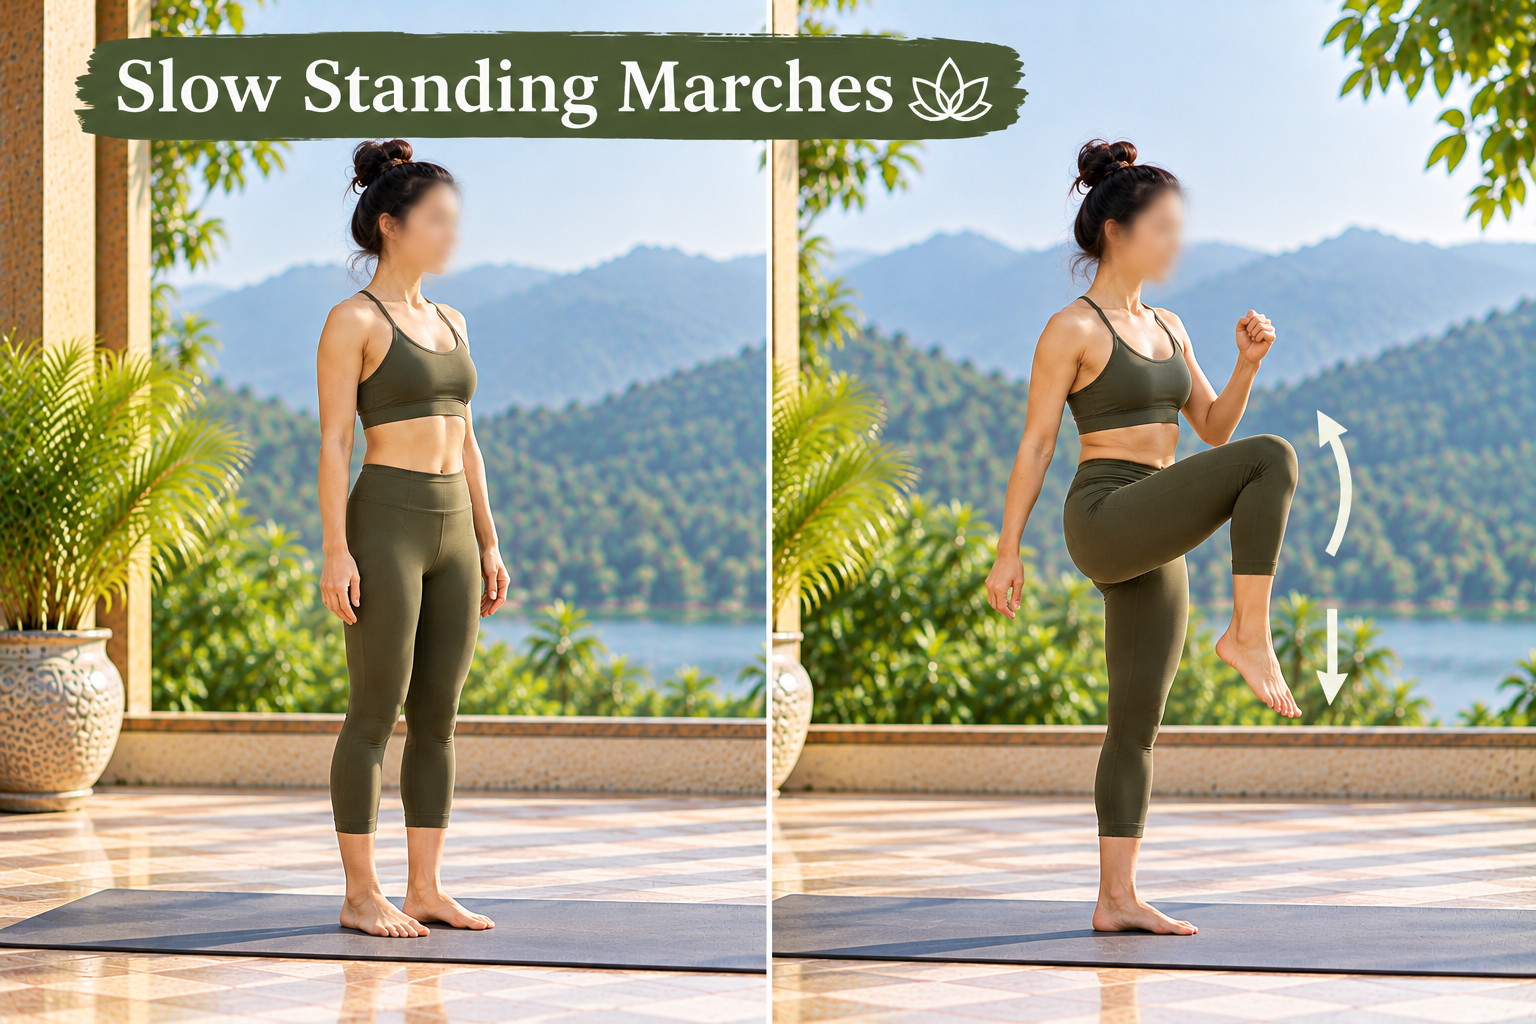
- Stand upright without leaning backward.
- Lift one knee, pause briefly, and lower it.
- Alternate legs for 8–10 repetitions.
- Focus on control rather than speed.
Glute Bridges
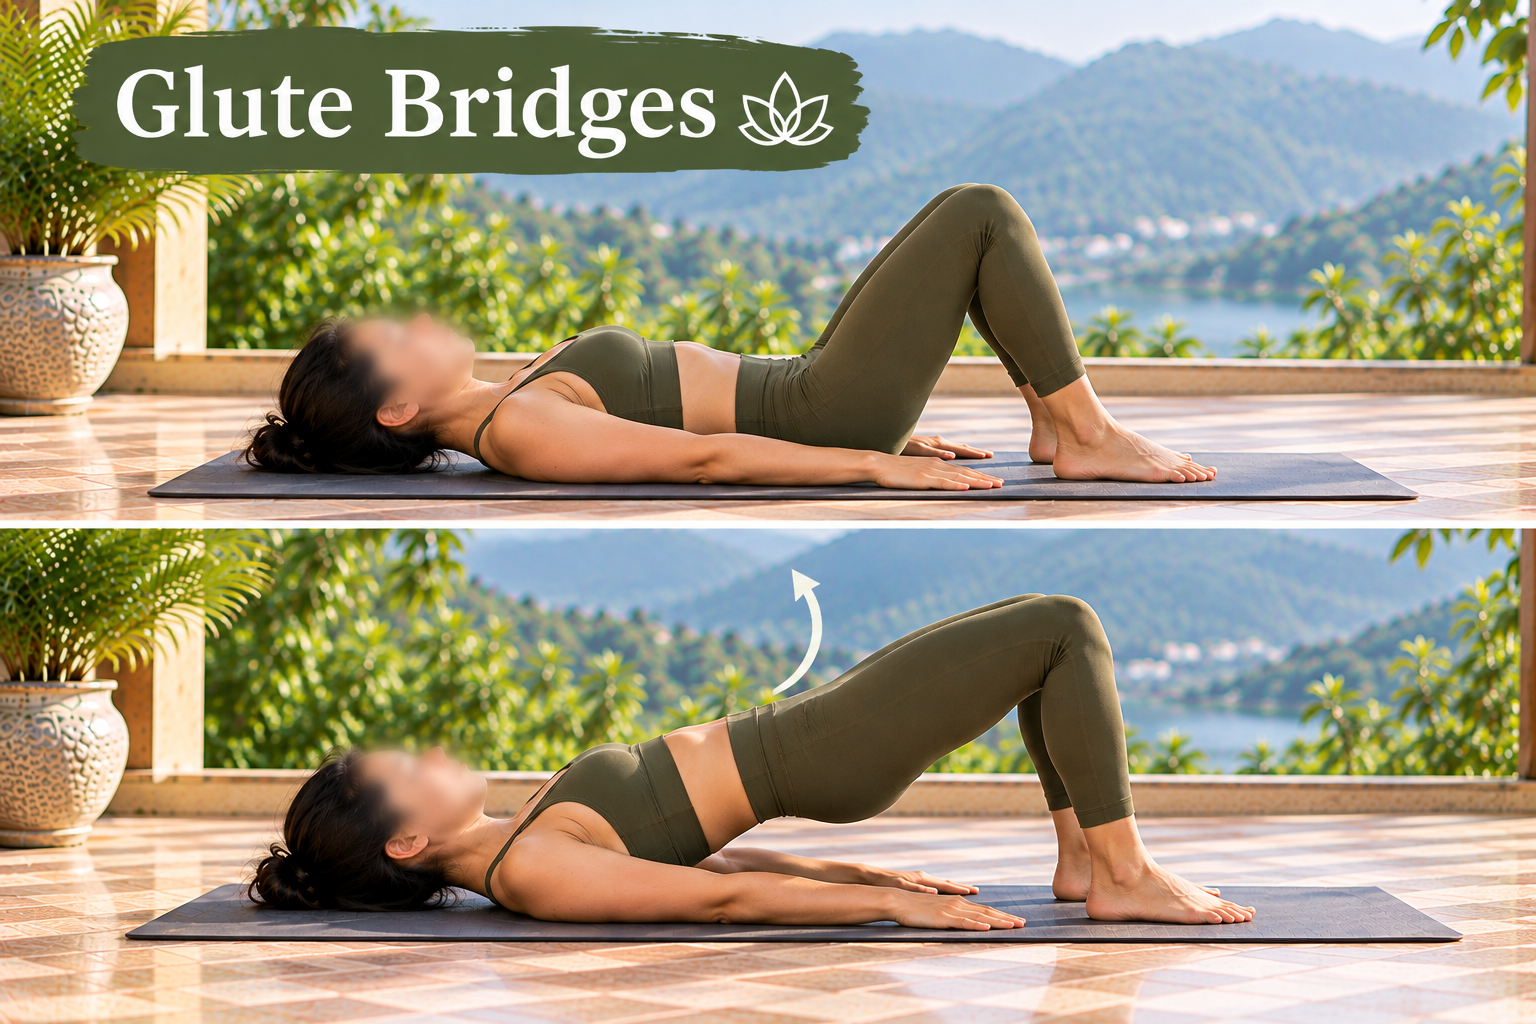
- Lie down with your knees bent and feet planted.
- Lift your hips using a comfortable amount of effort.
- Pause briefly at the top.
- Lower slowly and repeat 8–12 times.
These exercises can be included alongside your hip stretches to develop strength and control.
A Simple 10-Minute Hip-Stretching Routine
You don't need to practise every posture in this article during one session.
If you're short on time, the following sequence covers several areas of the hips and can be adjusted to your flexibility.
Minutes 1–2: Gentle Warm-Up
- Walk or march in place for one minute.
- Perform small, controlled standing hip circles for 30 seconds.
- Spend another 30 seconds making gentle pelvic movements or practising Cat-Cow.
Minutes 3–9: Hip-Stretching Sequence
| Exercise | Suggested duration |
| Low Lunge | 45 seconds per side |
| Reclined Figure-Four | 45 seconds per side |
| Butterfly Pose | 60 seconds |
| Wide-Knee Child's Pose | 60 seconds |
| Supported Bridge | 45 seconds |
| Knee-to-Chest Stretch | 20 seconds per side |
Allow approximately one minute for moving between positions. Adjust the holds slightly if needed.
Minute 10: Relaxation
Finish lying on your back with your knees bent or in another position that feels restful.
Give your breathing a chance to settle. Notice whether any movements feel different from when you began.
This routine can be practised three or four times a week, depending on your comfort and schedule.
If you're new to stretching, begin with fewer postures and gradually increase the amount of time you spend practising.
Common Mistakes to Avoid While Stretching Your Hips
Although hip stretches may appear simple, the way they are performed matters.
Forcing the Body Into a Position
Trying to match someone else's range of motion can lead to unnecessary strain.
A stretch should feel manageable, not like a test of flexibility. Modify the posture whenever needed.
Mistaking Pain for Progress
Stretching may produce a mild pulling sensation in the muscles, but sharp pain isn't a sign of an effective practice.
If you experience painful pinching, catching, or pressure inside the hip joint, stop the movement.
Holding the Breath
Some people unconsciously hold their breath while trying to stretch farther.
Allowing the breath to move naturally makes it easier to maintain a relaxed and controlled position.
Moving Too Quickly Into Deep Stretches
Going directly from prolonged sitting into an intense posture can feel uncomfortable.
A brief warm-up allows you to explore movement gradually before holding a stretch.
Neglecting Strength
Not every feeling of tightness can be resolved through stretching.
The muscles around the hips also need sufficient strength to support walking, balancing, and everyday movement.
Expecting Immediate Improvement
Flexibility develops at different rates. Your individual anatomy, physical activity, and consistency all influence the process.
Rather than comparing your postures with others, pay attention to improvements in comfort and movement over time.
What Does Research Say About Stretching?
Scientific studies suggest that regular static stretching can improve joint range of motion.
A large systematic review and meta-analysis published in 2024 examined 188 studies involving 8,095 adults. It found improvements in flexibility following static stretching programmes.
Research has examined how static stretching affects flexibility and joint range of motion. Read the research on stretching and flexibility for further scientific information.
The research also suggested that increasing stretching time beyond approximately four minutes per muscle in a session, or ten minutes per muscle across a week, produced little additional flexibility benefit on average.
These findings don't mean every person needs to follow those exact durations. They do, however, suggest that extremely long or intense stretching sessions are not necessary for everyone.
The main points to remember are:
- Regular stretching can improve flexibility.
- Longer holds aren't always more effective.
- Stretching intensity should remain comfortable and manageable.
- Strengthening and general physical activity are also valuable.
- Improved flexibility doesn't automatically mean that an underlying painful condition has been treated.
Is Stretching Safe When Your Hips Are Painful?
Hip stiffness and hip pain shouldn't be treated as the same thing.
A feeling of muscular tightness after sitting may settle with gentle movement. Pain within the hip joint, however, can have several causes.
People looking for hip joint pain stretching exercises may be experiencing muscular discomfort, tendon problems, joint irritation, or another condition that needs professional assessment.
Avoid stretching through pain, particularly if you experience:
- Sharp or increasing discomfort.
- Pain following a fall or injury.
- Swelling, numbness, or unexplained weakness.
- Pain that interferes with sleep.
- Difficulty walking or bearing weight.
- Repeated catching or painful pinching inside the hip.
Seek immediate medical care if an injury causes intense hip pain, you cannot put weight on your leg, or your hip becomes swollen and unusually warm along with a fever.
If you have undergone hip surgery, have a joint replacement, or have a diagnosed hip condition, follow the movement recommendations of your healthcare professional.
Yoga may be useful as part of an appropriate movement programme, but it shouldn't replace medical evaluation when symptoms suggest an underlying problem.
Final Thoughts
Hip flexibility doesn't improve through force. It develops gradually as you become more familiar with different movements and learn to work within your body's comfortable range.
If you're beginning, choose three or four stretches that feel manageable and practise them regularly. Use support when necessary, pay attention to your breathing, and don't worry about how deeply you can enter a posture.
At Nirvana Yoga School in Rishikesh, yoga is taught as a balanced practice that brings together mindful movement, breath awareness, strength, and flexibility.
Whether you are completely new to yoga or already have an established practice, approaching hip stretches with patience and proper technique can help you build a routine that supports your everyday movement.
The aim isn't to perform the deepest stretch. It is to move comfortably, with awareness, and develop a practice you can continue over time.