Patanjali's Yoga Sutras (2.46) say, "Sthiram sukham asanam," meaning a posture should be steady and comfortable. Natarajasana, or Dancer Pose, is a standing balance that asks for grace, focus and an open heart. It may look challenging at first, but it becomes easy to approach when you learn it step by step. In this guide, you'll find how to do the pose, its benefits, precautions and beginner-friendly variations, so you can practice with confidence and stability.
This guide covers:
- What the pose is and where its name comes from
- A clear step-by-step method
- Benefits, muscles worked and common mistakes
- Precautions, variations and a beginner path
Natarajasana at a Glance
| Detail | Information |
| Sanskrit name | Natarajasana (नटराजासन) |
| English names | Dancer Pose, Lord of the Dance Pose |
| Pose type | Standing balance with a gentle backbend |
| Level | Intermediate (with beginner variations) |
| Typical hold | 3–5 breaths, building to 5–10 breaths |
| Focus | Balance, concentration, chest and hip opening |
| Counter pose | Tadasana, followed by a gentle forward fold |
What Is Natarajasana?
The word has three parts:
- Nata means dance or dancer.
- Raja means king or lord.
- Asana means posture or seat.
Together, Natarajasana means "the posture of the Lord of the Dance." The name refers to Nataraja, the form of Lord Shiva who dances the cosmic dance.
Why does the pose feel like dancing?
- You stand on one leg, as the dancing figure does.
- The lifted leg and forward arm create a graceful, flowing line.
- The body stretches in opposite directions at once: the foot kicks back, the chest lifts and the hand reaches forward.
“The body is a sacred space. Care for it with awareness, so the inner self can flourish.” — Inspired by B.K.S. Iyengar
The idea behind the pose: Shiva's dance is not chaos. It is balanced inside movement. Natarajasana asks the same of you. You stay calm and steady while your body stretches in several directions.
Natarajasana Pose
Natarajasana, also known as Dancer Pose, is a standing balance asana.
What the final pose looks like (standing on the right leg):
- The standing leg is strong and stable, with the knee soft, not locked.
- The left knee is bent, and the left hand holds the inner foot or ankle.
- The lifted leg presses back and up into the hand.
- The chest lifts and opens forward.
- The right arm reaches forward or up, often in Gyan Mudra.
- The gaze rests on one steady point (drishti).
- The hips stay level, with no twisting.
Three things to remember:
- Balance comes before depth.
- The foot presses into the hand, and the hand doesn't yank the foot.
- The spine lengthens before it bends.
How to Do Natarajasana Step by Step
Before you begin, keep these in mind:
- Practice on a non-slip mat, with a wall nearby.
- Warm up first (see the table in the next section).
- Avoid the pose on a full stomach. Allow 2–3 hours for digestion after eating before beginning your practice.
Step 1: Stand in Tadasana
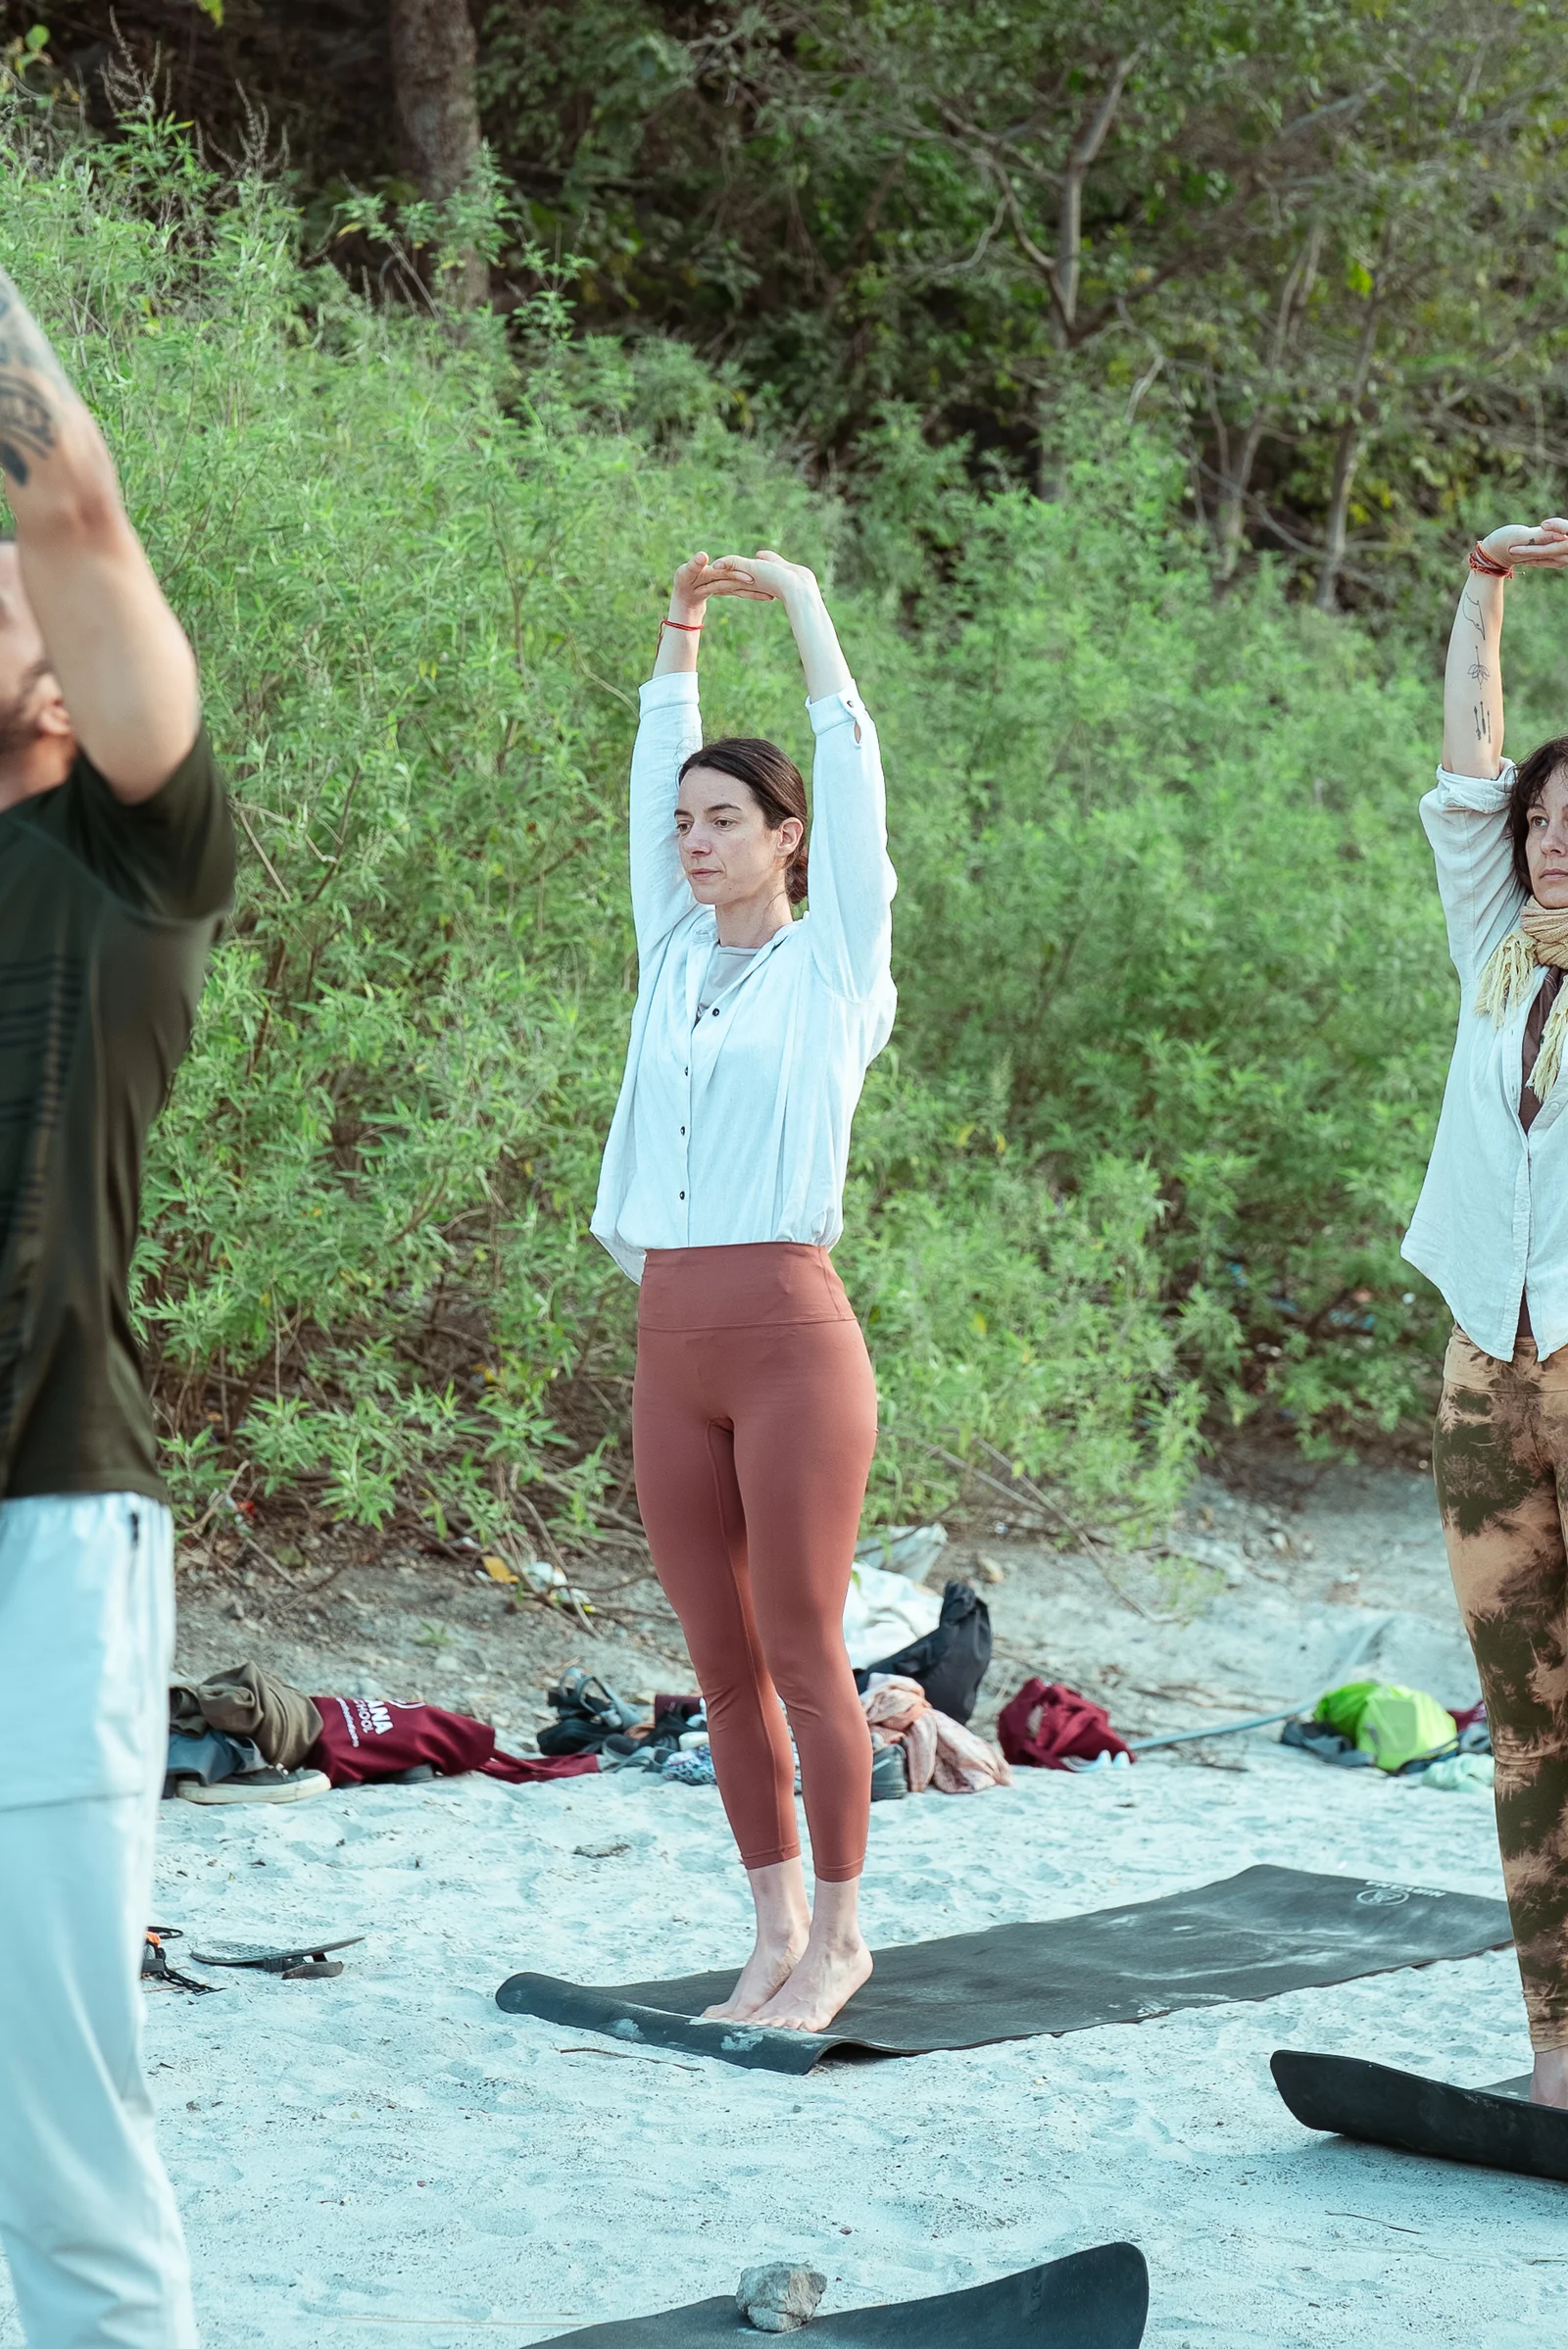
- Stand tall with feet hip-width apart.
- Spread your toes and press evenly through both feet.
- Lengthen the spine and relax the shoulders.
- Pick a fixed point at eye level.
Step 2: Transfer Your Weight to One Foot
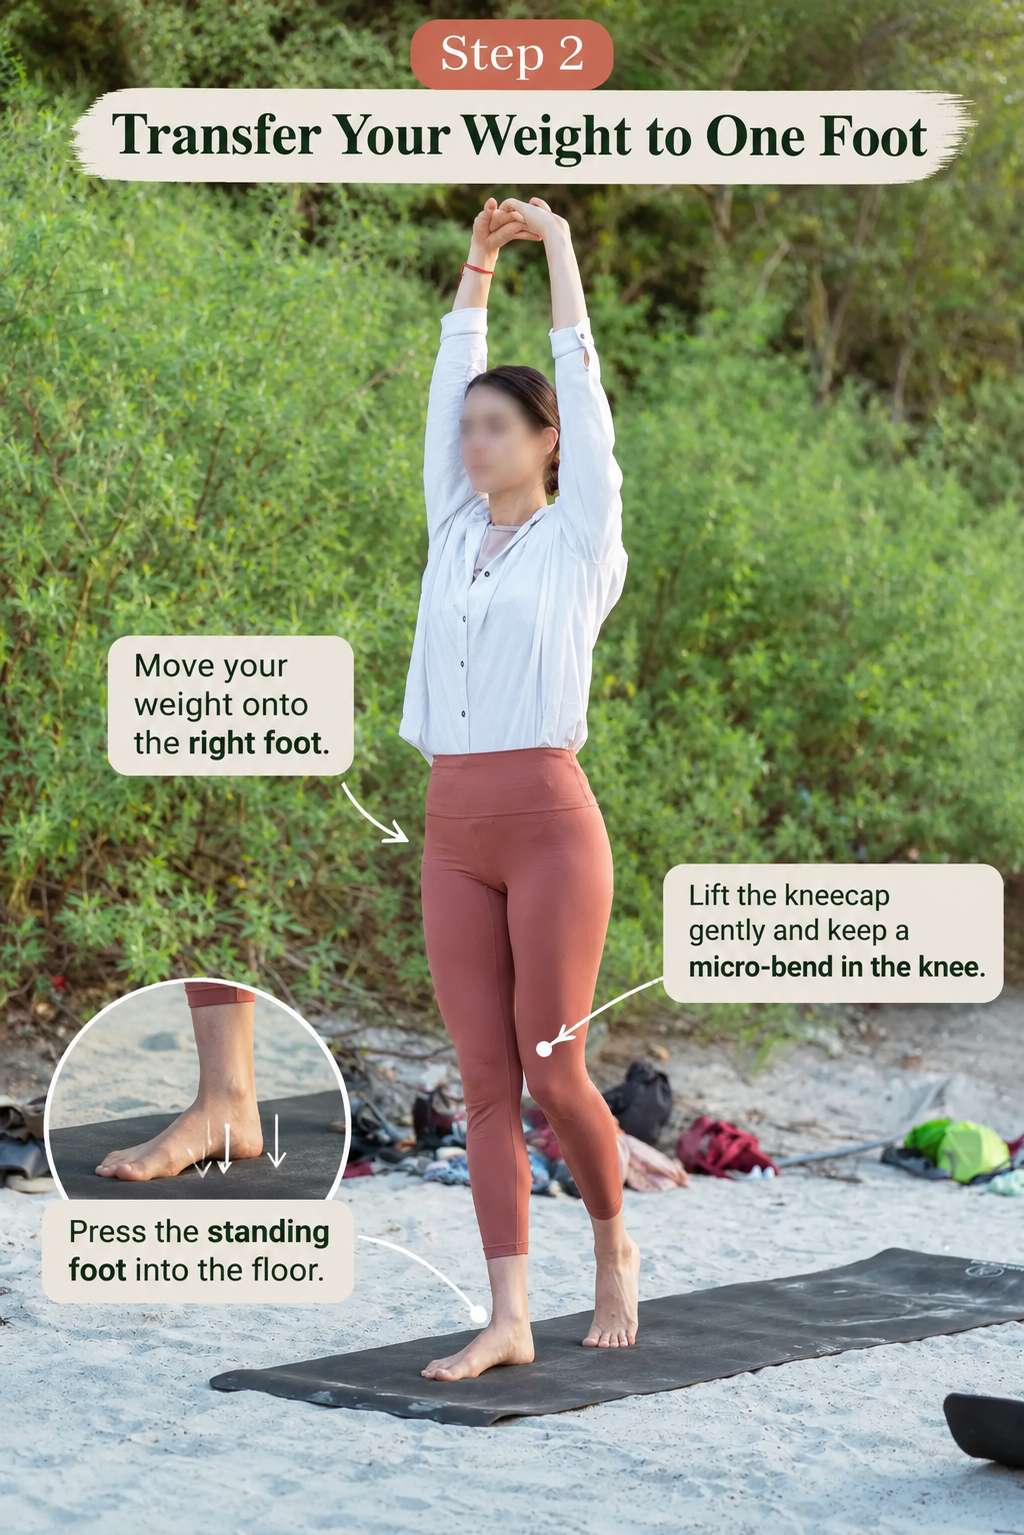
- Move your weight onto the right foot.
- Press the standing foot into the floor.
- Lift the kneecap gently and keep a micro-bend in the knee.
Step 3: Bend the Opposite Knee
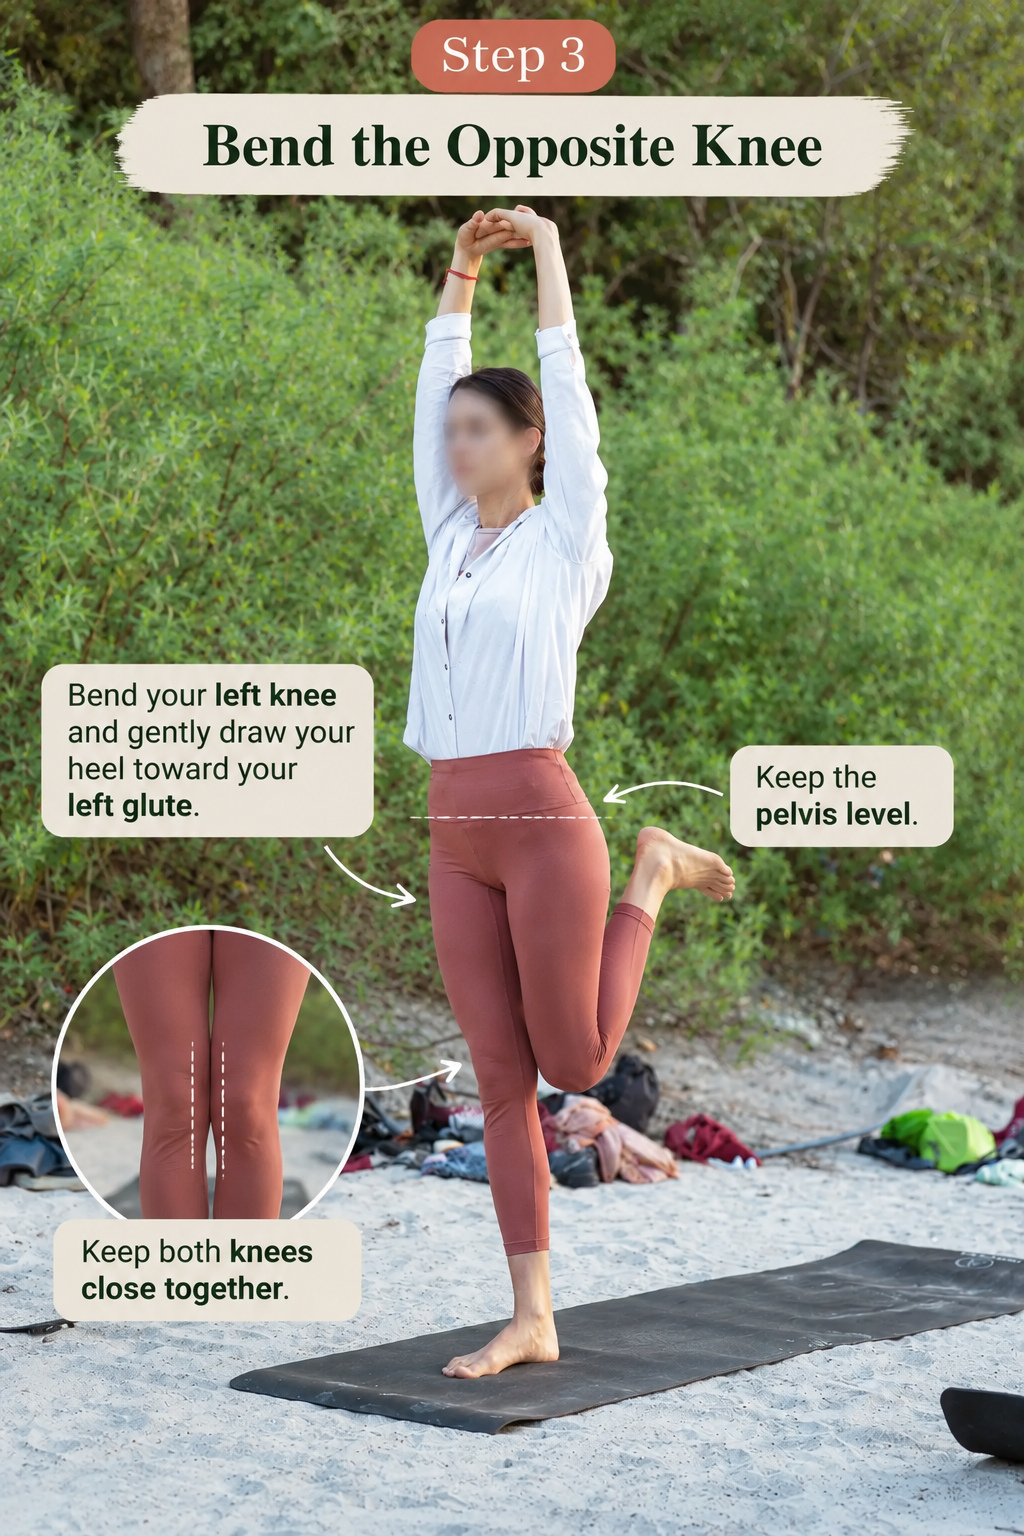
- Bend your left knee and gently draw your heel toward your left glute.
- Keep both knees close together.
- Keep the pelvis level.
Step 4: Hold the Ankle or Foot
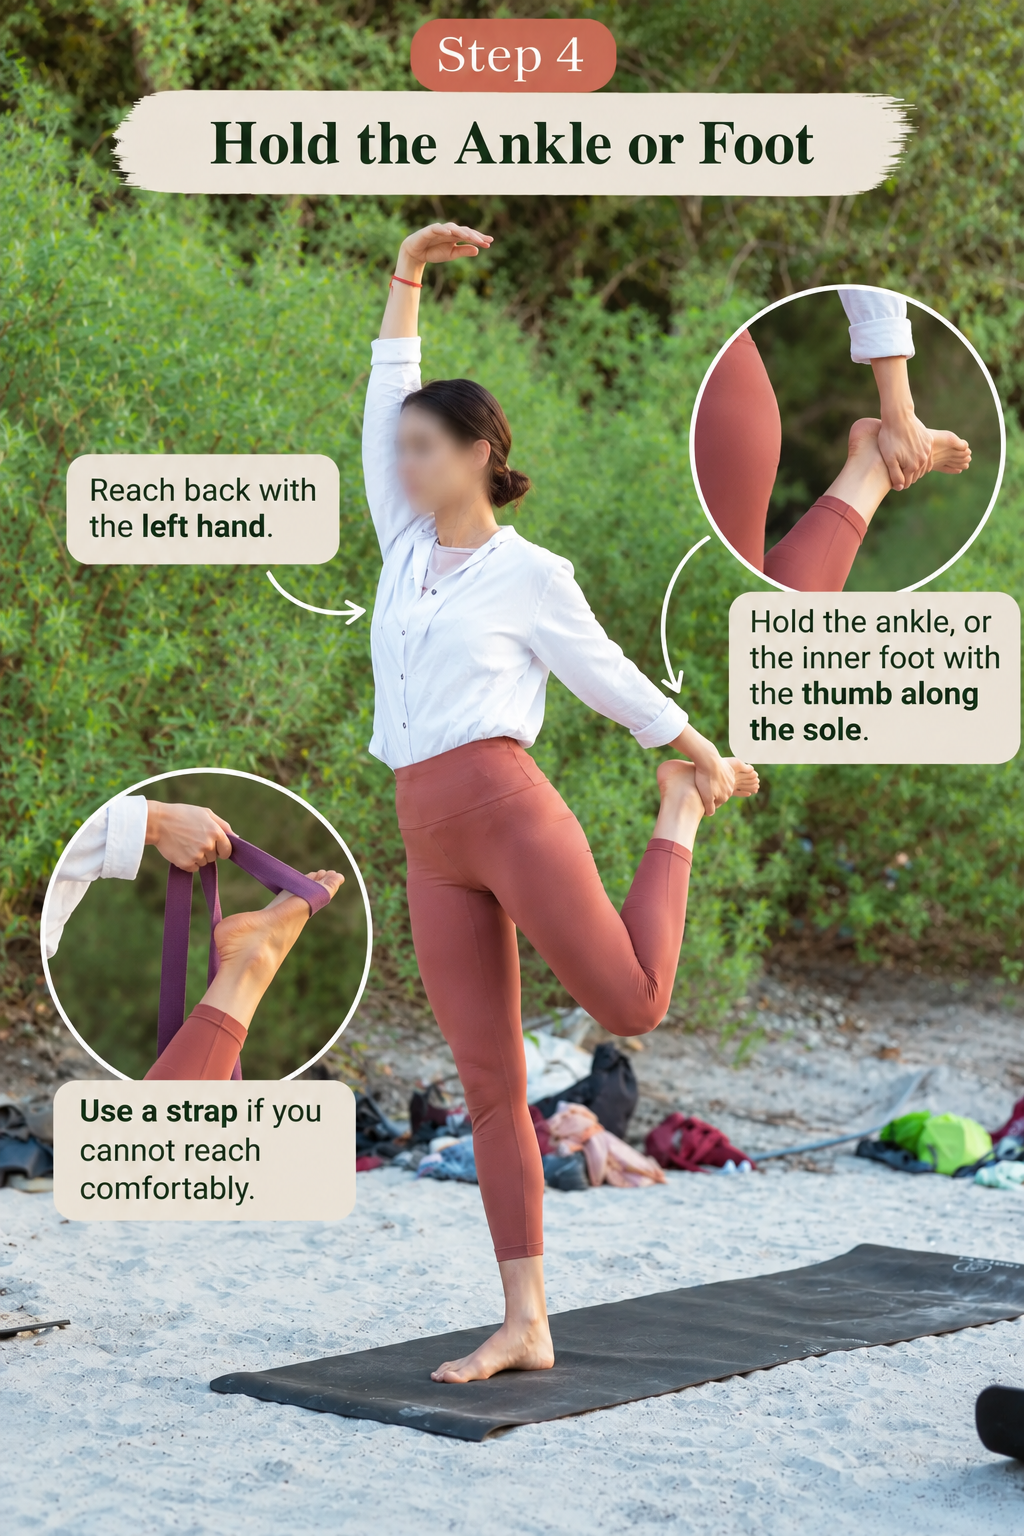
- Reach back with the left hand.
- Hold the ankle, or the inner foot with the thumb along the sole.
- Use a strap if you cannot reach comfortably.
Step 5: Lift the Leg Behind You
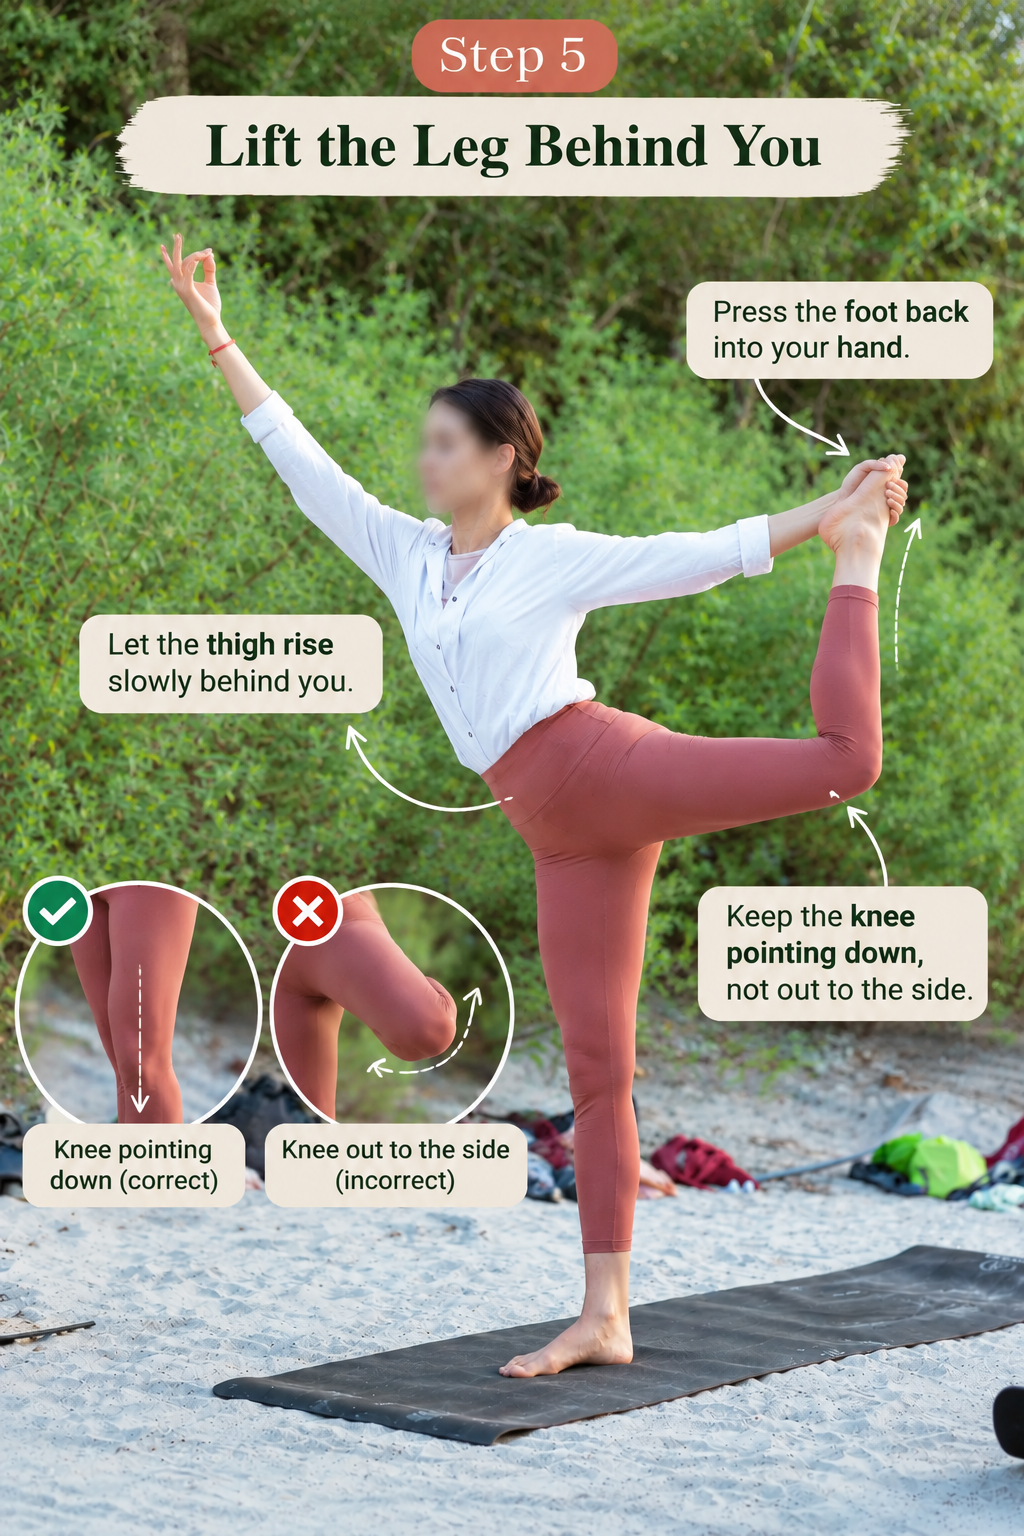
- Press the foot back into your hand.
- Let the thigh rise slowly behind you.
- Keep the knee pointing down, not out to the side.
Step 6: Extend the Opposite Arm
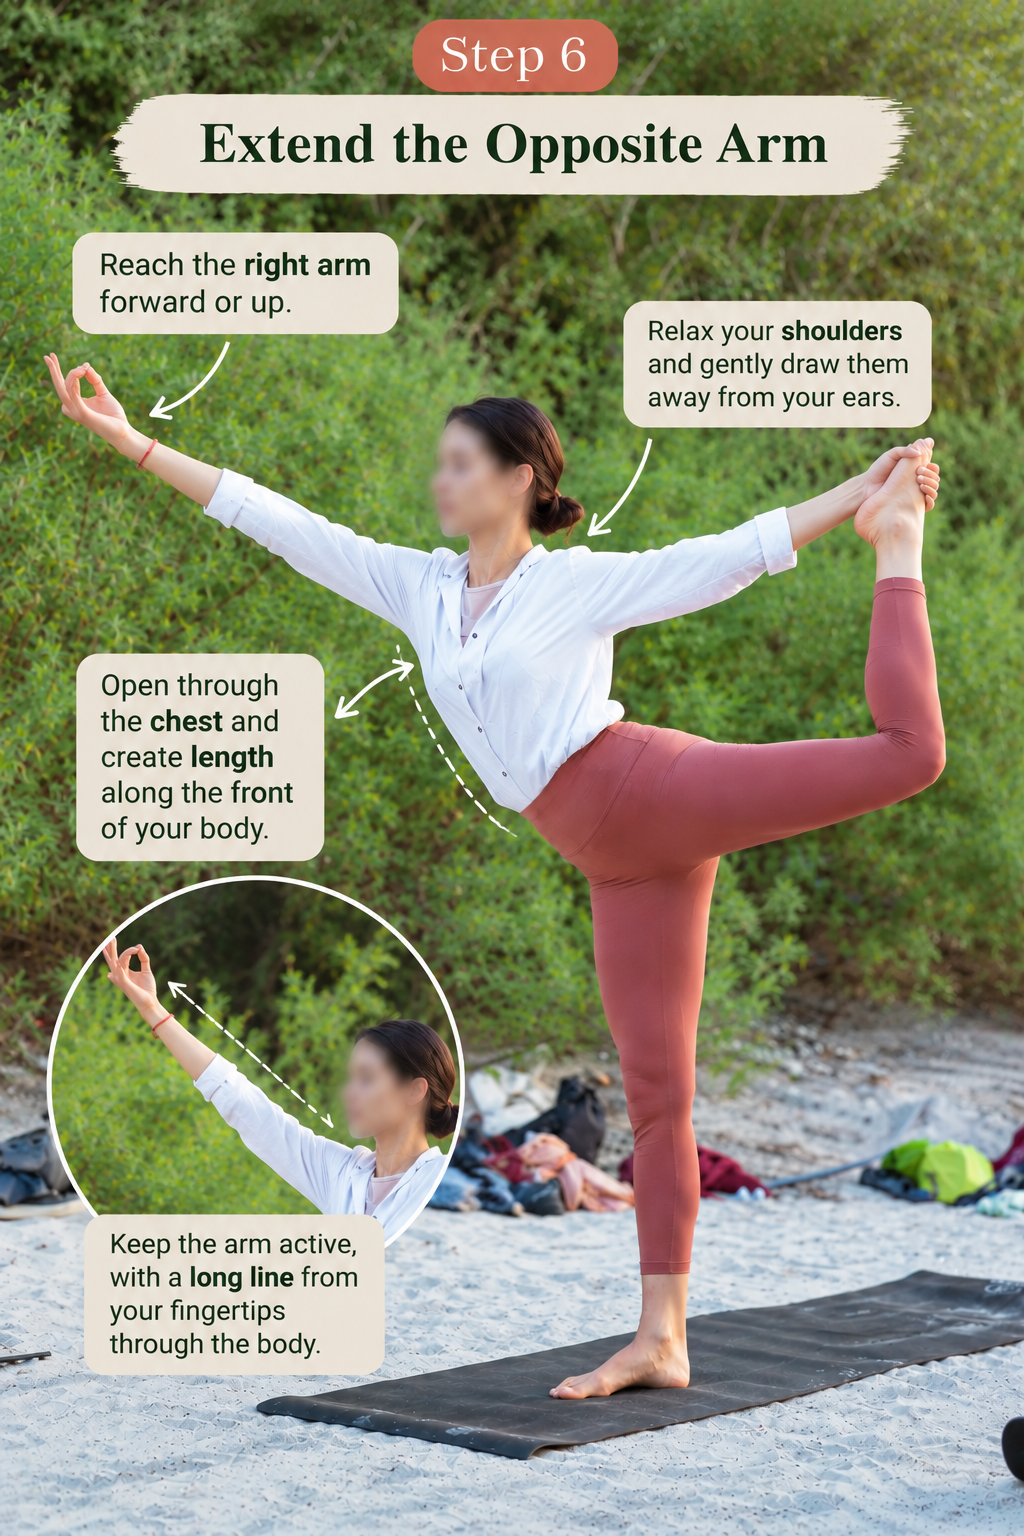
- Reach the right arm forward or up.
- Relax your shoulders and gently draw them away from your ears.
- Open through the chest and create length along the front of your body.
Step 7: Maintain Balance and Breathe
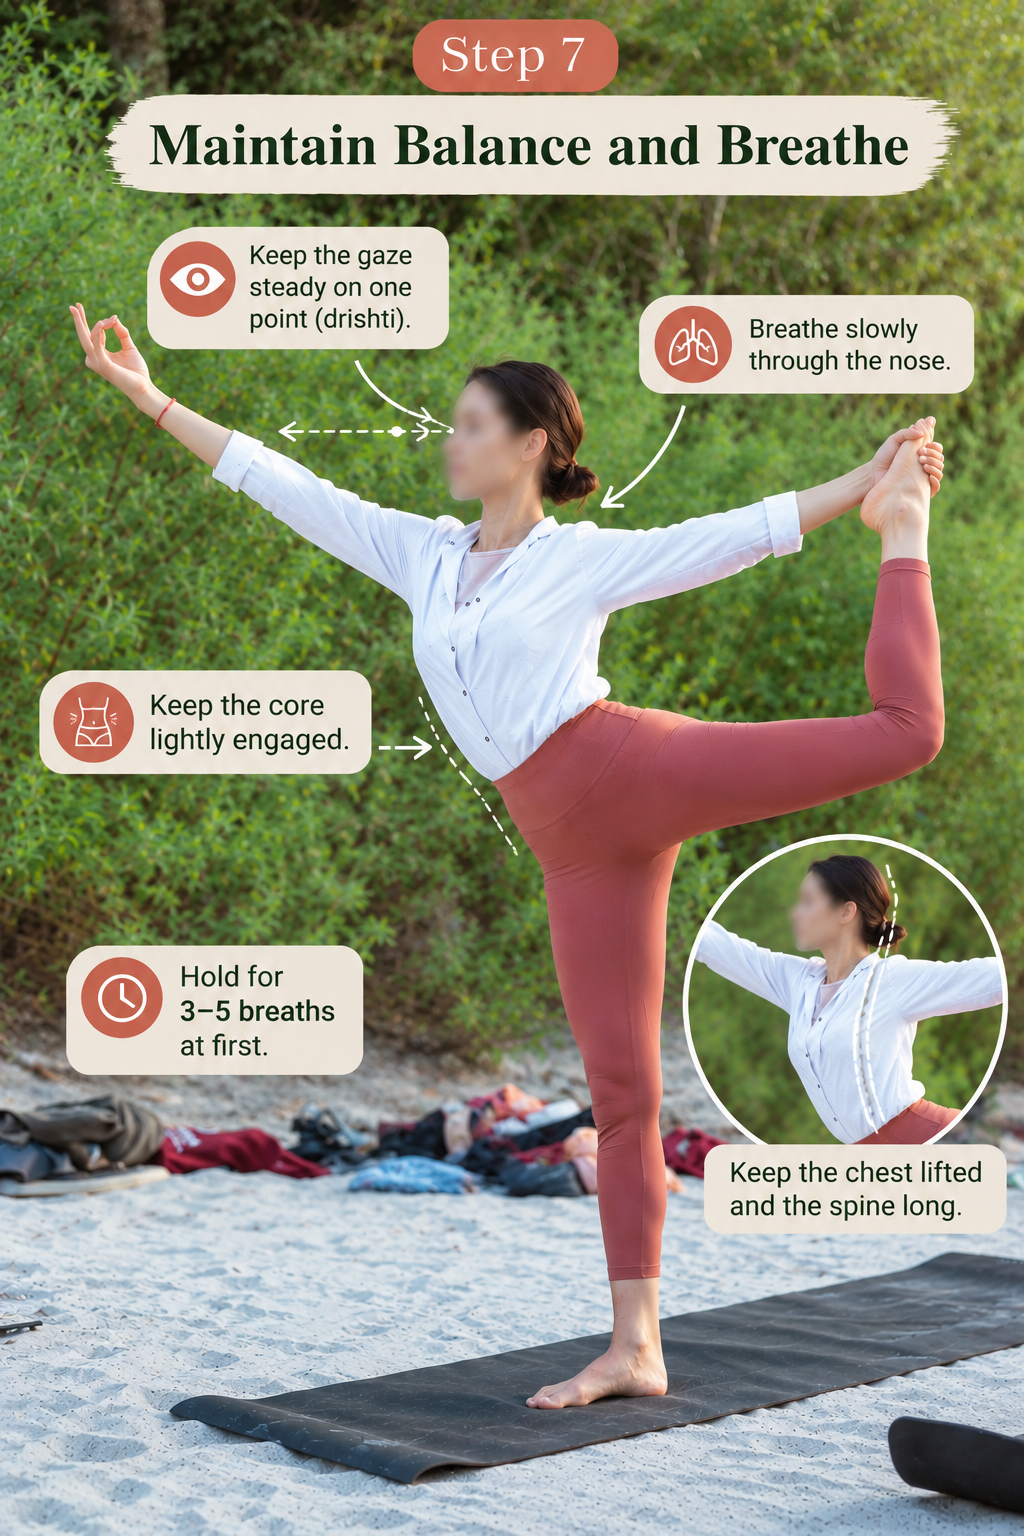
- Keep the gaze steady.
- Breathe slowly through the nose.
- Keep the core lightly engaged.
- Hold for 3–5 breaths at first.
Step 8: Release Slowly
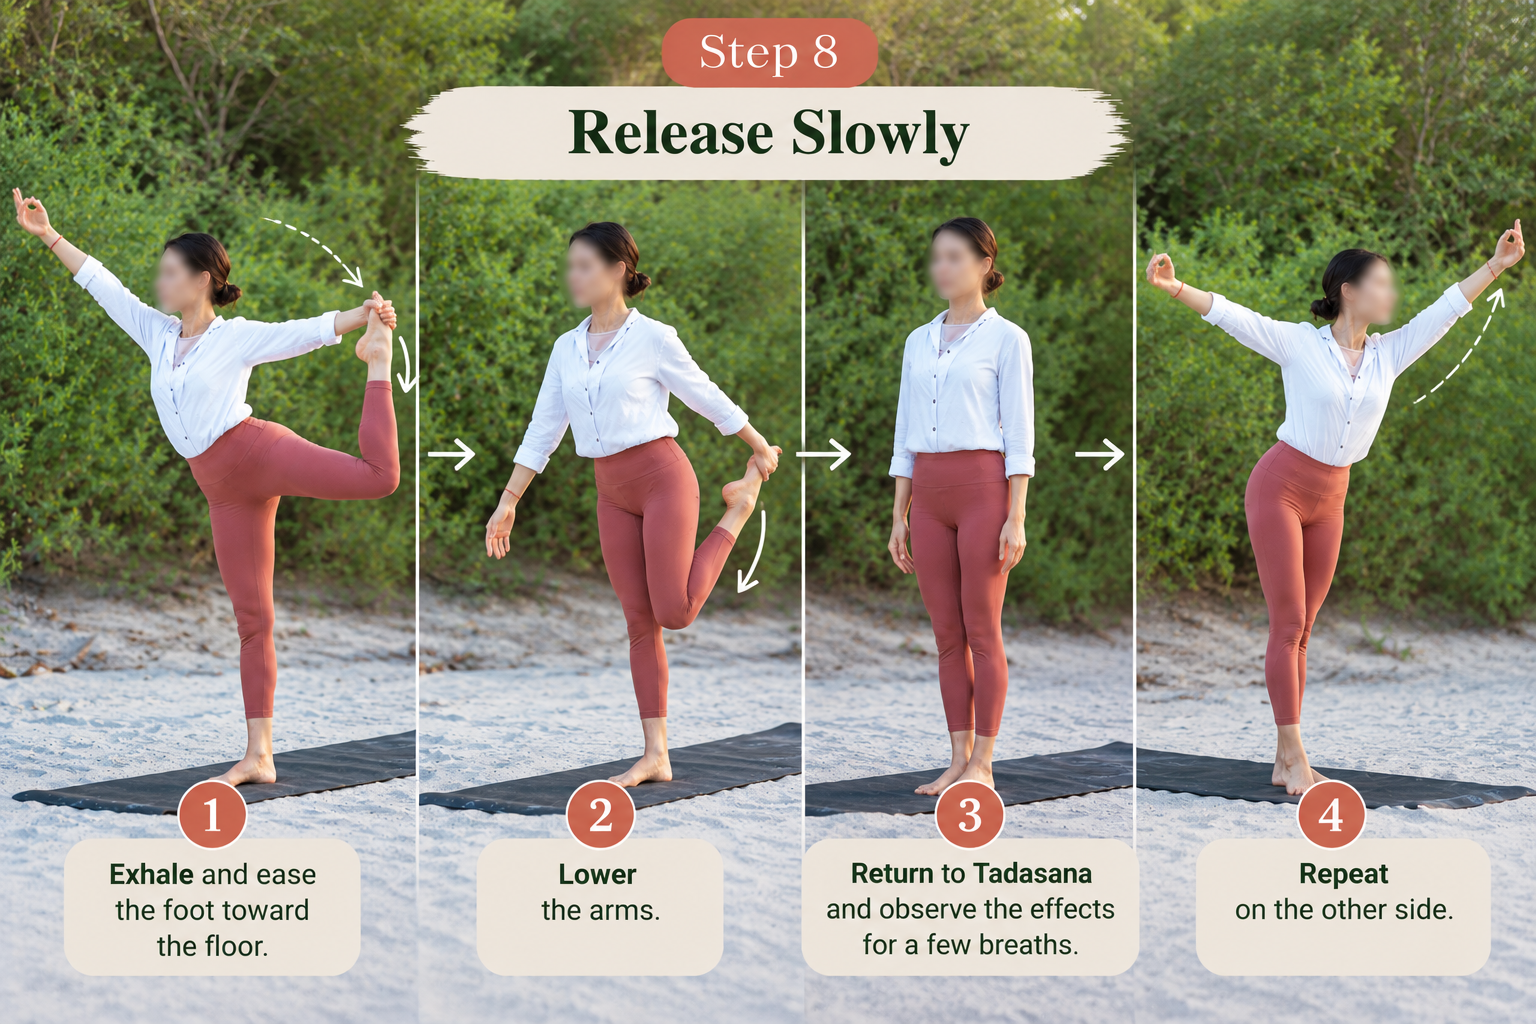
- Exhale and ease the foot toward the floor.
- Lower the arms.
- Return to Tadasana and observe the effects for a few breaths.
- Repeat on the other side.
Natarajasana Benefits
Many websites list every possible benefit. Here we stay realistic. Yoga is a wellness practice, and results vary from person to person. Wording such as "may help" is used on purpose.
Improves Balance
- Standing on one leg trains the muscles around the ankle, knee and hip.
- Regular practice may help improve steadiness in everyday movement.
Develops Concentration
- The pose is hard to hold if your mind wanders.
- A steady gaze and steady breath give the attention a single point to rest on.
- Over time this may build calm focus that carries into other areas of life.
Improves Flexibility
- The pose stretches the quadriceps, hip flexors and front of the thigh on the lifted leg.
- It can also support greater mobility in the shoulders and upper back.
Opens the Chest and Shoulders
- Lifting the chest while reaching through the arm gently opens the front of the body.
- This can be particularly beneficial after spending long hours sitting at a desk.
Strengthens the Legs
- The standing leg works constantly to hold you up.
- Ankles, calves, quadriceps and glutes all share the effort.
Improves Body Awareness
- Small errors show up quickly in this pose, such as a twisted hip or a collapsed chest.
- That feedback helps you learn alignment and control.
Supports Mindful Yoga Practice
- The pose links breath, movement and attention.
- It is a good example of moving meditation.
“Yoga teaches us to work with what can be changed and to meet what cannot be changed with patience and acceptance.” — Inspired by B.K.S. Iyengar
A note on claims: Some websites say this pose treats digestive problems, thyroid conditions or memory loss. These are not well established. Treat Natarajasana as a practice for balance, mobility and mindfulness, not as a medical treatment.
Muscles Worked in Natarajasana
| Area | Role in the Pose |
| Legs (standing side) | Support the body and hold the balance |
| Glutes | Stabilize the pelvis and support the lifted leg |
| Core | Keeps the torso steady and controls the balance |
| Shoulders | Position the arms and open the chest |
| Hip flexors | Stretch as the leg extends backward |
| Quadriceps (lifted leg) | Stretch as the foot moves toward the glute |
| Back muscles | Help maintain the gentle arch and upright posture |
| Ankles and feet | Constantly adjust to keep you stable |
How to Improve Your Natarajasana
Practice Balance First
- Start with Tadasana and Vrikshasana (Tree Pose).
- Hold each for 30–60 seconds on both sides.
Warm Up the Hips and Shoulders
| Warm-up | Purpose |
| Cat-Cow | Wakes up the spine |
| Low Lunge | Opens the hip flexors |
| Bhujangasana (Cobra Pose) | Gently prepares the back |
| Shoulder rolls | Frees the upper body |
| Quad stretch | Prepares the front thigh |
Use a Wall for Support
- Stand beside a wall and rest one hand on it.
- Keep your eyes forward and focus on the standing leg.
Avoid Forcing the Raised Leg
- Let the leg lift as the flexibility allows.
- A smaller, stable version is better than a deep, shaky one.
Focus on One Point
- Choose a stable object at eye level.
- Avoid looking at moving things.
Progress Gradually
- Move from wall support to a free-standing pose.
- Add depth only when the balance feels secure.
Common Mistakes in Natarajasana
| Mistake | Why It Matters | Simple Fix |
| Locking the standing knee | Puts pressure on the joint | Keep a soft bend |
| Leaning too far forward | Makes balance harder | Lift the chest and lengthen the spine |
| Pulling the raised leg too hard | Strains the knee and back | Press the foot into the hand instead |
| Losing core engagement | Causes wobbling and lower-back compression | Draw the navel gently in |
| Holding the breath | Increases tension | Breathe slowly through the nose |
| Trying the full pose too early | Increases the risk of strain | Start with the beginner variation |
Extra checks:
- Keep the raised knee close to the midline.
- Keep both hips facing forward.
- Keep your neck relaxed, long, and free from unnecessary tension.
Natarajasana Precautions
Yoga should feel challenging, but not painful. Take care in these situations:
- Balance difficulties: Practice with a wall or chair.
- Recent injuries: Avoid the pose until you have recovered and been advised it's safe.
- Pain during the pose: Release gently and stop.
- Difficulty with the supporting leg: Work on standing strength first.
- Shoulder or hip limitations: Use a strap and reduce the depth.
- Low back or knee concerns: Ask a qualified teacher or health professional before practicing.
- Pregnancy: Practice only with a qualified prenatal yoga teacher.
- Dizziness or low blood pressure: Practice near support and come out slowly.
Note: Practice within your comfortable range and learn advanced variations under the guidance of a qualified yoga teacher.
Natarajasana Variations
| Variation | How It Differs | Best For |
| Supported Natarajasana | Place one hand on a wall, chair, or yoga block for support. | New practitioners |
| Beginner Natarajasana | Lifted leg stays low, the foot is held with a strap if needed | Those learning alignment |
| Classic Natarajasana | Full lift, with the foot held in the hand | Steady practitioners |
| Advanced Natarajasana | Reach both hands back toward the foot as you gently deepen the backbend. | Very flexible, experienced students |
Supported Natarajasana
- Stand near a wall.
- Place the wall-side hand on the wall.
- Hold the opposite foot or use a strap.
Beginner Natarajasana
- Keep the thigh close to vertical.
- Reach the free arm forward.
- Focus on the pelvis staying level.
Advanced Natarajasana
- Lift the foot higher above the back.
- Bring both hands to the foot with the elbows pointing up.
- Requires strong shoulders, hips and back flexibility.
- Learn this only under a qualified teacher.
Natarajasana for Beginners
If Dancer Pose feels out of reach, that's normal. Try this path:
- Start with support. Use a wall or chair for support when beginning the practice.
- Learn to stand on one leg. Practice Tree Pose consistently for several weeks to build balance and stability.
- Stretch the front thigh. Use a strap and hold gently.
- Don't force the backbend. Let the chest rise naturally.
- Keep sessions short. 3 breaths on each side is enough at first.
- Progress gradually. Only move to the free-standing pose when you feel steady.
A simple weekly plan:
| Week | Focus | Duration per Side |
| 1 | Tree Pose and wall balance | 30–45 seconds |
| 2 | Quad stretch with a strap | 30–45 seconds |
| 3 | Supported Natarajasana | 3 breaths |
| 4 | Beginner Natarajasana | 3–5 breaths |
How Long Should You Hold Natarajasana?
- Beginners: Start with 3 comfortable breaths.
- Regular practitioners: Build slowly to 5–10 breaths.
- Focus on quality: A calm, stable 3 breaths is better than a shaky 20.
- Repeat on both sides: Try to give each side the same time.
- Increase gradually: Add a breath or two as balance improves.
If your breathing becomes short or your standing leg starts to shake heavily, that is a sign to come out.
When to Practice Natarajasana
Before or After a Yoga Sequence
- Practice this posture after warming up, once your muscles feel prepared and ready for movement.
- End with a gentle forward fold to release the back.
Morning Practice
- Good for waking up the body and focusing the mind.
- Warm up longer in the morning, as the body may feel stiffer.
Balance-Focused Practice
- Pair it with Tree Pose, Eagle Pose and Warrior III.
- These poses train similar strength and focus.
As Part of a Backbend or Heart-Opening Sequence
- Place it after preparation poses such as Cobra, Bow and Camel.
- Follow it with a counter pose such as Tadasana or a forward fold.
Helpful pre- and post-poses:
| Before | After |
| Vrikshasana (Tree Pose) | Tadasana |
| Ardha Dhanurasana (Half Bow) | Uttanasana (Forward Fold) |
| Low Lunge | Balasana (Child's Pose) |
Natarajasana vs Other Standing Balance Poses
| Pose | Main Focus | Difficulty |
| Natarajasana | Balance + back and hip opening | Intermediate |
| Vrikshasana | Balance + concentration | Beginner |
| Garudasana | Balance + coordination | Beginner to intermediate |
| Virabhadrasana III | Balance + strength | Intermediate |
How to choose:
- Want calm focus? Try Tree Pose.
- Want coordination and joint mobility? Try Eagle Pose.
- Want leg and core strength? Try Warrior III.
- Want balance with an open chest? Try Dancer Pose.
Final Thoughts
Natarajasana is more than a stretch. It is a practice of balance, patience and focus, where the body learns to stay steady and the mind learns to stay calm. Start small, use a wall or strap for support, breathe evenly and respect your limits. A small, stable pose is always better than a deep, shaky one, and progress will come with regular practice.
A teacher can spot what you cannot, such as a twisted hip or a strained knee. To learn Natarajasana and other asanas safely and traditionally, explore our Yoga Teacher Training in Rishikesh program at Nirvana Yoga School. You can also choose the 200 Hour, 300 Hour or 500 Hour Yoga Teacher Training, or deepen your practice with Hatha Yoga, Ashtanga Yoga and Meditation.
Balance is not something you find once. It is something you practice again and again, and every wobbly attempt is part of the dance.